Viewing the Access Denied Screen
In GENESIS64™, there are different levels of security. For Web Login, there may be additional system authentication requirements for accessing ICONICS applications. See Global Settings - Authentication. For standard security, the user logs into their Windows account. See Logins and Passwords.
In GraphWorX™64, if you do not have access to a file, your administrator may have limited access to the file in accordance company security standards. If you don't have access, an Authentication dialog may appear—you required to log in or have your request verified.
A GraphWorX user can open the display file, called GwxFileAccessDenied.gdfx in configuration mode. By default, this file is installed to C:\Program Files\ICONICS\GENESIS64\Components\.
In this mode, you can change any of the features in this display, such as:
- using a different background color,
- adding your company logo,
- including a contact phone number, or
- adding a hyperlink to a web site.
Or can simply insert your own custom display into this file. It is important, however, that you do not change the file name and do not move it because GENESIS64 requires the file name and location to remain in its installation location. You may want to start by saving a copy of the original file under a different name (for example, GwxFileAccessDeniedORIGINAL.gdfx) in case you ever have a need to revert back to it.
If you intend to change the display, there are a few features about the original display file you should be aware of so that you incorporate them into your new design. The original display file displays the current user and provides a button that displays the Login dialog box. How you include each of these is described in more detail below.
Displaying the User in Your Access Denied Screen
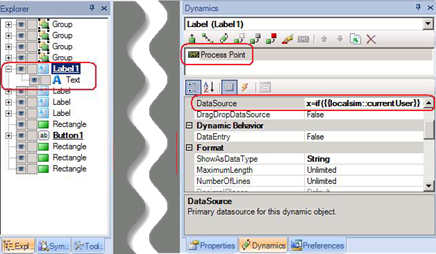
The runtime Access Denied displays the user that is currently logged in. If the user is not logged in, "Not Logged In" appears instead of the user name. The features that create this capability are circled in the illustration below. The object is a Label shape, circled in the Explorer on the left and in the display at the center. The label has its own Process Point dynamic, circled on the right. Most important is the dynamic's DataSource property (also circled on the right).
The Label's Process Point Dynamic has a Data Source of localsim::currentUser
To see how the DataSource property is defined, click its ellipsis button  to open the Data Browser. The Data Browser's Expression tab appears and displays the following local expression, which is used to populate the label at runtime:
if({{localsim::currentUser}} == "", "Not Logged In", {{localsim::currentUser}})
The variable localsim::currentUser is a predefined variable that is available throughout GENESIS64 applications. If you click the Expression tab's Variables button, a second the Data Browser opens; click its Simulation tab and you'll see the localsim::currentUser variable available for selection.
To learn more about Labels, Process Points, and dynamics in GraphWorX64, refer to Labels and Process Points and Data Entry Labels. To learn more about the Data Browser, refer to Unified Data Browser; for more about expressions, refer to Expression Tab on the Data Browser.
Displaying the Login Dialog Box from Your Access Denied Screen
The Access Denied screen that is installed with GENESIS64 has a Click here to LOGIN button that users can click in order to log in or log in as a different user. Clicking this button in runtime launches the Security Login dialog box that users can use to log in, log out, or change their password. (Logins are discussed in depth in Logins and Passwords.)
The features that create this button are circled in the illustration below. The object is a Button, circled in the Explorer on the left and in the display at the center. This button has its own Pick dynamic, circled on the right; the Pick dynamic makes the button "hot" by recognizing a user click. Most important is the dynamic's Command property (also circled on the right), which is set to Login/Logout Dialog, meaning that when a runtime user clicks on the button, the Security Login dialog box appears. To learn more, refer to Buttons, Pick Actions, and Commands for Buttons, Pick Actions, and Function Keys.
See also: