Expressions in the Data Browser
Expressions are combinations of data sources, numbers, operators, grouping symbols (such as brackets and parentheses) arranged in a meaningful way which can be evaluated. During runtime mode, OPC servers resolve the data source for the expression and the expression is evaluated.
Some applications like GraphWorX64 support built-in local expressions, which can be defined locally using the Data Browser's Expressions tab. A detailed description of this tab is provided in Expression Editor, along with ways to write effective expressions.
In addition, GENESIS64 provides Global Expressions. They are defined centrally in the Workbench in the Unified Data Manager provider and available as normal OPC tags in OPC UA client applications. A global expression allows combining of miscellaneous data tags in a simple expression. Each global expression is implemented as a single expression data tag. Its re-calculation will be based on input values or on trigger data tags. Client applications can access these expression data tags as read/write data tags with a configured data type.
Once a global expression is defined in the Unified Data Manager, it can be used in OPC UA client applications. As you navigate to the expression, the path to the expression is shown in the navigation toolbar as a bread crumb. When you click on the navigation toolbar, the path switches to the standard UNC format.
Creating a Global Expression
Global expressions are organized in a tree structure of folders and expression items. Features of global expressions include:
-
Create and edit expressions.
-
Create folders for expressions.
-
Expressions are available as data tags.
-
Specify READ expressions or WRITE expressions.
-
Expressions within expressions are calculated together.
ToCreate an Expression:
-
Start the Workbench, then expand your project. Next, expand the Platform Services node to show the Unified Data Manager provider.
-
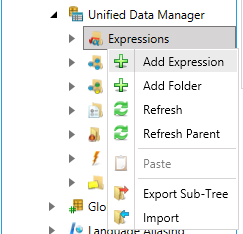
Right-click the Expressions node in the navigation tree and select Add Expression, as shown in the figure below.
The New Expression Command in the Data Manager
-OR-
Select the Expressions node, then click on the Add Expression button, shown below, in the Edit section of the Home ribbon in the Workbench.
Add Expression Button

-
This opens the New Expression properties window, as shown below.
New Expression Properties
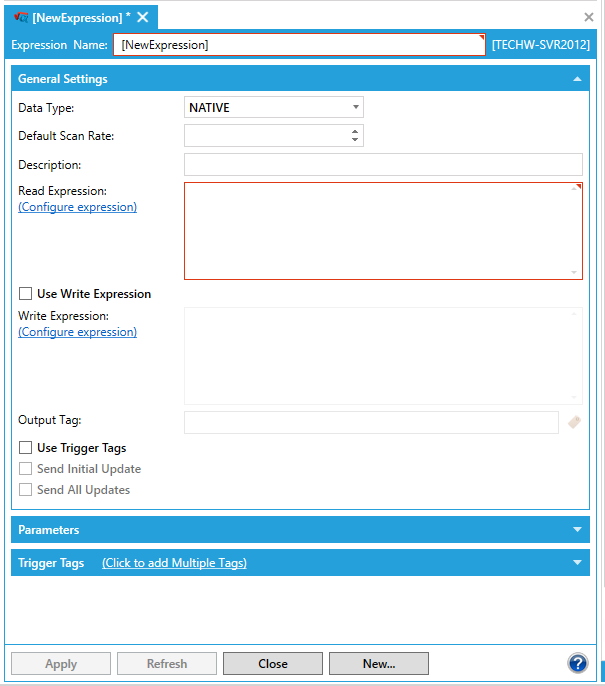
Enter a name in the Expression Name text box for the Global Expression form.
-
In the General Settings section of the window, specify the Data Type, Default Scan Rate, and Description (described in detail below in Expression Properties).
-
In the Read Expressionsection, you can enter the expression definition or click on the Configure expression link, which will open the Configure the expression window, where you can set the expression details. Once you have finished configuring the expression, click the OK button to return to the main expression window. Your newly configured expression details will now appear in the Read Expression text entry field.
Configure the expression Window

-
If you intend to write values, you can do the same within the Write Expression section. Enter the expression for the WRITE operation or click on the Configure expression link. The essential actions of an expression are contained in the these two sections. They are described in detail below in Read Expression Section and Write Expression Section.
|
|
Note. Some expressions have READ definitions, and others may have both READ and WRITE. |
-
In the Output Tag section, you can opt to Use Trigger Tags (described below), Send Initial Update or Send All Updates.
-
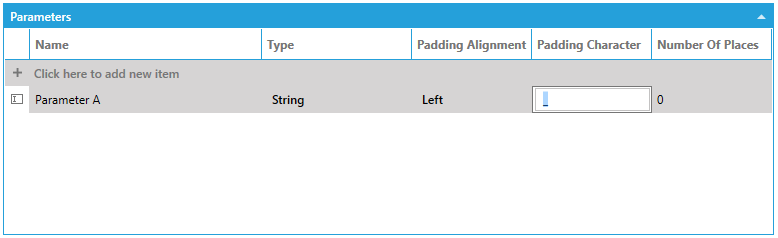
You can opt to expand the Parameters section via the triangle in the right side of the section. Click on the plus button [+] to add a new item. You can add a Name for the parameter, as well as Type (via pulldown menu, selecting either Number or String), Padding Alignment (None, Left or Right), Padding Character, and Number of Places.
Parameters Section of the Expression Properties
-
If you opted to 'Use Trigger Tags' in step 5 above, you can set them in the following section. Click on the plus button [+] to add a new item. You can add a Tag Name directly into the text entry field or click on the
 button to open the Data Browser and browse for your
selected tag. Next, you can set a Method
(On Change, On Become True, On Become False). You can also click on
the Click to add Multiple Tags
link, which allows you to make multiple selections in the Data Browser.
button to open the Data Browser and browse for your
selected tag. Next, you can set a Method
(On Change, On Become True, On Become False). You can also click on
the Click to add Multiple Tags
link, which allows you to make multiple selections in the Data Browser.
Trigger Tags Section of the Expression Properties

-
When you are done, click the Apply button.
Expression Properties
The Expression Properties allows you to configure the following settings:
-
Expression Name - Enter a name for the expression.
-
Data Type - Each expression must have a data type that will be used as an output data type. In the case the output value cannot be converted into this configured data type, you will get an error and the return value will be bad and of no use. Select from the following data types: Native/Empty, Float, Double, Boolean, Byte, Word, DWord, Character, Short, Long, String.
-
Default Scan Rate - Specify the default scan rate (in milliseconds) for all input and trigger data tags. This value can be overridden for particular data tags by using point extension syntax.
-
Description - Enter a description for the expression (optional).
Read Expression Section
A READ expression must be compliant with the ICONICS expression syntax. In runtime, it is processed by the standard ICONICS expression engine. The expression can be recalculated and triggered in two basic ways:
-
When at least one trigger data tag is changed
-
When any data expression input changes
Write Expression Section
An expression can be defined to WRITE new values, but expression must be compliant with GENESIS64 's expression syntax. The three rules you need to follow are:
-
WRITE expressions allow one output data tag.
-
They can use as inputs the written value and any number of other input data tags.
The Write Expression section has the following settings:
-
Use Write Expression - You must check this check box to create and edit write expressions and have values calculated.
-
Write Expression -Mark a place in your expression, where you expect an operator’s input. The input value, which a runtime operator writes into the expression tag, is represented by the string {{input}}. For example, x= (<<input>>*1.8)+32 is the write expression of a thermometer.
- Output Tag - Specify a
data point where the result of write expression will be stored. If
you are doing a conversion, it might make sense to use the same tag
as the one used in the Read expression. Write expressions allow one
output data tag only. Click the button to select
a tag from the Unified Data Browser.
-
Use Trigger Tags - Checking this check box enables you to specify a set of data tags that may trigger an expression calculation. The expression can be calculated when one of the trigger tags becomes true, becomes false, or changes value.
-
Send Initial Update - When you subscribe to the expression data tag, you get the value of the tag immediately.
-
Send All Updates - Every time the expression is recalculated, the expression engine for the Unified Data Manager will send the new value to the client.
Parameters
Parameters are client-driven, and they do not change the number of requested data tags in runtime. Parameters can replace parts of data tag names by values passed in the expression data tag name. Each parameter can be an integer or a string data type with optional formatting. Type the name of the parameter to add it to the list. Once the parameter tag is added to the list, you can click the Remove button to delete the parameter from the list, or you can click the Move Up and Move Down buttons to change the order of the parameter in the list. Each data tag may support parameters that could modify names of the data tags. Each parameter can be integer or string data type with optional formatting. The table below shows possible formatting for each supported data type.
Data Types
|
Data Type |
Formatting |
|
Integer (number) |
Minimum number of digits used for character representation of an integer number and padded character. |
|
String |
Minimum number of characters and padding characters plus padding direction (add padding characters from left or right side). |
The client application passes configured parameter values as a part of the full data tag name. Parameters are client driven, and they do not change the number of requested data tags in runtime. Parameters can be integer or string values. These values are then formatted using pre configured format data, and then they replace specific parts of a data tag name by values passed in the data tag name. Parameters are delimited by double carets (i.e., << and >>) and specified by their names in the tag name, as shown below:
ICONICS .Simulator.1\SimulatePLC\Ramp<<Parameter1>>) in the data tag name.
Trigger Tags
Specify a set of data tags that may trigger an expression
calculation. The expression can be calculated when one of the trigger
tags becomes true, becomes false, or changes value, which you specify
in the Method box. Click the
button to select a list of data trigger tags from the Unified Data Browser.
Once the selected tag is added to the list, you can click the Remove button
to delete the tag from the list, or you can click the Edit button to change
the tag.
The data trigger executes an event on any data tag change, or when the specified data tag changes to TRUE or FALSE. Under the Method column (next to the tag name), specify execution on Change, True, or False for each tag in the list.
Folders
Expressions can be logically organized inside the Unified Data Manager in folders. Each folder appears as a node in the navigation tree. Some folders may already be defined, such as the SubExpressions and Units folders. You can add a folder to the Expressions node or to any existing folder.
ToCreate a New Folder:
-
In the Unified Data Manager, right-click the node in the Expressions node and select Add Folder.
Add Folder from the Project Explorer

-OR-
Select a node in the Expressions provider project explorer, then click on the Add Folder button, shown below, in the Edit section of the Home ribbon in Workbench.
Add Folder Button

-
A new folder (with the name New Folder) appears in the tree control and the Folder form appears.
-
In the FolderName field, type a name for the new folder.
See Also: