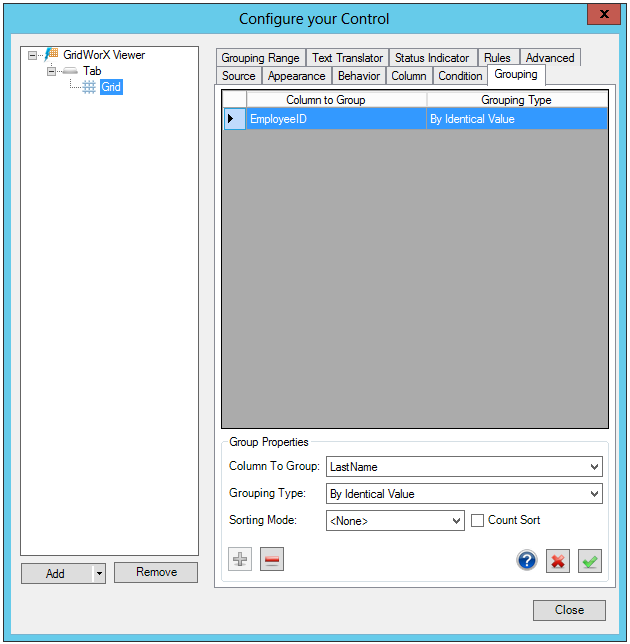
Grouping Tab (GridWorX Viewer)
Use the GridWorX configurator's Grouping tab to select the criteria on which to group columns in your grid. You can also select the type of grouping to include (e.g. by identical value).
It's possible to group the rows of the grid. Thanks to grouping capabilities, the grid can be simplified, organized and, in the end, made easily readable by operators. To group, it's necessary to select a column (used to group the rows) and a group type. It's possible to group by identical values (all the rows that have the same value in the selected column will belong to the same group). It's also possible to group objects by a user-defined range.
It's possible to combine multiple groups (i.e. by Severity and by Date/Time). Just add or remove rows from the grid on the right.
Sorting tips: Usually, groups on the same level are sorted by name. When the grouping range is applied, groups are sorted using their position in the grouping range. When the "Count Sort" checkbox is checked, groups are sorted by the number of items they contain.
Grouping Tab

To define ways in which alarms can be grouped:
-
In the Column to Group cell, select the column you want to group or sort by. Note that all available attributes appear in the drop-down list. event hose attributes that are hidden from the grid, so make sure you select the correct attribute. If you want to sort on an attribute that is hidden, do so with a purpose in mind.
-
In the Grouping Type cell, specify the group of ranges to be used for sorting the column. You can select a range that is provided by ICONICS (by Identical Value or Severity Range) or you can select a range that you defined using the Grouping Range tab.
-
Use the pulldown menu to select the Sorting Mode. Click the Count Sort checkbox to sort groups by the number of items they contain.
-
Repeat Steps 1 and 2 for each field you want to use for sorting values.
-
Sequence the columns in the order in which you want alarms to be grouped. For example, if you want alarms to be grouped by priority, put Priority at the top of the list. All other fields in the list are grouped inside the first grouping. To move a field up or down in the list, select the field then click the up or down arrow.
See also: