Logger System Settings
To Edit Logger System Settings:
-
Open the Workbench and expand your project and then the Internet of Things node.
-
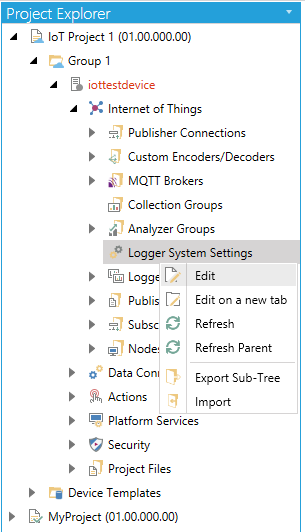
Right-click on the Logger System Settings node, then click on Edit in the pulldown menu, as shown below.
Editing the Logger System Settings in the Project Explorer
-OR-
Select the Logger System Settings node, then click on the Edit button, shown below, in the Edit section of the Home ribbon in the Workbench.
Edit Button

This opens the Logger System Settings properties in the Workbench, as shown below.
Logger System Settings
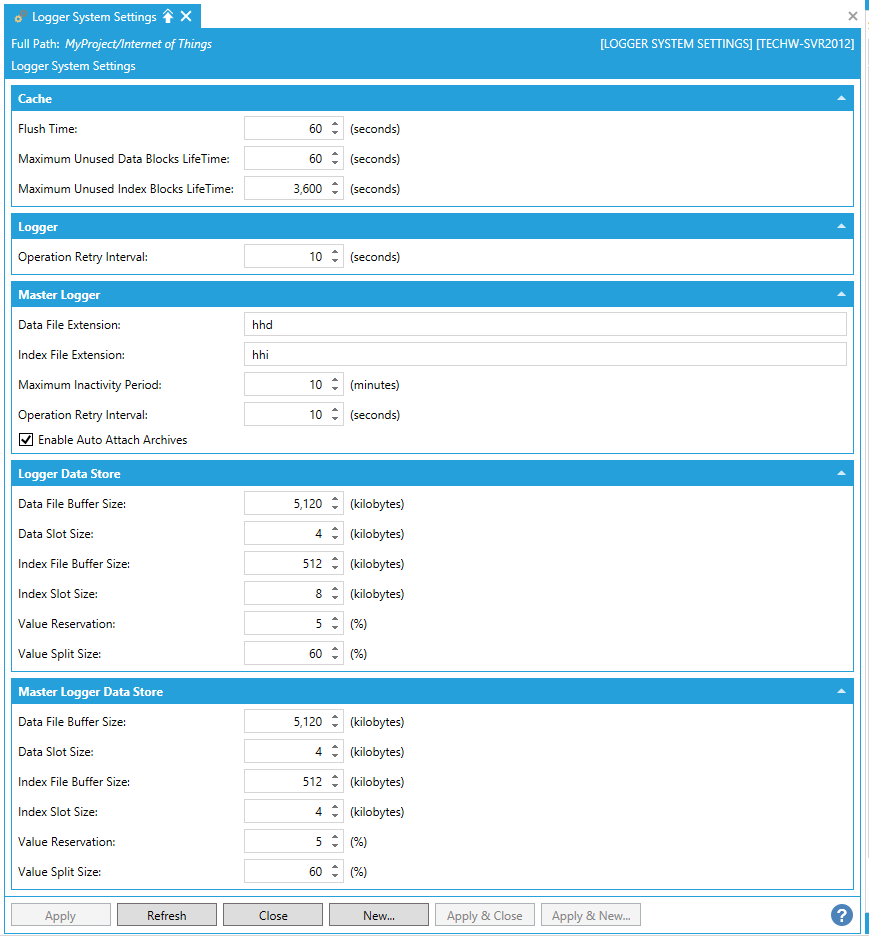
Cache
-
Flush Time -Specifies the time interval (in seconds) after which the cache is cleared. Enter the time interval in the text entry field or use the up/down arrow buttons.
-
Maximum Unused Data Blocks LifeTime -Specifies the maximum lifetime (in seconds) of unused data blocks. Enter the maximum lifetime in the text entry field or use the up/down arrow buttons.
-
Maximum Unused Index Blocks LifeTime -Specifies the maximum lifetime (in seconds) of unused index blocks. Enter the maximum lifetime in the text entry field or use the up/down arrow buttons.
Logger
-
Operation Retry Interval -Specifies the time interval (in seconds) after which the logger attempts to re-execute a failed operation. Enter the time interval in the text entry field or use the up/down arrow buttons.
Master Logger
-
Data File Extension -Specifies the extension for logged data files. Enter a data file extension in the text entry field.
-
Index File Extension -Specifies the extension for index files. Enter an index file extension in the text entry field.
-
Maximum Inactivity Period -Specifies the maximum inactivity period (in minutes) allowed for the master logger. Enter the maximum inactivity period in the text entry field or use the up/down arrow buttons.
-
Operation Retry Interval -Specifies the time interval (in seconds) after which the master logger attempts to re-execute a failed operation. Enter the operation retry interval in the text entry field or use the up/down arrow buttons.
-
Enable Auto Attach Archives -Specifies if automatic attach/detach feature is on.
Logger Data Store
-
Data File Buffer Size -Specifies the size (in kilobytes) of the data file buffer. Enter the size in the text entry field or click on the up/down buttons.
-
Data Slot Size -Specifies the size (in kilobytes) of the data slot. Enter the size in the text entry field or click on the up/down buttons.
-
Index File Buffer Size -Specifies the size (in kilobytes) of the index file buffer. Enter the size in the text entry field or click on the up/down buttons.
-
Index Slot Size -Specifies the size (in kilobytes) of the index slot. Enter the size in the text entry field or click on the up/down buttons.
-
Value Reservation -Specifies values reservation as a percentage. Enter the percentage in the text entry field or click on the up/down buttons.
-
Value Split Size -Specifies values split size as a percentage. Enter the percentage in the text entry field or click on the up/down buttons.
Master Logger Data Store
-
Data File Buffer Size -Specifies the size (in kilobytes) of the data file buffer. Enter the size in the text entry field or click on the up/down buttons.
-
Data Slot Size -Specifies the size (in kilobytes) of the data slot. Enter the size in the text entry field or click on the up/down buttons.
-
Index File Buffer Size -Specifies the size (in kilobytes) of the index file buffer. Enter the size in the text entry field or click on the up/down buttons.
-
Index Slot Size -Specifies the size (in kilobytes) of the index slot. Enter the size in the text entry field or click on the up/down buttons.
-
Value Reservation -Specifies values reservation as a percentage. Enter the percentage in the text entry field or click on the up/down buttons.
-
Value Split Size -Specifies values split size as a percentage. Enter the percentage in the text entry field or click on the up/down buttons.
Once you have completed making updates to the Logger System Settings, click on the Apply button then on the Close button to return to the Workbench.
See Also: