Augmented Reality
The Augmented Reality feature is intended to provide the user with configurable types of Location Services as well as a configurable Actions dialog. Location Services are a group of MobileHMI features that allow displays to automatically load and display data based on the user's location and proximity to devices.
Location Services
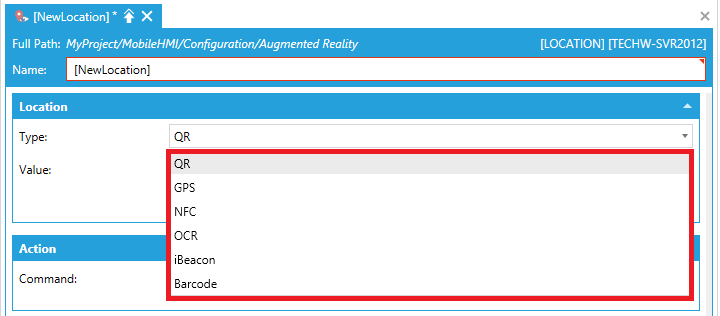
There are five Location Services within the Augmented RealityType menu:
-
QR - Quick Response Code
-
GPS - Global Positioning System
-
NFC - Near Field Communication
-
OCR - Optical Character Recognition
-
iBeacon - Apple's implementation of Bluetooth low-energy (BLE) wireless technology
-
Barcode - Optical, machine readable representation of data
-
Geofence - Virtual perimeter for a real-world geographic area
Each Location Service Type provides a different set of configurable functions and values that the user can customize.
Listed Location Services
QR
-
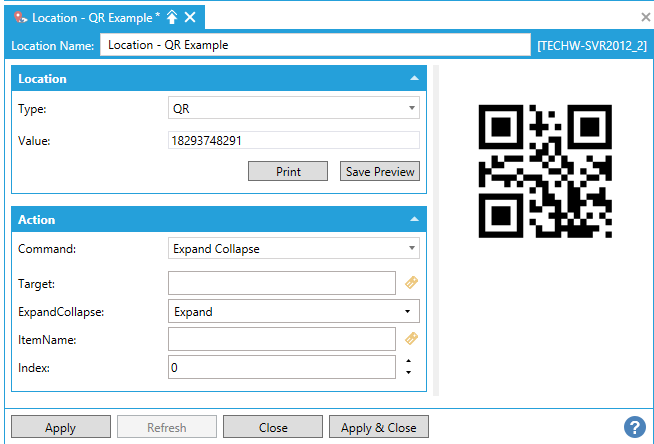
QR - Quick Response Code. This code allows users to scan pre-established, physical QR code on a device, and retrieve current and historical information regarding that device in real time while physically interacting with the equipment. QR codes can be set to correlate to any equipment information while preventing operator confusion by having a physical tag associated with each piece of equipment.
Accessing QR: -
-
Open the Configuration option in MobileHMI.
-
Open the Augmented Reality heading within the Project Explorer.
-
Select a Project Detail from within the Augmented Reality List.
-
Set the Location Type to QR.
-
Set the value of the QR code in order to generate an appropriate image.
The user can now choose to print or save the generated image using either the Print or Save Preview buttons respectively.
-
Using the QR Location Service
GPS
-
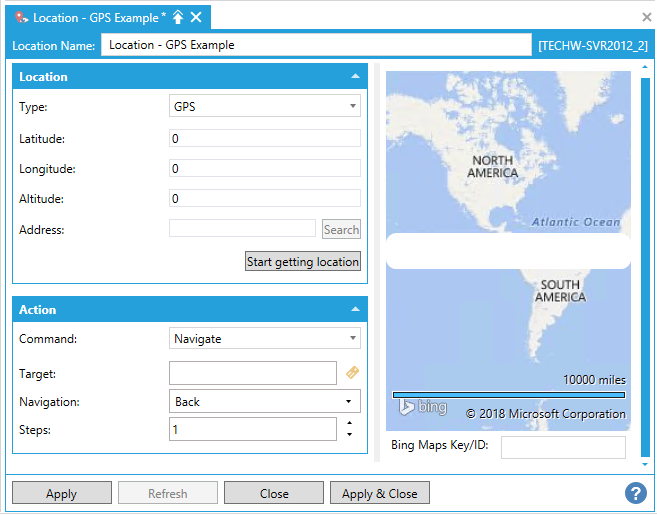
GPS - Global Positioning System. GPS loads information along with a detailed map based on the users physical location. GPS Location Services are an ease of use enhancement that is intended to provide several actions based on the users' location.
Accessing GPS: -
-
Open the Configuration option in MobileHMI.
-
Open the Augmented Reality heading within the Project Explorer.
-
Select a Project Detail from within the Augmented Reality List.
-
Set the Location Type to GPS.
The user can now specify a location through latitude, longitude and altitude, or retrieve a location using an address. -
Click Apply & Close.
-
Configuring GPS:
-
Click the Start getting location button.
Workbench now attempts to get your current location from integrated GPS using WiFi positioning or the user's IP address. As the user moves, the location will also relocate until the user selects the Stop getting location button.
Note: The user can also enter the location by searching for an address, or right-clicking their location on the preview map.
In order to dismiss the "Invalid Credentials" prompt in the map preview, the user must provide a valid Bing Maps key or a Bing Maps key ID that is being used in EarthWorX. This should be configured in the Security on a per-user basis.
Searching for an Address:
-
Fill in the address field.
-
Select the Search button.
The GPS coordinates populate automatically.
Using the GPS Location Service
NFC
-
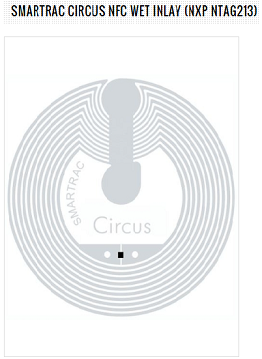
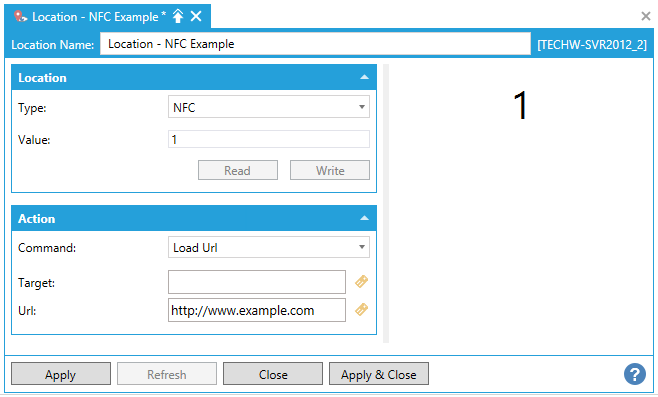
NFC -Near Field Communication.NFC allows a user to create a connection to any supported device without the need for a physical connection. This ensures the user can monitor or configure data and settings remotely with automatic connections and no need for additional infrastructure. NEDF-formatted TEXT values can be stored in and read from inside of the NFC tag. NFC is only supported in Windows 8.1 and above.
Note: You must configure an NFC reader/writer before this option is available. This is done either from an integrated NFC reader on your PC, or an external one connected by USB. An NFC tag can look like the image below.
NFC Tag Example
Accessing NFC:
-
Open the Configuration option in MobileHMI.
-
Open the Augmented Reality heading within the Project Explorer.
-
Select a Project Detail from within the Augmented Reality List.
-
Set the Location Type to NFC.
-
Set an appropriate Value.
-
Click Apply & Close.
Note: Just for convenience, when you already have an NFC tags with an NDEF string value, clicking the Read button reads the value from the tag and fills the Value field for you. The Write button is there, again for convenience, and works the other way around. It allows you to write the value to the tag. To enable both buttons, you will need at least Microsoft Windows 8.1 (or newer operating system), as well as supported hardware and properly installed drivers. Some laptops come with NFC readers built in. Otherwise, you will need a USB reader/writer. The buttons will be enabled once you connect the reader to the PC and install the drivers.
Using the NFC Location Service
OCR
-
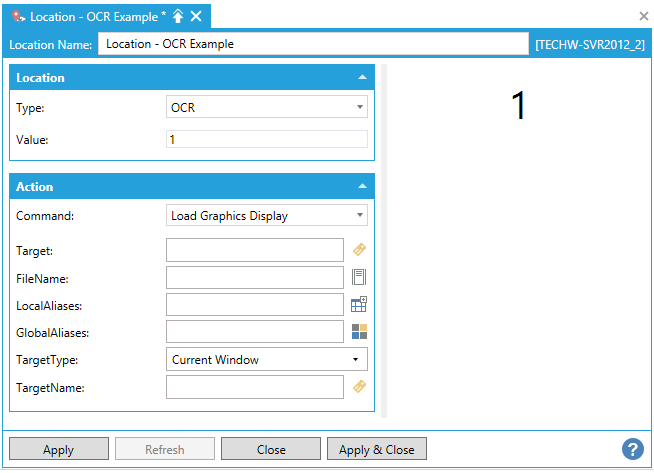
OCR - Optical Character Recognition. Optical character recognition is an Augmented Reality feature that allows a mobile device to derive information from standard alphanumeric characters. OCR scanning is a major ease of use improvement that allows a user to scan alphanumeric characters in the form of words or isolated characters, and instantly retrieve all device information while showing it in the MobileHMI display.
Accessing OCR:
-
Open the Configuration option in MobileHMI.
-
Open the Augmented Reality heading within the Project Explorer.
-
Select a Project Detail from within the Augmented Reality list.
-
Set the Location Type to OCR.
-
Input an appropriate Value.
This will launch a preconfigured Action. -
Click Apply & Close.
Using the OCR Location Service
iBeacon
-
iBeacon -Apple's implementation of Bluetooth low-energy (BLE) wireless technology. iBeacon enables smartphones (such as Apple iPhones or Android smartphones), tablets and other compatible mobile devices to perform actions when near hardware compatible with iBeacon technology. See iBeacon Location Services for additional details.
Accessing iBeacon
-
Open the Configuration option in MobileHMI.
-
Open the Augmented Reality heading within the Project Explorer.
-
Select a Project Detail from within the Augmented Reality list.
-
Set the Location Type to iBeacon.
-
Input an appropriate Value.
This will launch a preconfigured Action. -
Click Apply & Close.
Using the iBeacon Service
![]()
Barcode
-
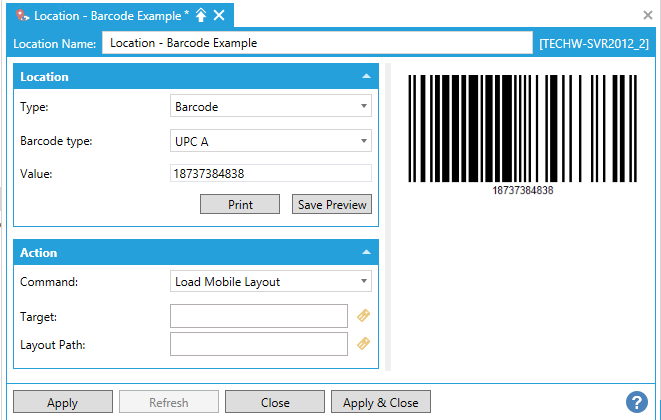
Barcode - Optical, machine readable representation of data. Barcode scanning gives the user information in real time, while physically interacting with the equipment. Barcodes can be set to correlate to any equipment information, while preventing operator confusion by using a physical tag associated with the equipment.
Accessing Barcodes:
-
Open the Configuration option in MobileHMI.
-
Open the Augmented Reality heading within the Project Explorer.
-
Select a Project Detail from within the Augmented Reality list.
-
Set the Location Type to Barcode.
-
Select the Barcode type.
-
Input a Value for the Barcode.
-
Select to Print or Save Preview.
-
Click Apply & Close.
The primary advantage of Barcodes is that all existing
codes can be re-used for Augmented Reality and for better accuracy in
code recognition. The user can also connect a USB barcode reader (such
as Honeywell Xenon 1900G SR) and use it instead of the built-in camera
Using the Barcode Location Service
Geofence
-
Geofence - Virtual parameter for a real-world geographic area. Geofencing allows software to set an area that can trigger a response when connected devices enter or leave. It can be used in scenarios such as Geofencing Alarms, as in CFSWorX.
Accessing Geofence
-
Open the Configuration option in MobileHMI.
-
Open the Augmented Reality heading within the Project Explorer.
-
Select a Project Detail from within the Augmented Reality list.
-
Set the Location Type to Geofence.
-
In the Geofence Points section of the window, input a Latitude and Longitude. You can also left-click on a vertex to select the geofence point. Right-click on the map in the Preview Panel to move the geofence point. Middle-click on the map to add a geofence point.
-
Click Apply & Close.
Using the Geofence Location Service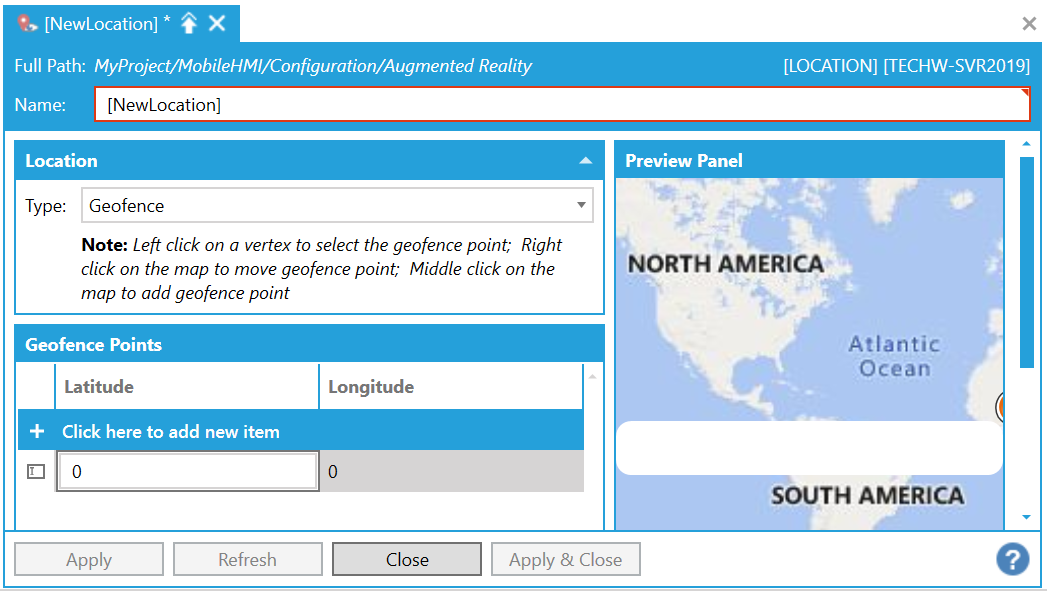
Displaying Geofences in EarthWorX
-
This feature is not supported in 10.96.2.
-
In 10.97, you need to create a new connection of “Geofence” type and assign it to a map layer. This map layer will then display the geofences. Displayed geofences cannot be configured at this moment.
Displaying Geofences in KPIWorX
-
Add a map widget on the canvas.
-
Go to the widget settings of the map widget and set Show geofences to true
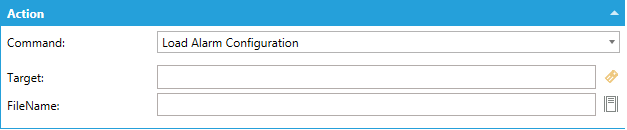
Commands Within the Action Dialog
For each Type you choose from, there are multiple Commands that can be configured independently within the Action dialog. From the Command drop-down menu within the Actions menu, the user can choose from a variety of specific options to configure their selected Augmented Reality Type. Commands within this dialog include; Load Alarm Configuration, Select Asset, Set Global Aliases, and many more. Click on a command to open its specific menu and edit it.
Within the Action dialog, the user can configure multiple different Commands for each Type, including:
-
Acknowledge: The Acknowledge command allows a user to acknowledge alarms in an associated AlarmWorX64 Viewer.
-
Add Favorite: The Add Favorite command inserts a new favorite asset in target Asset Navigator's favorites folder.
-
Add Operator Comment
-
Apply Discard: The Apply Discard command performs a selected action in a target GridWorX64 Viewer control.
-
Batch
-
Call Method: The Call Method command calls a method or task from within Platform Services.
-
Create Pen: The Create Pen command adds a new pen into a target TrendWorX Viewer control.
-
Custom Command: The Custom Command was designed to allow future expansion to third-party integration and reference to the API. Custom Commands are virtually unlimited.
-
Delete Pen: The Delete Pen command removes a pen from a TrendWorX Viewer Control. This command requires a Target. The name of the Pen and the Target viewer are the parameters for this command.
-
Edit Pen: The user can edit a Pen here. This command requires a Target. The name of the pen and the target viewer are the parameters for this command.
-
Edit Trend Chart:
-
Expand Collapse: The user can change the levels shown in the target Asset Navigator by expanding or collapsing the assets to a desired level.
-
Export Data: The Export Data command exports chart data from a TrendWorX64 Viewer, using export settings configured in the target control.
-
Export Image:
-
Go To Location: The Go To Location Command is used with EarthWorX targets and works similar to the Ribbon menu option in the EarthWorX contextual Ribbon in GraphWorX64 by allowing users to input a Latitude, Longitude and Zoom (based on the Unit pulldown). Executing this command will zoom or otherwise change the view of the target EarthWorX window.
-
Group:
-
Load Alarm Configuration: The Load Alarm Configuration command opens an AlarmWorX file of alarms inside an AlarmWorX Viewer when a runtime user selects the menu option.
-
Load DataGrid Configuration:The Load Data Grid Configuration command, used with GridWorX, will locate and load a GDXX (WPF-based) file format that contains GridWorX Configurations. Users can specify the file name and path of the file as well as any desired target.
-
Load Executed Reports: The Load Executed Reports command loads a list of reports from a specific folder into a target report viewer.
-
Load Facility Data: The Load Facility Data command a initializes a target FDD Viewer control with a given configuration, time range and asset.
-
Load Graphics Display: The user can load Graphics Displays.
-
Load KPI Dashboard: The user can load the KPI Dashboard into a target GraphWorX Viewer control.
-
Load Mobile Layout: The user can load a Mobile Layout into a target control.
-
Load Report: The Load Report command opens a specified report template in a target report executor control.
-
Load Schedule Control Configuration: The Load Schedule Control Configuration command loads a specified configuration file into a target ScheduleWorX64 Viewer control.
-
Load Transaction:
-
Load Trend Configuration: The user can load a Trend Configuration into a target TrendWorX Viewer control.
-
Load URL: The Load URL command loads a URL into a target Web Browser control. You can use this command to load a frequently-used online tool, a corporate Web site, a vendor's page for placing an order, or an interactive page for requesting service.
-
Log Event: The Log Event command allows for logging custom simple or tracking events.
-
Login Dialog: The Login Dialog command will pop up the Security Login Dialog when triggered. Similar to the original Pick Action in GraphWorX64, this command will function similarly in other client types by allowing access to the dialog via command execution.
-
Navigate: The Navigate command allows users to supplement navigation buttons with GraphWorX64 buttons or Asset commands to provide alternative navigation schemes. The Steps option allows users to determine how far the navigation goes while the Navigation option allows movement backward and forward. Home, End and Now refer to the TrendWorX64 Freeze mode where they can be used to Navigate the Summary View and manipulate trend data.
-
Open URL: The Open URL Command opens a URL in a default internet browser. You can use this command to go to a frequently-used online tool, a corporate web site, a vendor's page for placing an order, or an interactive page for requesting service.
-
Phone Call: The Phone Call command lets a user make a phone call from a Windows phone (using MobileHMI) to a pager. Refer to the MobileHMI documentation for requirements.
-
Recipe: Copy: The Recipe:Copy command will create a copy of the recipe item that is currently selected in the target Recipe Navigator control.
-
Recipe: Delete: The Recipe: Delete command will delete the recipe item that is currently selected in the target Recipe Navigator control.
-
Recipe: Download: The Recipe: Download command will execute the download of the recipe item that is currently selected in the target Recipe Navigator control, downloading those values to the target tags.
-
Recipe: Load: The Recipe: Load command will load the target Recipe Navigator control’s currently selected recipe item into the Recipe Grid control.
-
Recipe: New: The Recipe: New command will create a new recipe item under the currently selected recipe in the target Recipe Navigator control.
-
Recipe: Save: The Recipe: Save command will apply changes in the target Recipe Grid control, saving them back to the database.
-
Recipe: Upload: The Recipe: Upload command will execute the upload of the recipe item that is currently selected in the target Recipe Navigator control. It will upload the current values of the tags and save them to the recipe item in the database.
-
Refresh: The user can use this command to refresh a target control requiring an updated view.
-
Remove Favorite: The Remove Favorite command removes a specific or selected favorite in a target Asset Navigator.
-
Run Report: The Run Report command executes a report using ICONICS ReportWorX when a runtime user selects the menu option.
-
Run Transaction: The Run Transaction command executes an ICONICS BridgeWorX transaction when a runtime user selects the menu option. For example, if you use BridgeWorX to populate a database table for us in reports, you can use this command to launch that service.
-
Save Configuration: The Save Configuration command can be used for any of the controls (e.g., AlarmWorX64 AWXX and AWXXS files). The file type used to save the configuration is entered at the end of the file path and name in the FileName field. Select the Overwrite check box to allow for changing the configuration of an existing one when saving.
-
Scan:
-
Schedule Clear Override: The Schedule Clear Override command
-
Schedule Event:
-
Schedule Override:
-
Select Asset: The Select Asset Command allows users to do three things. The first is to target the Asset Navigator and tell the control to select an asset (more commonly triggered from GraphWorX64). The second is to target TrendWorX64 Viewers to parse the asset’s equipment properties to trend the values. No configuration is necessary for the points, as they are automatically added as Pens to the targeted viewer.
-
Select Element: The Select Element command selects a desired UI element ( row, view, tab, object, pen, etc.) in a target control.
-
Select View: The Select View command selects a specific tree view in a target Asset Navigator
-
Send Alert E-mail: The Send Alert E-mail Command lets users send an Alert E-mail.
-
Send Alert Page: The Send Alert Page Command lets users send an Alert Page.
-
Send E-mail: The Send E-mail Command lets users send an e-mail from a Windows phone (using MobileHMI).
-
Send Message: The Send Message Command lets users send a text message from a Windows phone (using MobileHMI).
-
Send Notification:
-
Set Fault Incident State:
-
Set Filter: The Set Filter Command is most commonly used with AlarmWorX64 Viewers to apply or remove filters from Viewers dynamically, but can also be applied to GridWorX Viewers, allowing users to configure a filter name or create a new filter (specifying a new previously unused filter name) based on the Filter Name and Expression. The Filters are Server Side for Historical Alarms and Client Side for Real Time Alarms.
-
Set Freeze Mode: The Set Freeze Mode Command toggles Freeze Mode in TrendWorX64 Viewer.
-
Set Global Aliases: The Set Global Aliases command sets a Global Alias theme or alias. Refer to Global Aliasing for more information.
-
Set Global Color Theme: The Set Global Color Theme Command allows the user to select a ThemeName and a ThemeScope.
-
Set Language: The Set Language command allows operators to trigger a change in language by entering in the Culture name listed in the Language Aliasing Engine. This name must match the Language Aliasing Configuration on the server in order to trigger the change.
-
Set Period: The Set Period Command, used with TrendWorX64, allows the real-time mode Period to be changed in runtime.
-
Set Time Range: The Set Time Range command, used with TrendWorX64, allows the freeze mode time range to be changed in runtime.
-
Set Visibility: The Set Visibility Command is a flexible command used to target GraphWorX64 Objects (Visual ObjectType), TrendWorX64 Pens (Pen ObjectType), and any grid-based layout like AlarmWorX64 and GridWorX (Column ObjectType). The command will allow operators to Show, Hide or Toggle the visibility of any one of these object types by issuing the command from an AssetWorX asset or GraphWorX64 Pick Action.
-
Show Details:
-
Sort: The Sort Command, used to target AlarmWorX64 or GridWorX Viewers, will allow sorting of data grids using the parameters offered. Sorting can encompass one or more levels by using the Add Action or be removed entirely using the Reset Action.
-
Write Value: The Write Value Command writes a value to tag. For example, you might use this Command to give operators the ability to switch a machine "off" or to set a thermostat to a specified temperature.
-
Zoom: The Zoom Command allows the user to zoom in or out on a specific Target.
See Also: