Transactions
To Create a New Transaction:
-
Open the Workbench and expand your project, then the Bridging node. Right-click on a Transaction Configuration beneath the Transactions node, then click on Add Transaction, as shown below.
Adding a New Transaction in the Project Explorer in the Workbench
![]()
-OR-
Select a Transaction Configuration beneath the Transactions node, then click on the Add Transaction button (shown below) in the Edit section of the Home ribbon in the Workbench.
Add Transaction Button
![]()
-
This opens the Transaction Properties, shown below, beneath the Project Details section of the Workbench. Enter a name in the Transaction Name text entry field.
Transaction Properties
![]()
3. The Transaction Properties are separated into the Transaction Settings, Triggers, and Alarm Subscriptions tabs.
Transaction Settings Tab
General Settings
-
The transaction is enabled - Make sure this checkbox is checked in order to enable the currently selected transaction.
-
Cancel transaction on server shutdown - Check this checkbox if you would like to ensure that the currently selected transaction does not run after the connected server is shut down.
-
Description - Enter a description for the transaction in the text entry field.
-
Default Themes - Enter a global alias theme, or themes, in the text entry field or click on the
 button to open the Set Global Themes
and Aliases window and select them. See Global
Aliasing for more information on using global aliases.
button to open the Set Global Themes
and Aliases window and select them. See Global
Aliasing for more information on using global aliases. -
Number of Retries - Enter a number of times, in the text entry field or by using the up/down buttons, that the transaction should be attempted to run if not immediately successful.
-
Retry Delay - Enter the time (in milliseconds), in the text entry field or by using the up/down buttons, between each additional attempt to successfully run the transaction, based on the Retry Number.
-
Timeout - Enter the time (in seconds) in the text entry field for timeout or 0 for no timeout.
-
Priority - Use the pulldown menu to set a priority for the transaction. Select from Normal, Below Normal, or Above Normal.
Transaction Template
-
Selected Template - Use the pulldown menu to select from existing Templates (set via the Templates node). You can also immediately create a new template by clicking on the
 button.
Once a template has been selected or newly created, you can also click
on the
button.
Once a template has been selected or newly created, you can also click
on the  button to edit it or on the
  button to delete it. You
can test the Transaction itself from the selected Template by clicking
the "Test the Transaction Now" link at the top of this section.
button to delete it. You
can test the Transaction itself from the selected Template by clicking
the "Test the Transaction Now" link at the top of this section. -
Template Name - For any template not yet named, you can enter one here in the text entry field.
Advanced Settings
-
Execution Log - Use the pulldown menu to select from Trace only workflow messages; Trace workflow and activity information; or Trace workflow information, activity information and every data step within the activity.
-
Log Only Failed Transactions - If 'Trace only workflow messages' is NOT selected in the Execution Log setting, you can opt to click this checkbox to log only failed transactions.
-
Maximum activities logged - If 'Trace only workflow messages' is NOT selected in the Execution Log setting, you can enter the number of maximum activities logged in the text entry field or use the up/down arrow buttons.
-
Recovery Mode (if unexpected shutdown occurs, resubmit interrupted transactions on next startup) - As stated, click this checkbox to ensure that if an unexpected shutdown happens, the currently selected transaction will run after the next system startup.
-
Recovery Timeout - If you have selected a Recovery Mode of "Restart the workflow from the beginning", you can then enter a number of seconds in this text entry field.
-
Transaction Options - Use the drop-down list to select between "Queue and Execute Immediately," "Execute if the transaction is unique," "Queue if the transaction is unique," or "Execute if the transaction is unique and the trigger is unique."
Note: When determining uniqueness, the transaction object and global aliasing themes are considered. Parameter values are not considered.
-
Hibernation Threshold - Enter a threshold (in seconds) in the text entry field or use the up/down arrows. For more information, see Transaction Hibernation.
Transaction Execution Tab
Triggers
Triggers Tab in the Transaction Properties
![]()
Specify the list of tags that can trigger a transaction execution
-
Click on the + Click here to add new item link to add an action that can trigger a transaction execution. You can also opt to click on the Click to add multiple tags link to open the Data Browser and make multiple selections.
-
You will then be able to edit the action, first by entering a Tag in the text entry field or clicking on the
 button to open the Data Browser to navigate to your selected tag.
You can decide if the tag should be Enabled.
You can then opt to Override Global
Alias (the existing set global alias). If this is checked,
you can then enter global alias themes in the Global
Alias Themes text entry field or click on the button to open the Set
Global Themes and Aliases window and select them. See Global
Aliasing for more information on using global aliases.
button to open the Data Browser to navigate to your selected tag.
You can decide if the tag should be Enabled.
You can then opt to Override Global
Alias (the existing set global alias). If this is checked,
you can then enter global alias themes in the Global
Alias Themes text entry field or click on the button to open the Set
Global Themes and Aliases window and select them. See Global
Aliasing for more information on using global aliases.
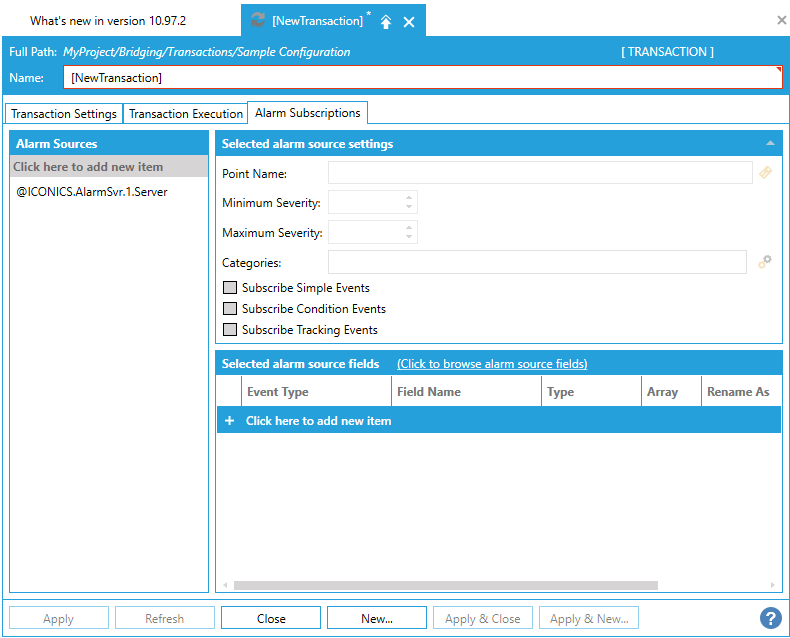
Alarms
Alarms Sources Tab in the Transaction Properties
![]()
Note: Starting version 10.97.1, only a short field name, such as {{OriginalSource}} is accepted. The full field name, such as {{BaseConditionType.OriginalSource}}, is converted on the fly to the short field name, so filters that were originally configured in earlier versions will continue to work.
Alarms and Triggers Tab
Alarms and Triggers Tab in the Transaction Properties
![]()
Alarm Settings
-
Trigger transaction using alarm source -True to trigger the set transaction with a configured alarm source.
-
Override Global Alias Themes -True to use a set a global alias from within the transaction's Alarm Sources to overwrite any other(s).
-
Global Alias Themes -If activated, enter a global alias in the text entry field or click on the
 button to open the Set Global
Themes and Aliases window to set
your global alias.
button to open the Set Global
Themes and Aliases window to set
your global alias.
Alarm Subscription Tab in the Transaction Properties
Alarm Subscriptions
-
Click the Click to configure fields and mapping link to open the Add/Remove fields from the subscription window, where you can add or remove from Server Fields or Virtual Fields (with an option to Select/Unselect all). Click OK to return to the previous configuration form.
-
Click the Click here to add new item link to add a new alarm subscription item. Once added, you can set a new Tag (by entering it in the text entry field or clicking on the now active
 button
to open the Data Browser and navigate to your selected tag), Min.
Severity (by entering a number in the text entry field), Max. Severity
(by entering a number in the text entry field, and Alarm Type (use
the pulldown menu to select from Simple, Tracking, Condition, Simple
& Tracking, Simple & Condition, Tracking & Condition,
or All).
button
to open the Data Browser and navigate to your selected tag), Min.
Severity (by entering a number in the text entry field), Max. Severity
(by entering a number in the text entry field, and Alarm Type (use
the pulldown menu to select from Simple, Tracking, Condition, Simple
& Tracking, Simple & Condition, Tracking & Condition,
or All).
Note: See Directly Subscribe to Alarms and Events.
-
You can click Apply to save your transaction properties and Close to return to the Workbench. Your new transaction will now appear in the Project Explorer, beneath your previously selected Transaction Configuration node.
See Also: