Creating Separate Configuration Databases
After creating a new project database in the GENESIS Configure System utility, you can create a separate configuration database for each installed GENESIS component that uses databases.
 This is an advanced option that may require additional settings since many servers need their configurations to be stored in the same (unified) database.
To set up separate databases for each configuration:
-
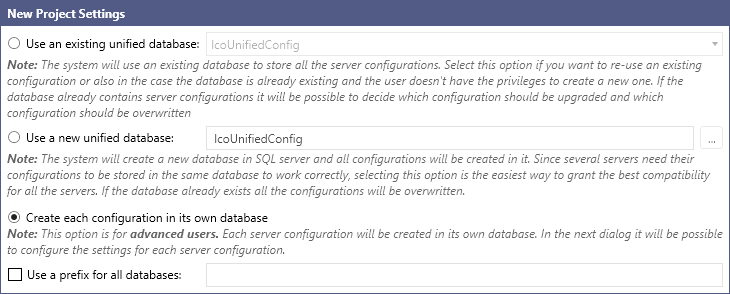
In the New Project Settings section of the Configure System utility dialog, select Create each configuration in its own database.
-
(Optional) Select the Use a prefix for all databases checkbox, enter the desired prefix in the text box, and then click Next.
The names of the databases are assigned automatically and reflect the GENESIS component for which they are created. You can add the prefix to identify the project to which the databases belong. -
(Optional) On the next screen in the Configuration Settings section, select or clear the checkboxes to set your preferences for upgrading (the default setting) or overwriting all configurations and for including sample data.
 Selecting Automatically upgrade all configurations saves any existing data and makes it compatible with the new version, while selecting Overwrite all configuration permanently deletes the data and creates a clean database. When neither checkbox is selected, the existing data is used as is and may not be compatible with the new version.
Including sample data by selecting Include samples in all configurations can help you become familiar with GENESIS before you start working with your real data.
-
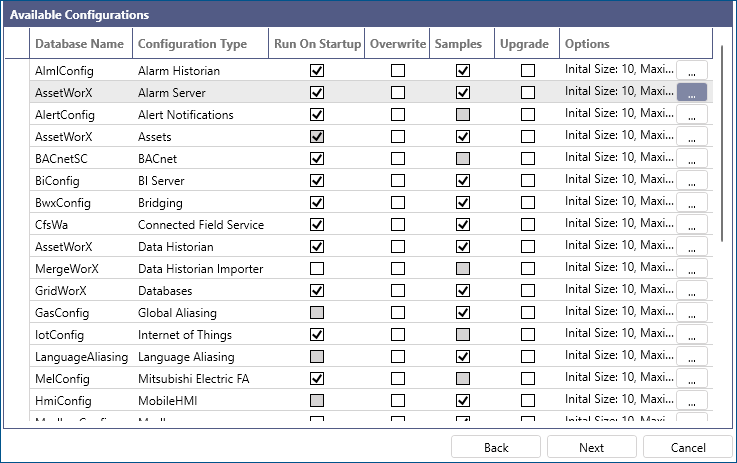
(Optional) In the Available Configurations section, select or clear the checkboxes in the Overwrite, Upgrade, and Samples columns to customize the preferences from the previous step for individual configurations.
-
(Optional) In the Options column, click
 to customize the database file and log settings for each database (configuration type).
  View the advanced settings
Edit the File size and Log Size options as needed, and then click OK.
View the advanced settings
Edit the File size and Log Size options as needed, and then click OK.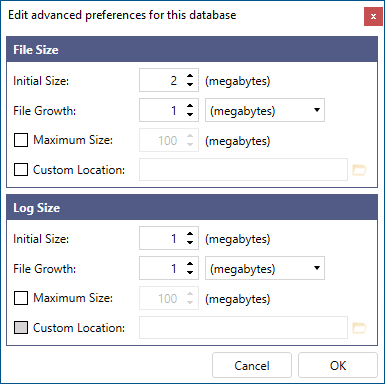 You can set the following advanced preferences in both the File Size section and the Log Size section.SettingDescriptionInitial SizeThe space in megabytes initially allocated for the file.File GrowthThe file growth increment in megabytes or percentages after the file reaches its initial size.Maximum SizeThe limit for the file size in megabytes.Custom LocationSelection of a custom file and log location. The default location of the databases' files and logs isC:\Program Files\Microsoft SQLServer\MSSQL16.SQLEXPRESS\MSSQL\DATATo change the location, select the Custom Location checkbox in each section and click
 to browse for the desired folder.The checkbox in the Log Size section activates after you select the checkbox in the File Size section.
 -
In the Run On Startup column, select the checkboxes for services (point managers) that you want to start when Windows starts up, and clear all the other checkboxes. When finished, click Next.
-
On the next screen in the FrameWorX Connection Mode section, select either Normal Setup (the default option) or Secured Setup.
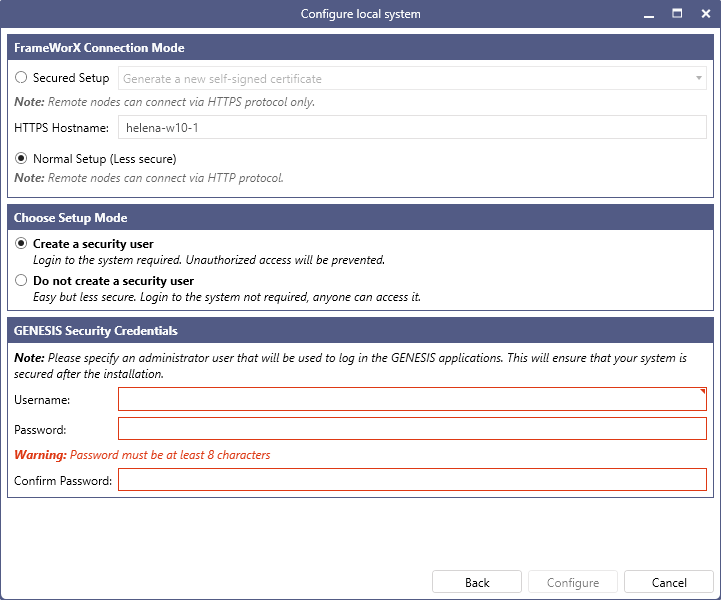
For Secured Setup, select the desired option in the drop-down list.
-
Generate a new self-signed certificate: A self-signed certificate will be created during the configuration and used to secure the connection.
-
Select an installed certificate: In the Certificate text box that appears, select an existing certificate from the drop-down list.
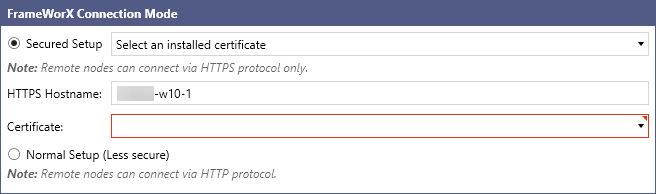
The HTTPS Hostname field displays the Fully Qualified Name specified in the selected certificate. -
-
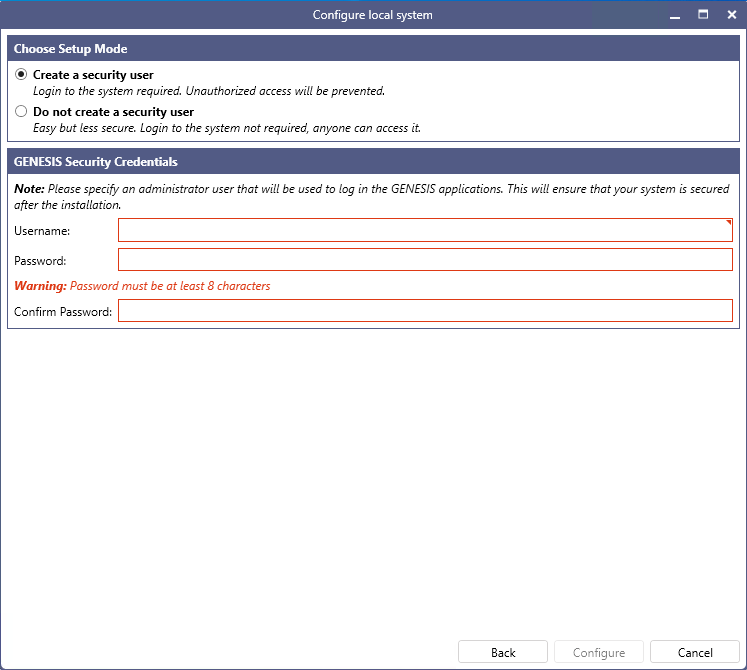
In the Choose Setup Mode section, select one of the following options.
-
Select Create a security user to create a user account with administrator privileges that will be required to log in to Workbench and make changes to the system. In the GENESIS Security Credentials section, specify the Username and Password.
You can find the account in Workbench in Project Explorer under Security > Users. -
Select Do not create a security user to allow anyone to access Workbench and make changes to the GENESIS configuration.
Choosing not to create a security user will trigger a popup to confirm this choice, as the result will be an installed GENESIS application without security protections.
-
-
Click Configure to begin the configuration process. When successfully completed, the window automatically closes.
If you have selected Normal Setup in the FrameWorX Connection Mode section, a message appears. Click Yes to confirm the action.
What's Next?
- If you are configuring a new installation of GENESIS: Activating a License
- If you are upgrading GENESIS from version 10.97 to version 11: Using Upgrade Utility to Update an Existing Project