Connecting to an MQTT Broker
An MQTT broker definition holds the address, protocol, and credentials GENESIS uses to reach one broker. You can define it once and then reference it from multiple publisher and subscriber connections that use that broker. It is the first step for both publishing data and subscribing to data. Learn more
Before you begin, obtain the address and port of the broker, the credentials or certificates it requires, and any certificate authority certificate needed to validate it.
To connect to an MQTT broker:
-
Open Workbench. In the Project Explorer, expand your project > Data Connectivity > Internet of Things, right-click MQTT Brokers, and select Add MQTT Broker.
-
In the new broker configuration dialog, enter a Name for the broker.
-
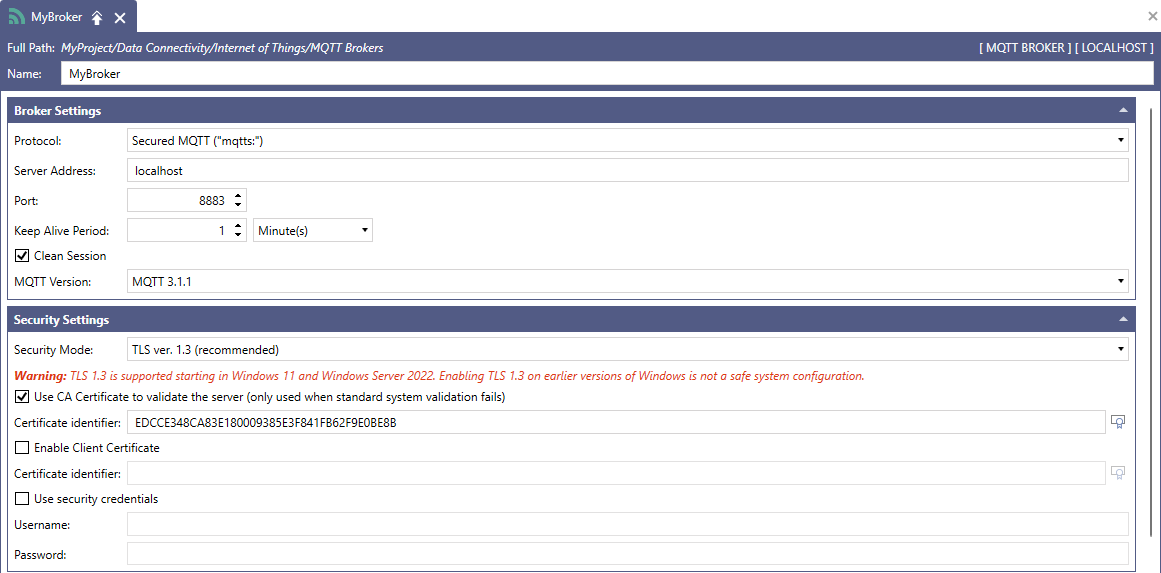
In the Broker Settings section, define how GENESIS reaches the broker:
-
In Protocol, select Simple MQTT ("mqtt:"), Secured MQTT ("mqtts:"), Web Sockets ("ws:"), or Secure Web Sockets ("wss:").
-
Enter the Server Address and Port of the broker. Each protocol has a conventional default port:
Protocol
Default port
Simple MQTT ("mqtt:")
1883
Secured MQTT ("mqtts:")
8883
Web Sockets ("ws:")
80
Secure Web Sockets ("wss:")
443
-
In ClientID, enter an ID that must be unique among all clients connected to this broker.
-
In MQTT Version, select a version that the broker supports: MQTT 3.1, MQTT 3.1.1, or MQTT 5.
Select Clean Session to have the broker discard subscriptions and queued messages when GENESIS disconnects. Clear it to keep the session durable, so that subscriptions survive a disconnect and messages published at At Least Once or Exactly Once are stored until GENESIS reconnects.
-
-
In the Security Settings section, configure how the connection is protected:
-
In Security Mode, select TLS ver. 1.3 (recommended) or TLS ver. 1.2. Select None only for a plain
mqtt:orws:connection on a trusted, isolated network.TLS 1.3 requires Windows 11 or Windows Server 2022 or later.
-
If the broker presents a certificate that the operating system's trust store does not already accept, select Use CA Certificate to validate the server, and then click the browse button to open the Certificate Browser. It lists the certificate authorities in the Trusted Root Certification Authorities store of this machine. Select the authority that issued the broker's certificate and click OK.
The broker definition stores a reference to the certificate rather than a copy of it, so the certificate must already be installed on the GENESIS machine. A certificate you hold only as a file does not appear in the list until you import it into Trusted Root Certification Authorities, and a certificate that is not itself a certificate authority never appears.
Importing a certificate into Trusted Root Certification Authorities makes Windows trust it for every application on the machine, not only GENESIS. Import only certificates you control, and remove them when they are no longer needed.
-
If the broker authenticates clients by certificate, select Enable Client Certificate and choose the certificate in the Certificate identifier field beneath it, the same way.
Some cloud brokers require the client certificate to be combined with the client key in a Windows PFX file. Create one with
openssl pkcs12 -export -inkey MyThing.private.key -in MyThing.cert.pem -out MyThing.p12, replacingMyThingwith the name of your device, and then import it into the Local Machine Personal certificate store. -
If the broker authenticates clients by username and password, select Use security credentials, and then enter the Username and Password.
Individual publisher and subscriber connections can override these credentials, so several connections can share one broker definition under different identities.
-
-
Click Apply & Close. The new broker appears under MQTT Brokers and can now be selected from a publisher or subscriber connection.
What's Next?