Creating a Writable Data Source
This procedure builds on the concepts covered by Create a Data Source, and expands on how to make your Data Source writable.
A writable Data Source is a Data Source that can be used to modify the database via the Grid Control in GraphWorX. While it is possible to make any Data Source writable, it is easiest if the Data Source reads from a single table in the database.
To create a writable Data Source:
-
Follow the steps detailed in Create a Data Source to create a new Data Source and connect it to a single table using the Table Query option.
NOTE: To follow the example, select the PartsDetails_Daily table when configuring the Data Source.

-
To make the Data Source writable, use the options in the Data Modification Options panel:
Option Description Enable INSERT Enables creating new rows in the Data Source, and in the database. Enable DELETE Enables deleting existing rows from the Data Source, and from the database. Enable UPDATE Enables updating existing rows in the Data Source, and in the database. -
Select the Enable INSERT box. A new panel called INSERT will be displayed, and the INSERT Command box will be populated, with parameters generated for each writable column.
NOTE: If the Data Source is connected to a single table, GENESIS can automatically build the command to insert a new row in the table.

-
In Command Timeout enter an appropriate timeout for the query. This value represents how log the GENESIS Databases Point Manager will wait for the query to complete before returning an error.
-
To verify that the INSERT command has been created correctly, select Configure Command in the INSERT panel. The Configure INSERT Command dialog is displayed. Select Next to proceed to the Configure Parameters screen.
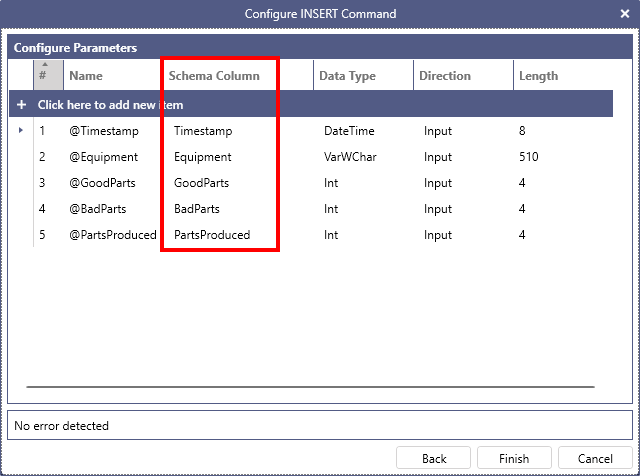
NOTE: This screen is very similar to the screen with the same name in the Configure SELECT Command dialog seen in Create a parameterized Data Source. The main difference is the Schema Column property highlighted above. Make sure the values in the Schema Column align with the Name Column
Property Description Name The name of the parameter. Schema Column Specifies to which column of the Data Source schema the parameter is bound to. When a row is edited via the Grid Control, the value for the parameter will be retrieved from the selected column in that row. Data Type The data type of the parameter. For more information, refer to Data Types Reference. Direction Defines the direction of the parameter. Input represents a parameter from GENESIS to the database: this is the option to use for parameters in a modification (INSERT, DELETE or UPDATE) command. The other available options are not relevant for writable Data Sources. Length The size, in bytes, of the parameter for the specified data type. For fixed-length types (Int, Double, etc.) the size is automatically assigned. For fixed or variable-length string types, you can enter the value directly. -
Select Finish to close the Configure INSERT Command dialog. Select Enable DELETE and Enable UPDATE to generate commands for those operations. Select Apply to save your changes.
TIP: You can create INSERT, DELETE and UPDATE commands even if the Data Source is a custom query or calls a stored procedure. In this case, you must configure the commands manually and bind all the parameters to the appropriate columns from the Data Source's schema.