Creating a Data Source
After creating a database connection, you can create a query to the database table that contains the data. In GENESIS, queries are called data sources.
Once a data source has been created, it is available for use by any GENESIS client as a data set. In GENESIS, data sets are tabular data structures that can be directly consumed by several clients and GraphWorX controls, including Grid Viewer, Table, and Data Diagram.
The zip file contains RollerChainManufacturing.bak, which is the SQL Server backup file that you need to restore. Make sure to add Network Service to the restored database's db_owner role.
To create a data source:
- Open Workbench and expand your project folder, and then go to Data Connectivity > Databases > SQL Connections.
-
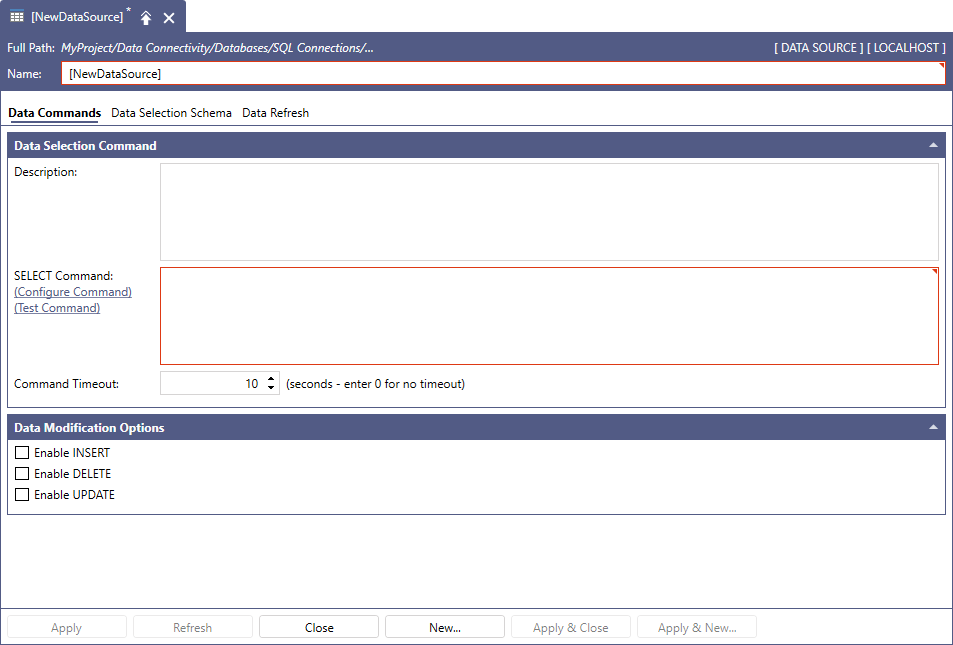
Right-click the desired database connection, and then select Add Data Source. The Data Source Configuration window is displayed.
To continue the example used in Connecting to an Existing SQL Server Database, right-click RollerChainManufacturing.
- Enter a name for the data source. To follow the example, use OEE_Daily.
-
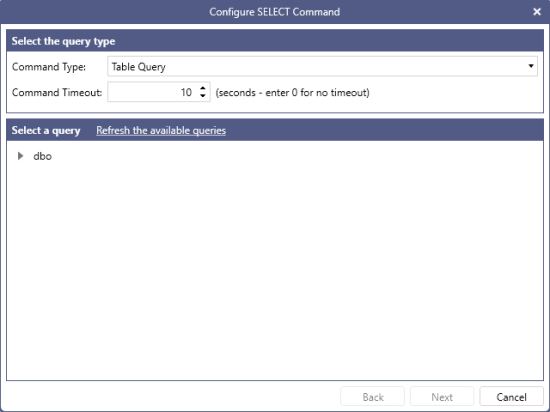
On the Data Commands tab, click the Configure Command link to display the Configure SELECT Command dialog, which you use to configure your query.

-
From the Command Type drop-down, select the type of command that you want to create.
Command Type Option
Description
Custom Query
Allows you to manually enter a SQL query.
Table Query
Automatically builds a SQL query to retrieve all the data from a single table. You can customize the query further, if needed.
Stored Procedure
Calls a stored procedure.
To follow the example, select Table Query. -
In Command Timeout, enter an appropriate timeout for the query. This value represents how long theGENESIS Databases Point Manager will wait for the query to complete before returning an error.
If you are running a complex query, or if you are reading a large amount of data from the database, you may want to increase this timeout. -
In the Select a query section, expand dbo > Tables, select the desired table, and then click Next to display the pre-built query.
- To follow the example, select the OEE_Daily table.
- You can refresh the list of queries by selecting the Refresh the available queries link.
-
You can customize the query further by completing the following screens, if desired. Click Next to proceed to each screen. When you're done, click Finish to close the Configure SELECT Command dialog. The query now appears in the SELECT Command box
Screen
Description
Filter Configuration
Add filters to retrieve only a subset of data from the table. which will add a WHERE statement to the query. For more information, see Create a Parameterized Data Source.
Configure ORDER BY
Configure sorting options for the query. This adds an ORDER BY statement to the query.
Configure Parameters
Configure any parameter used in the query. For more information, see Create a Parameterized Data Source.
The SELECT Command box is read-only. To edit the query, click the Configure Command link to open the dialog again. -
Use the Data Selection Schema and Data Refresh tabs to further customize the behavior of the data source.
Tab
Description
Data Selection Schema
Displays the columns returned by the data source, along with their types and primary key information, if available. For more information, see Customize a Data Source Schema.
Data Refresh
Configure how the data source's query result is retained in memory by the GENESIS Databases Point Manager, and how to refresh it. For more information, see How to Configure a Data Source Refresh.
- On the Data Commands tab, click the Test Command link to execute the query and display the results in the Test the data source configuration dialog to verify that your query works as expected. Click Apply to save the data source.