Setting Alarms and Events for Assets
Before adding alarms to individual equipment or equipment class properties, you need to configure the general settings for alarms and events in Assets.
The configuration contains the following parts:
General Settings and Alarms and Events Sources
In the two sections of this configuration dialog, you can configure general settings for the rules engine and set up the alarms and events sources of the following types:
-
Alarms & Events sources for BACnet alarms and events.
-
Manually defined event fields for virtual event types.
-
Distributed event fields for distributed child Assets.
-
Extension event sources for connecting through the Alarm Server—Assets extension.
To configure general settings for alarms and events in Assets:
-
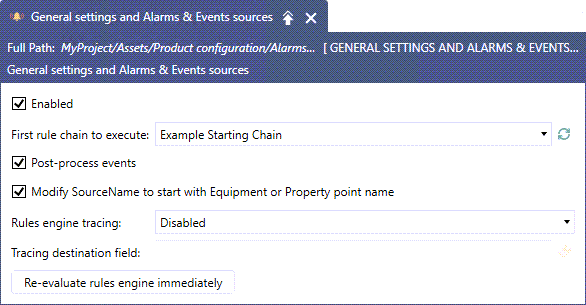
Open Workbench and in Project Explorer, expand your project > Assets > Product configuration > Alarms & Events Settings and double-click General settings and Alarms & Events sources to open the configuration.
-
Select Enabled to enable alarm processing.
-
In First rule chain to execute, select the first set of rules to apply to alarms and event notifications coming into Assets. The drop-down list contains the rule chains defined in Rules. Learn more
To refresh the list, select clear value and/or click
 .
. -
Select Post-process events to process all notifications after exiting the rules engine. Post-processing replaces any relative references and event fields found inside << >> in all text (string) fields. This makes it possible to define them in the alarm source (in Alarm Server, for example) and then have them replaced by Assets.
-
Select Modify SourceName to start with Equipment or Property point name to include the equipment or property name in the SourceName field of alarms subscribed via Assets.
-
In Rules engine tracing, select the level of information generated by the rules engine to be logged in TraceWorX.
-
In Tracing destination field, enter the field on the alarms and events notification to which the trace messages will be added. It must be a virtual field on the subscription.
-
Select Re-evaluate rules engine immediately to run all cached condition notifications through the rules engine again so that they can pick up any changes.
-
Click Apply and continue in the Alarms & Events sources section.
To configure alarms and events sources in Assets:
-
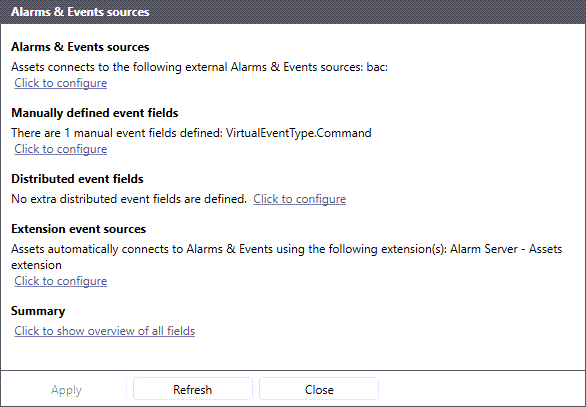
Go to the Alarms & Events sources section of General settings and Alarms & Events sources
(In Project Explorer, expand Assets > Product configuration > Alarms & Events Settings and double-click General settings and Alarms & Events sources.)
Select the Click to configure link for the desired source type.
-
Configure the settings for the selected source type(s), click OK to close the dialog, and then click Apply.
-
Alarms & Events sources
-
In the Alarm Sources panel, click the default bac: source to open its settings. You can see all subscribed fields in the Selected alarm source fields chart.
-
In the Selected alarm source settings section, you can adjust the minimum and maximum severity and select or disable subscriptions to specific event types. By default, all events (Simple, Condition, and Tracking) are subscribed.
-
To add a new alarm source field, select Click here to add a new item in the Selected alarm source fields chart and select the desired event type. The Field name and Type fields are completed automatically.
-
To remove an item, right-click the row and select Delete Item.
To add and remove multiple items, select the Click to browse alarm source fields link in the chart heading. In the right panel of the Select event types and properties dialog, select or clear the checkbox for each desired field. Then click OK.
-
-
Manually defined event fields
-
Select Click here to add new item and in the Field Name column, enter a name to be used in the subscription.
-
In Type, select the type of the field's data (the default is String).
-
Click into the Expression column and enter an expression manually or click
 to create it in the expression editor.
-
-
Distributed event fields
-
In the Alarms & Events sources section in Summary, select Click to show overview of all fields. The Event Fields Overview chart contains all fields fetched from distributed child Assets servers.
-
Click Copy to clipboard for use with distributed event fields, and then click Close.
-
In Distributed event fields, select Click to configure.
-
In the new dialog, click Paste from clipboard to copy the event fields to the chart. Then click OK.
-
-
Extension event sources
The configuration dialog contains a list of all sources provided by the Alarm Server - Assets extension. By default, all sources are enabled. To disable an event source, clear the checkbox in the Included column of the Selected extension details chart. To disable all, clear the Enabled checkbox.
-
Rules
As alarm and event notifications arrive in Assets, they must first pass through a rules engine that serves the following purposes:
-
To assign individual alarms and events to their corresponding assets.
-
To expand alarms with information taken from the assets.
-
To add commands to the alarms.
The rules engine follows defined sets of rules called rule chains. All processing starts in the default chain, selected in the General Settings section. Each rule in a chain is processed in the order that it appears in that chain. This flow can then be changed by individual rules. Chains other than the default chain are processed only if a particular rule changes the flow to that chain.
Each rule has three parts:
-
Condition (defined by an expression).
Rules can be executed conditionally based on an expression, which must evaluate to either True or False. You can use variables in the expressions.
Relative references (such as {{@@self.Description}}) can be used only after the event has been successfully assigned to an equipment or property.
-
Action (for example: Assign to equipment or property; Set field value; Set field to command).
-
Continue with (for example: Go to next rule; Return from sub-chain; Quit).
To add a rule chain:
-
Open Workbench and in Project Explorer, expand your project > Assets > Product configuration > Alarms & Events Settings, right-click Rules, and select Add Rule chain.
-
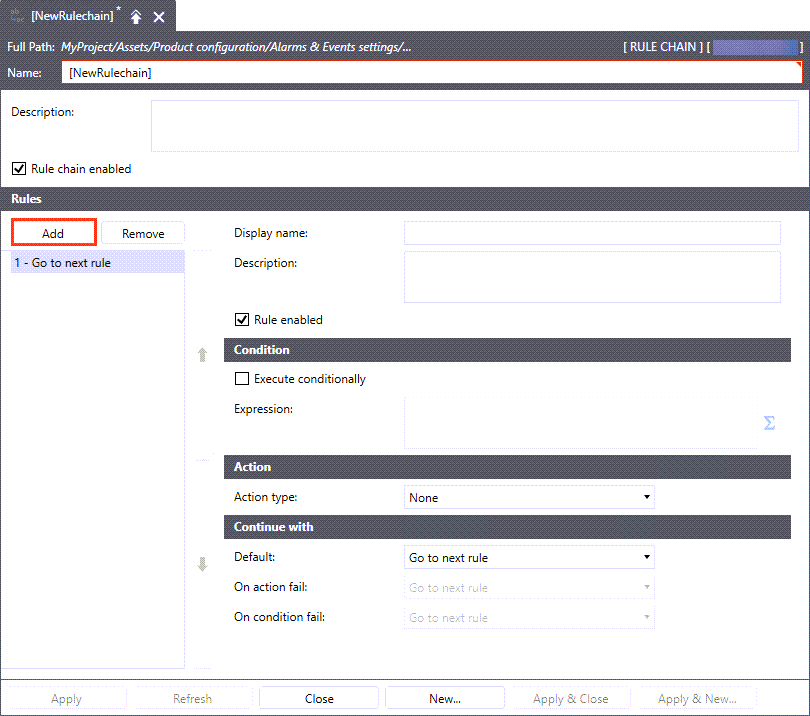
In the new rule chain dialog, enter the rule chain's name and select Rule chain enabled (default). Optionally, add a description.
-
In the Rules section in the left panel, click Add to create a rule in the chain.
-
In the right panel in Display name, enter a name of the rule to be displayed at runtime. Optionally, add a description to distinguish the selected rule from others.
-
Use the Condition section to execute the rule under a specified condition. Select Execute conditionally, and then enter the expression or click
to create it in the expression editor. -
In the Action section in Action type, select one of the available actions, and then configure the additional properties that are displayed for the selected type.
-
None—Used when the rule is only needed to jump to a sub-chain or change the execution flow in another way.
-
Set field value—Changes the value of a field based on an expression. The expression is evaluated, and the value assigned to one of the Alarms & Events fields.
 View exceptions
The following reserved fields cannot be changed:
-
BaseEventType.EventClass
-
BaseEventType.EventType
-
BaseEventType.EventId
-
BaseEventType.SourceName
-
BaseConditionType.ChangeMask
-
BaseConditionType.NewState
Configure the settings
-
In Value destination field, enter the desired Alarms & Events field for the value or click
 to open the Data Browser and navigate to your selected destination field.
 -
In Value expression, enter the expression for calculating the value or click
to create it in the expression editor.
-
-
Set field to command—Assigns a command to a field. You can use a single command as the field value.
Configure the settings
-
In Command field, enter the field to use the command in or click
 to select it in the Data Browser.
 -
In Command, enter the desired command or click
 to select it in the Configure Command dialog and configure the related settings as needed.
You can use event fields and relative references (such as <<@@self/.Description>>) in the command. The syntax uses << and >>, as the references are not resolved in the expression engine, but using string replacement.
-
-
Assign to equipment or property—Used to assign an incoming alarm and event notification to one of the existing assets. You can take the OriginalSource field, split its value by a separator (/ by default), and use the result to look up an equipment or property that matches this path.
Configure the settings
-
In Assign type, select one of the following:
-
By path—Used if an event field contains the asset information in a string form. For example, Company#Foxboro bakery#South. Use the Path separator text box to configure the character used to split the levels in the path.
-
By property realtime data tag—Finds an equipment property by its real-time data tag. If multiple properties match, the assignment will fail.
-
-
In Value expression, enter the expression for calculating the value or click
to create it in the expression editor.
-
-
-
In the Continue with section, select the next step for each of the following outcomes of the rule's execution.
-
Default—The execution completed successfully.
-
On action fail—An action may fail, for example, when the rule tried to assign the event to an asset, but the asset was not found in the configuration.
-
On condition fail—The rule was not executed conditionally, although a condition was set up.
-
-
Repeat steps 3 to 7 to add multiple rules.
To change the order of the rules, select a rule and move it up or down using the arrows at the right side of the left panel. To remove a rule, click Remove at the top of the panel.
When finished, click Apply. The new rule chain appears in Project Explorer in the Rules node.
Counters
Each equipment and property exposes predefined real-time properties. Each counts the statistics for the actual equipment (property) and all its children recursively. The following table lists some predefined examples.
|
Name |
Function |
|---|---|
|
.AlarmActiveUnackedCount |
Number of conditions in the active (alarm) state and not yet acknowledged. |
|
.AlarmActiveUnackedMaxSeverity |
The maximum severity of the above. |
|
.AlarmActiveAckedCount |
The number of acknowledged conditions in the active (alarm) state. |
|
.AlarmActiveAckedMaxSeverity |
The maximum severity of the above. |
|
.AlarmNormalUnackedCount |
The number of conditions that are no longer in the active (alarm) state and not yet acknowledged. |
|
.AlarmNormalUnackedMaxSeverity |
The maximum severity of the above. |
Alarm counters are fully configurable. They have two parts:
-
Condition—Defined by an expression.
-
Counter type—Specifies what to count. Currently, it is either a simple alarm counter or maximum severity.
To add a counter:
-
Open Workbench and in Project Explorer, expand your project > Assets > Product configuration > Alarms & Events Settings, right-click Counters, and select Add Counter.
-
In the new counter configuration dialog, enter the counter's name and select Enabled (default). Optionally, add a description.
-
In Expression, enter the expression for calculating the value or click
to create it in the expression editor. -
In Counter type, select either Simple count or Maximum severity, and then click Apply. The new counter appears in Project Explorer in the Counters node.