WebAPI
WebAPI is used as a server/gateway in conjunction with the Workbench for all third-party components that use the REST API. WebAPI provides the framework for the following ICONICS applications:
- CFSWorX mobile health and integration with third parties
- KPIWorX support for Apple Watch
- Web Login with External Identity Providers (OIDC and SAML 2.0)
- Voice Machine Interface (VMI) and Text Machine Interface
Additionally, WebAPI provides a REST endpoint for retrieving data points from the FrameWorX server and its point managers. The WebAPI REST endpoint is secured by OAuth 2.0, and supports writing to points. Also, note the OData Connector service and its endpoint is still functional. Reference the REST and OData Overview topic for additional information.
An example REST URI for the Web API service would be:
http://localhost/fwxapi/rest/data?pointname=svrsim:sine double med -100 100
The Windows service associated with the WebAPI is the ICONICS WebAPI Service (IcoWebAPIService). This service must be running to support the REST endpoint and the aforementioned other features.
WebAPI can be used in property configuration for ICONICS applications' use with multiple providers, including Amazon Alexa, Microsoft Bot, and Google. Using this tool, users are able to set Providers' settings (values) as well as perform JSON Configuration File Actions.
Configuring ICONICS WebAPI Service
Installation
- HTTPS: You must configure HTTPS binding in IIS. Seehttps://docs.microsoft.com/en-us/iis/manage/configuring-security/configuring-ssl-in-iis-manager.
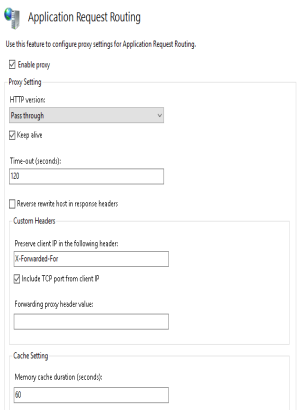
(Optional) Url Rewrite: On the IIS server configured for Url Rewrite, disable Reverse rewrite host in response headers in Application Request Routing > Server Proxy Settings.
Platform Services
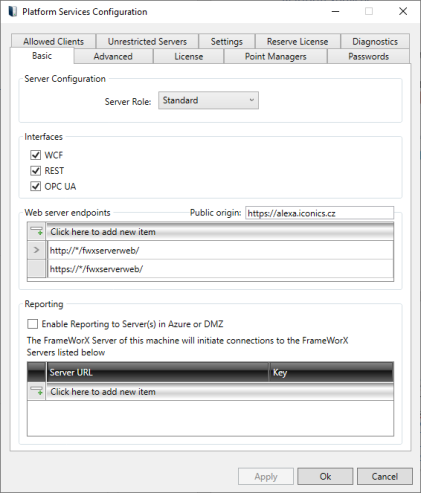
In Platform Services, make sure you fill in the Public origin with the protocol and host name where the service will be accessible from the outside. This step is important, because the IdentityServer must be able to provide endpoint discovery at https://<host_name>/fwxserverweb/security/.well-known/openid-configuration.
Security
Open Workbench.
Select Security and double-click Global Settings and select the Web Login tab.
From the Web Login tab, select Enabled and then select a certificate. This step is important; otherwise, all issued tokens become invalidated once the FrameWorX server is restarted. See Global Settings for specific guidelines.
Add Relying parties by right-clicking OIDC Relying Parties and selecting Add OIDC Relying party). See OIDC Relying Parties for more information.
 Each service has different configuration,
the OIDC
Relying Party must be configured for each service individually.
Each service has different configuration,
the OIDC
Relying Party must be configured for each service individually.
- Add users to the Security. See Users and Groups.
Providers
Providers, as they are explained below, pertain to the Voice Machine Interface configuration within GENESIS64.
To Add a Provider:
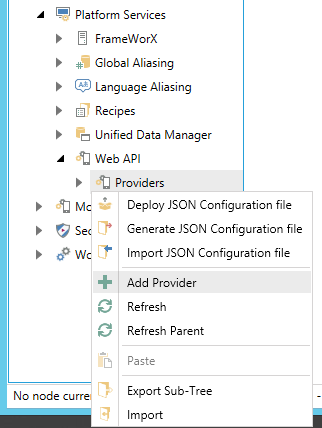
Expand your project in the Project Explorer, then expand the Platform Services node and then the Voice Machine Interface node.
Right-click on the Providers node, then click on Add Provider, as shown below.
Adding a Web API Provider from the Project Explorer
This opens the Provider properties window in the Workbench, as shown below. Enter a name for the Provider in the Name text entry field.
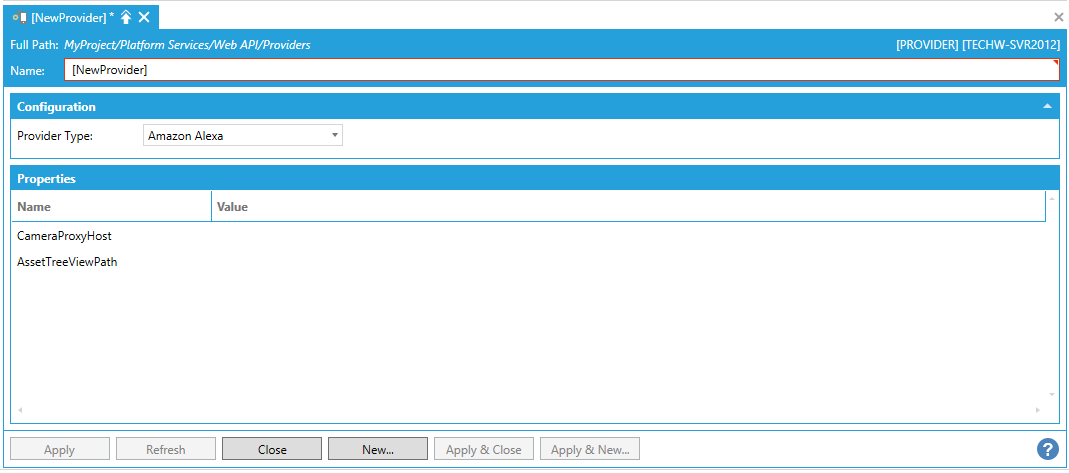
Configuration
- Provider Type - Use the pulldown menu to select from Amazon Alexa, Microsoft Bot, or Google. Notice that changing the Provider Type will load its own corresponding set of Properties in the bottom section of the window.
Properties
Select the Provider Type from the drop-down list, and then enter values for associated properties.
- Amazon Alexa. Select the CameraProxyHost and AssetTreeViewPath and enter the appropriate data values.
- Microsoft Bot. Select the LuisAppVersion, LuisEntityDeviceID, LuisEntityDeviceName, LuiseEntitySceneID, LuisUrl, LuisEntitySceneName, and AssetTreeViewPath and enter the appropriate data values.
- Google. Select the AssetTreeViewPath and enter the data value.
- Click Apply and Close to save your Provider properties. Your new Provider will now appear beneath the Providers node in the Project Explorer.
JSON Configuration File Actions
Deploy JSON Configuration file. This option deploys a JSON configuration file to a target machine. Deployment can be done by exporting the configuration JSON file from the Workbench and replacing the one in C:\Program Files\ICONICS\Genesis64\WebSites\IcoWebAPIService.
Generate JSON Configuration file. This option exports a provider into a JSON configuration file.
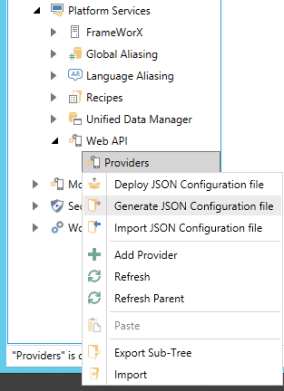
- Expand your project in the Project Explorer, then expand the Platform Services node and then the Web API node.
- Right-click on the Providers node, then click on Generate JSON Configuration file, as shown below.
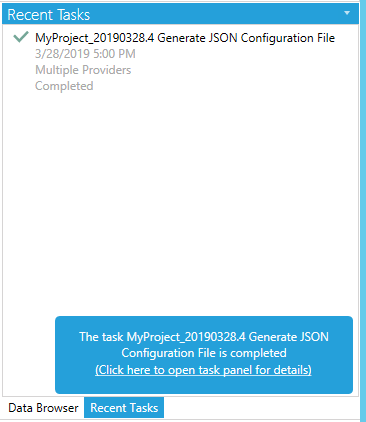
The Workbench will generate the JSON Configuration file and show the results as they are generated in the Recent Tasks section on the right side of the Workbench, as shown below.
Once generated, you can perform multiple actions, as shown in the image below. Click on Download generated file.
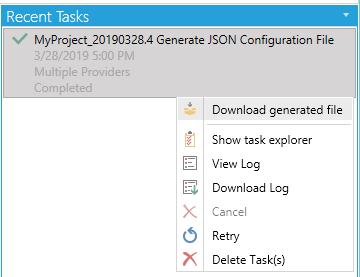
- This opens the Save As window, where you can decide where you would like to save your generated JSONConfiguration File (in compressed [zipped] file format).
Import JSON Configuration file. This option imports a provider from a JSON configuration file.
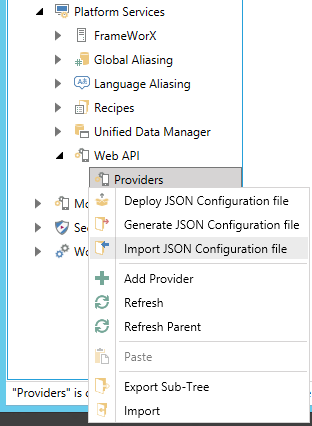
- Expand your project in the Project Explorer, then expand the Platform Services node and then the Web API node.
- Right-click on the Providers node, then click on Import JSON Configuration file, as shown below.
This opens the Import Configuration window, as shown below.
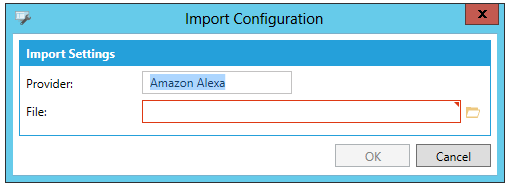
Provider - Enter the Provider type (Amazon Alexa, Microsoft Bot, or Google) in the text entry field.
File - Enter the location of the JSON Configuration file in the text entry field that you wish to import or click on the
 button to open a file
browser to navigate to your selected JSON Configuration
file to import.
button to open a file
browser to navigate to your selected JSON Configuration
file to import.
Click OK to finalize your settings and return to the Workbench.
See Also:
Support for Standard and Historical Datasets
Support for Swagger