Configure Security in Runtime
 Common security administrative functions in GraphWorX™64
displays or other Runtime areas require permissions. See Password Authorization in GraphWorX64. Privileges define what applications a user or group of users can access. Access to application permissions is located in the Workbench under Security > Users or Groups in the Application Actions section. See Global Settings for information.
Common security administrative functions in GraphWorX™64
displays or other Runtime areas require permissions. See Password Authorization in GraphWorX64. Privileges define what applications a user or group of users can access. Access to application permissions is located in the Workbench under Security > Users or Groups in the Application Actions section. See Global Settings for information.
However, the following information is not related to standard ICONICS login or password authorization dialogs. Data sets and the configure security function allow system designers to create their own interfaces and perform common security administrative functions in GraphWorX64 displays or other run-time areas.
Data Sets
Use the data sets under Diagnostic > Configuration > Security to display the current security configuration information. The data sets are secured using the same application actions that control whether a user can browse, edit, or delete security items. There are two data sets—one to show security groups and another to show security users:
- SecRole - All
– This dataset contains information about all groups in the security
configuration.
Example tag name: cfg:entities/readall<SEC,SecRole> - SecUser - All
– This dataset contains information about all users in the security
configuration.
Example tag name: cfg:entities/readall<SEC,SecUser>
You can display these data sets in a GridWorX64 Viewer or table control. More advanced users can select individual data set cells to display in a process point and leverage the clone dynamic in GraphWorX64 to create more customized views. Data sets are secured using the same application actions that control whether users can browse, edit, or delete security items.
Configure Security Command
The user executing the Configure Security command must have administrator permission for the security configuration (configured on a user or group and permission to execute the command.
The Configure Security command performs several different functions, based on the assigned Action parameter value:
- CreateUser Creates a new security user with the given username, group, policy, and password.
- ChangePassword Changes the password of the given security user.
- AddUserAdds a security user to a group.
- RemoveUser Removes a security user from a group.
The Password parameter for CreateUser and ChangePassword must be checked against a policy and the policy associated with a given user—these actions accept both a plain text password and a password hash, depending on the IsPasswordHash dynamic behavior property. See the Commanding - Configure Security topic for more information.
The CreateUser, AddUser, and RemoveUser actions can only work with one group at a time. To add a user to multiple groups, use the Batch command and call the Configure Security command multiple times.
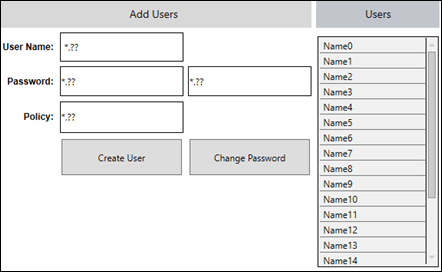
The following is an example to shows how to create a GraphWorX64 display allows a security administrator to create a new user and change the password.. ![]() View example
View example
 Use Advance Mode in display design (View tab > Application Mode > Advanced Mode).
Add three text labels to a GraphWorX64 display, and then identify the Data Source to local variables in the Dynamics properties pane:
- User Name: localsim::user:String
- Password: localsim::hash:String
Policy: localsim::policy:String
- Add a button and label it, Create User, and then set the button's pick action with the following command parameters:
- Command: Select Configure Security
- Action: Select CreateUser
- User Name: Enter {{localsim::user:String}}
- Group: Enter {{localsim::group:String}}
- Policy: Enter {{localsim::policy:String}}
- Password: Enter {{localsim::hash:String}}
IsPasswordHash: Set to True
When the IsPasswordHash is set to True, the password parameter for the Configure Security command expects a hashed password—password policies are not used because a hashed password cannot be inspected. If set to False, the password parameter is contains plain text and all policies are applied—the plain text password is transferred to the server through the encrypted channel. - Add a button and label it, Change Password, and then set the button's pick action with the following command parameters:
- Command: Select Configure Security
- Action: Select ChangePassword
- User Name: Enter {{localsim::user:String}}
- Password: Enter {{localsim::hash:String}} or
- IsPasswordHash: Set to True
- Add a GridWorXViewer control.
Double-click the grid to display the Configure Control window.
Select the Grid object and then set the source data tag to cfg:entities/readall<SEC,SecUser>.
Click Close and then Save the display. .
For best results, confirm that your currently logged-in user has the proper permission to create users with this command. Go to Workbench >Security > Users and / or Groups. Refer to Users and Groups for additional information.
Return to GraphWorX64 and go into Runtime.
The GridWorX Viewer populates with the current users in your security configuration.
Enter values into the process points. Group and Policy must match existing group and policy names in your security configuration. Here are some example values:
Username: Test
Policy: Leave blank to use the default security policy.
Password: Ensure the password is consistent with the policy's password complexity rules.
Select Create User.
Refresh the GridWorX Viewer. If the user has been created successfully, it should now show in the list of users. You should also be able to see the user in Workbench, after refreshing the list.