Add a 3D Size Dynamic to a Selected Object
In GraphWorX64, a size dynamic changes an object's size during runtime based on the data source or animation feature that you specify. To add a size dynamic to an object in a 3D viewport:
-
Select the object you are adding the dynamic to.
-
Click the
 Size button
 on the Position section on the Dynamics ribbon. This creates a Size dynamic for the object.
 -
On the Properties tab, use the
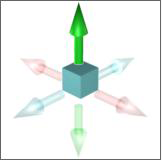
SizeMode property to specify the directions in which the object’s size is to change. The colors on the icon match the colors on the viewport’s x-, y-, and z-axis legend. By clicking the arrows, you identify the axes and directions in which the objects are to resize. The directions you choose will display in the SizeMode field as Up, Down (x-axis); Left, Right (y-axis); and Back, Front (z-axis).

Size Dynamic Properties for 3D
The ![]() Size dynamic’s properties for 3D are similar to its properties for 2D, although there are some differences to accommodate the 3D environment. (For 2D Size dynamic properties, refer to Size Dynamic Properties for 2D.) Properties for 3D are:
Size dynamic’s properties for 3D are similar to its properties for 2D, although there are some differences to accommodate the 3D environment. (For 2D Size dynamic properties, refer to Size Dynamic Properties for 2D.) Properties for 3D are:
-
Name, Description, and CustomData
-
DataSource is the source of data for the Size action. Click the ellipsis button
 to open the Data Browser, where you can select a tag. You can also create Expressions in the Data Browser.
 -
LowLimit is the lowest boundary (if any) for use with the ActiveWhen property.
-
HighLimit is the highest boundary (if any) for use with the ActiveWhen property.
-
ActiveWhen—Select the discrete range of values that will make animation occur during runtime. Choose one of the following expressions, then use the LowLimit and/or HighLimit properties to specify any low or high limits that are required.
-
AnimationMode—Choose one:
-
-
Analog animates the selected object’s change in size based on continuously changing values provided by an OPC tag.
-
Discrete animates selected object’s change in size based on time-based movie-like animation you specify for the object.
-
-
StartPercent, EndPercent—Use these fields to limit the amount of change in the object. By default the size can change as little as 0% and as much as 100%. StartPercent identifies the object’s starting magnitude; EndPercent identifies the object’s ending magnitude.
-
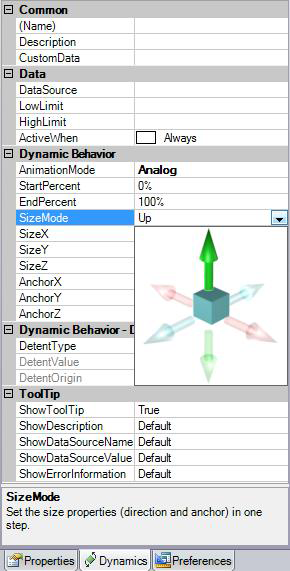
SizeMode has a
graphical indicator for specifying the direction in which the object’s size will change at runtime. This indicator appears when you click the drop-down list. The arrow that is not dimmed is the direction the object's size will change at runtime. To make the object resize in a particular direction, click the arrow for that direction; when an arrow is highlighted then the object will resize in that direction. Clicking on an arrow toggles it between the highlighted and non-highlighted states.
The dimensions you choose for the SizeMode property are reflected in the following Size and Anchor properties. You can set these six properties individually, or you can just click the arrows in the SizeMode property:
-
-
SizeX—True when one or both of the red left/right arrows is highlighted; False when both are unhighlighted.
-
SizeY—True when one or both of the green up/down arrows is highlighted; False when both are not highlighted.
-
SizeZ—True when one or both of the blue forward/backward arrows is highlighted; False when both are not highlighted.
-
The following fields use percentages (0% to 100%) to identify the anchored point of the object. The anchored point is the point that does not move when the object changes size.
-
AnchorX—0% anchors the left side of the object; 100% anchors the right side of the object; 50% anchors the x-axis of the object at the object’s center.
-
AnchorY— 0% anchors the bottom of the object; 100% anchors the top of the object; 50% anchors the y-axis of the object at the object’s center.
-
AnchorZ—0% anchors the back of the object; 100% anchors the front of the object; 50% anchors the z-axis of the object at the object’s center.
-
If you want the object to size incrementally, use the Detents section. (This section is available only if the AnimationMode is Analog.) In the DetentType property you can specify increments in one of two ways:
-
-
A total number of increments for the object to resize to. Set the DetentType to Number of Detents, then specify the total number of increments to be used in the DetentValue property.
-
A delta by which the object will resize. Set the DetentType to Delta Value, then specify the number by which the incremental value by which the object’s size will change. For example, if you want a thermometer to change every 5 degrees starting at 35 degrees, set a DetentValue to 5, and the DetentOrigin to 35.
-
-
Dynamic Behavior-Discrete section contains a number of options for controlling discrete behavior. For more about the properties in this section, refer to Animation Mode for 3D Dynamics. Properties are: StartDelay, Duration, SkipInitialDuration, AccelerationRatio, DecellerationRatio, AnimateWhenTrue, ReverseAnimateWhenFalse, AutoReverse, RepeatCount, FillBehavior, and FreezeWhenNotAnimating.
-
Tool Tips—To add information about the dynamic to the object’s runtime tool tips, see Tool Tips.
See also:
Position Section of the 3D Dynamics Ribbon