Adding a Worker
A worker is a person that Connected Field Service can contact when sending a notification. Workers can be defined directly in the local worker database or imported from Active Directory, Microsoft Entra ID, or a maintenance management system. This topic covers adding a worker to the local database, which is the Local-Default source created with the installation. For using third-party derived worker lists, see integrating with a CMMS.
To add a worker to the local worker database:
-
Open Workbench. In Project Explorer, expand your project > Alarms and Notifications > Connected Field Service > Workers, right-click Local-Default, and select Add User.
-
In the new worker dialog, enter the worker's name.
-
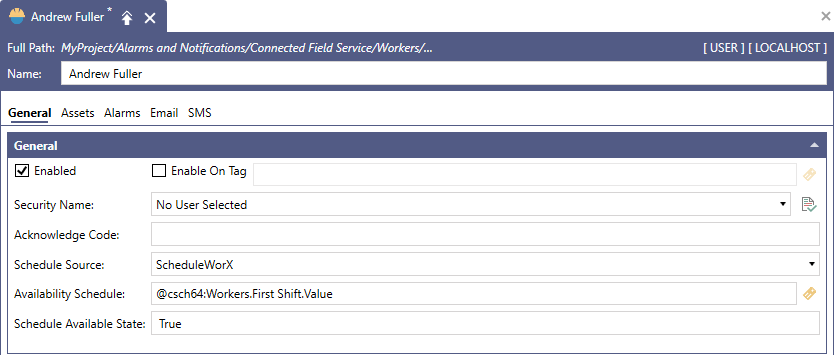
On the General tab, do the following:
-
(Optional) In Security Name, select the GENESIS security user that identifies this worker. This is required if the worker's mobile device is to report health and location, or if they are to acknowledge alarms from a message. Learn more
-
(Optional) In Acknowledge Code, enter the code this worker quotes when acknowledging an alarm. Leave it empty to use the code set on the workflow configuration. Learn more
-
Set when the worker is available:
-
In Schedule Source, select ScheduleWorX to use a GENESIS schedule or select the maintenance system if the worker's calendar is held there.
-
In Availability Schedule, browse for the schedule that describes the worker's shift.
-
In Schedule Available State, enter the schedule state that counts as available. It must match one of the availability states defined in that schedule. Learn more
-
-
-
On the Email tab, select Click here to add new item, enter the worker's Address, and select Enabled. Add a row for each address at which the worker can be reached.
-
On the SMS tab, add the worker's telephone numbers in the same way. These numbers are used by the Send Sms, Send Voice Message, and Send WhatsApp activities.
-
When finished, click Apply.
What's Next?