Customizing Equipment Hierarchy
By default, Assets implement the ISA-95 equipment hierarchical structure. However, you can customize the hierarchy in the Assets configuration, including the option of not using any hierarchical structure at all.
Using a fixed hierarchical structure has its benefits, but it can also be limiting, since it only allows you to add equipment of a certain type under the defined level. For example, if the structure is Enterprise > Site > Area, you cannot add an Area directly to the Enterprise level. Therefore, you have the option to remove the entire equipment hierarchy and use the equipment classes structure as a template instead.
To override the default equipment hierarchy:
-
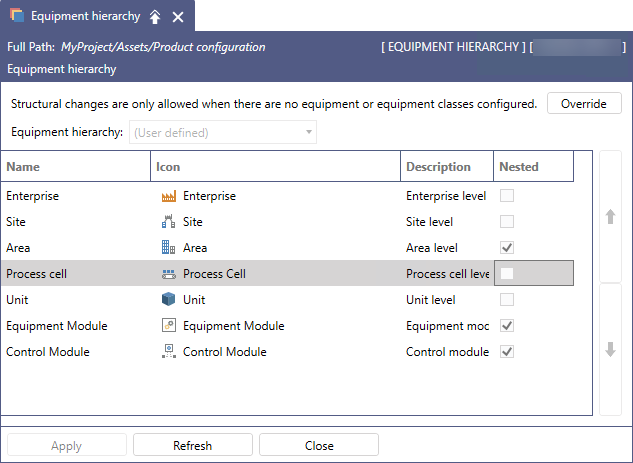
Open Workbench and in Project Explorer, expand your project > Assets > Product configuration, and double-click Equipment hierarchy. This opens the default (or currently used) list of equipment hierarchical levels.
-
Click Override at the top of the dialog to enable editing.
-
In Equipment hierarchy, select the type of structure that you want to use. For full edit options, select User defined. The other types (Batch Production, Building Automation, and Discrete Manufacturing) are predefined, and only allow you to change the icon for each level.
-
For a user-defined structure, edit the equipment hierarchy table as desired. You have the following options:
-
Customize an existing tier:
-
To move the tier up or down the structure, select the desired item, and then use the arrows on the right.
You cannot move a tier if equipment is defined for that tier in the asset tree.
-
To edit the name or description, click into the text box in the respective column and enter the desired text.
-
To replace the default icon, click in the field in the Icon column, and then select the desired icon from the drop-down list of previously configured images. If you want to use a custom image, you must first define it in Assets > Product configuration > Images. Learn more
-
To enable creating multi-level structure of the tier (for example, several levels of Area), select the checkbox in the Nestled column.
-
-
Add a new tier:
-
Above the hierarchy table, select Click here to add new item. A new row is added to the table.
-
In the Name column, enter a name that clearly identifies the tier of the equipment hierarchy. Optionally, add more details to the Description column.
-
In the Image column, select the desired icon from the drop-down list of previously configured images. If you want to use a custom image, you must first define it in Assets > Product configuration > Images. Learn more
To add another row, click on an existing row (other than the one you have just created. This enables the Click Here to Add New Item link.
-
-
Remove a tier or the entire hierarchy:
-
To remove a tier, select the entire row by clicking in the
 column and press Delete.
 -
To remove the entire equipment hierarchy, delete all rows.
-
-
-
When finished, click Apply to save the settings.
Applying the changes deactivates editing. If you want to make more edits, click Override again.