Adding an Equipment Node
In Assets, each node in the asset tree represents a piece of equipment, a building, a location, or some other form of asset or identifier that represents the assets in the tree. You can add a new equipment node to your assets and configure it in Workbench.
To add an equipment node to the asset tree:
- Open Workbench and in Project Explorer, expand your project > Assets > Equipment. Right-click the desired equipment on any level of the structure (including the Equipment root level), and select Add Equipment.
-
In the new equipment configuration dialog, enter the equipment's name. Optionally, enter a display name and description. Click
 to use language aliases.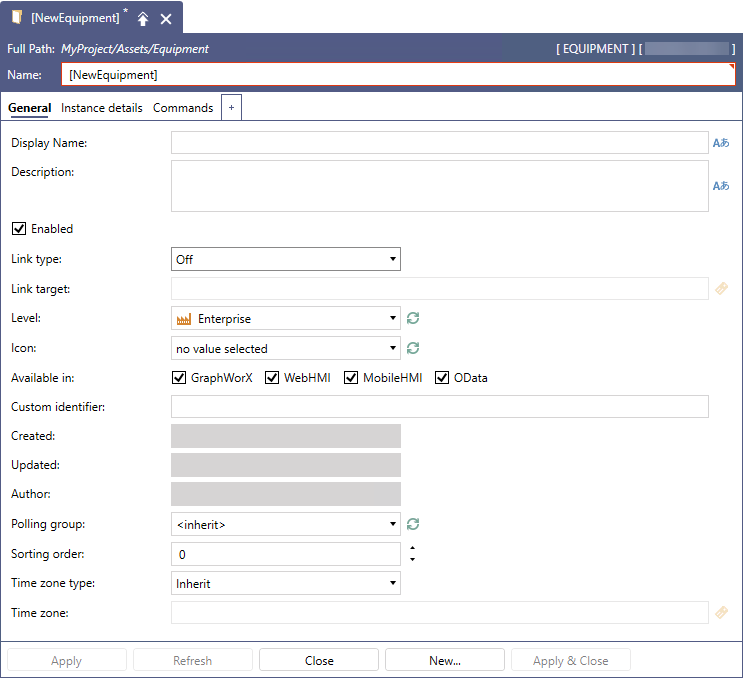
- Make sure the Enabled checkbox is selected, which indicates that the equipment is active, and that data is being collected for it. Clear the checkbox if the equipment is not active, or if you do not currently want to collect its data.
-
In Link type, select Off.
The Assetsand Tunnel (limited) options allow you to create an external link to an asset on another machine that is connected via your FrameWorX network. Learn more
-
Complete the remaining General tab settings, and then click Apply.
Setting Name
Description
Level
Indicates the equipment node's level in the asset tree. For most items, you cannot change the level that you have determined by selecting the parent equipment node in step 1. However, if the level of the parent equipment can be nested, you must choose which level the equipment belongs to: the level of the parent or the next level down.
Icon
Select the icon for the equipment's node to display in the asset tree.
Available in
Select the components in which the selected item will appear. These currently include GraphWorX, WebHMI, MobileHMI, and OData.
Custom identifier
Enter the code or ID used for the equipment in an external system. This field is required if you are collecting equipment data from an external or legacy system. You can use alphanumeric characters of any type, including special characters. The identifier is case sensitive.
If you do not enter the equipment's identifying code or ID from the external or legacy system, no information will be available for the equipment.Polling group
Select the polling group that will include the selected asset.
Sorting order
Select the parameter to use for sorting assets.
Time zone type
Select one of the following:
- Inherit: The selected asset inherits the time zone for any parent-level asset or pre-set time zone.
- As specified: Set your preferred time zone in Time Zone.
Time zone
If you have selected As specified in Time zone type, enter a time zone in the text entry field or click
 to select your preferred time zone in Data Browser.If the equipment node was created using an equipment class and this or other fields contain aliases (that is, variables that are surrounded by /? and ?/), you can replace the aliases with values that are appropriate for this equipment node by instantiating the aliases. Learn more
 - On the Instance details tab in Equipment class, click the <none> link to open the Equipment Class Library dialog, select an equipment class for the instance, and click OK. This populates the section below with the selected equipment class' Parameter Name, Default Value, Parameter Description, Value, and Description.
-
(Optional) On the Commands tab, add commands to the equipment's runtime menu (available through right-clicking an equipment node at runtime).
- In the left panel, click Add to display the command settings form on the right.
- In Command, select one of the pre-configured commands from the drop-down list, and then complete the settings for the selected command.
- Repeat for each command (runtime menu item), and then click Apply.