SNMP Explorer/Edit Network Settings
The SNMP Explorer appears in the right-side pane of the Workbench once you begin to either edit the default network or create a new network.
SNMP Explorer Window - Editing SNMP Network Settings
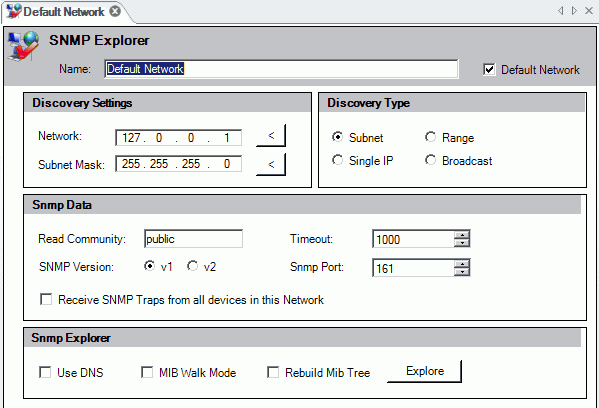
From here, you can change the main settings to optimize the Network discovery.
-
In the DiscoverySettings, you can input a Network IP address or Subnet Mask or use the left-facing arrow buttons to choose from previously-defined data (like all the subnet masks available or the IP addresses of the local machine).
Under Discovery Type you can:
-
Search all the SNMP-enabled devices within a Subnet,
-
Use a Single IP address to locate a single device through SNMP,
-
Search between a Range of two IP addresses (for example, from 192.168.1.1 to 192.168.10.255), or
-
Locate devices via Broadcast method.
In the Snmp Data settings, you can edit the following:
-
Read Community - This is a kind of password that allows you to access all the agents where the very same community is set. In other words, the devices that have a different Read Community from the one set in the dialog will not be shown after the Network Discovery.
-
Timeout- The discovery function will discard all the devices that answer after this timeout. You can set a different timeout for the SNMP requests (for example, because the SNMP agent speed is lower than the device speed to the ping requests).
-
SNMP Version - You can select from either SNMP v1 (the standard version) or v2 (an update to the original version that includes additional features). The latest "v3" is not yet fully supported by SNMP Connector.
-
SNMPPort- The discovery tries to connect through this port to retrieve SNMP data.
-
You also have the option to Receive SNMP Traps from all devices in this Network. Check or uncheck this option as you desire.
In the SNMP Explorer settings, you can edit the following:
-
Use DNS- Use this check box to show the names of the devices instead of their IP addresses.
-
MIB Walk Mode - MIB Walk produces a list of all supported MIBs and OIDs with current settings for each OID
-
Rebuild MIB Tree- When the data are collected through SNMP Explorer, all the information is stored in the SNMP tree. You can organize the data like a standard MIB tree by checking this check box. Otherwise you will organize the data by creating your own folders.
Click the Explore button to start the discovery of the network. A new dialog box appears with all the devices found.
SNMP Explorer with Results
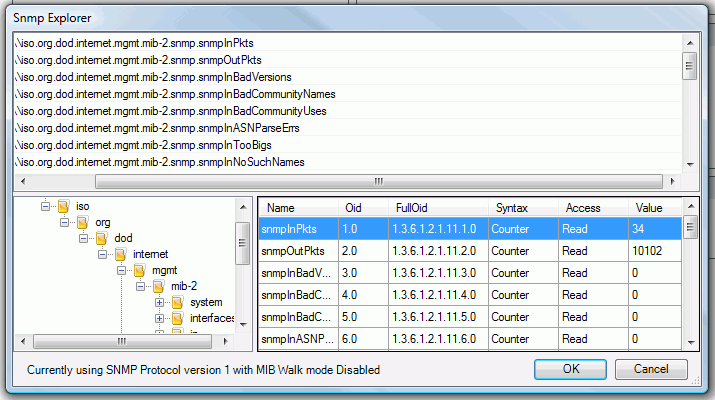
You can explore the information stored in every device by expanding the device tree. The SNMP Explorer can provide real time information coming from the devices. The MIB Items tree provides the organization of the data, while the device itself gives the data.
To be more precise, the Device tree is the instantiation of the MIB Items tree. When you load a MIB file into the MIB Items tree, you define the structure of a new branch of the tree that will be visible in all the devices where that branch is implemented. Without such information, the Device tree will have a simple tree form where the branches are numbers (and it is impossible for anyone to understand what they mean).
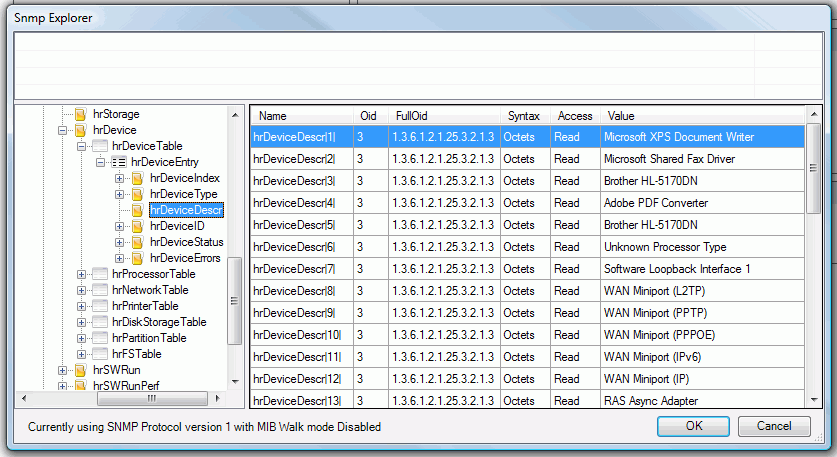
To make the link between the MIB Items tree and the Device tree, here is a simple example. In the figure below is a branch of the Device tree from SNMP Explorer that includes all the information about the devices installed on a machine.
Branch of the Tree in SNMP Explorerwith Loaded MIB Items Tree
If you delete all the information from the MIB Items tree, the result is similar to what is shown in the figure below. See howthe branches are numbered in a way that is not helpful.
Branch of the Tree in SNMP Explorer - MIB Items Tree is not Loaded

Now that you can see why the information must be organized through the MIB Items tree, let's see how the information is organized. There are three kinds of information stored in a device:
-
Scalar Values
-
Arrays
-
Tables
Scalar Values
These are the simplest type of information that can be found. Every value has its own specific name and it is easily recognizable because its OID ends with ".0".
Usually, these objects contain particular information about the device, such as the system uptime, the device description, or the number of running processes. A simple set of scalar values in the "iso.org.dod.internet.mgmt.mib-2-system" folder is shown in the figure below. You can add a tag connected to the scalar value by double-clicking on it. The SNMP tag will be imported into the SNMP Connector, and you can retrieve it by using the Unified Data Browser.
Scalar Values

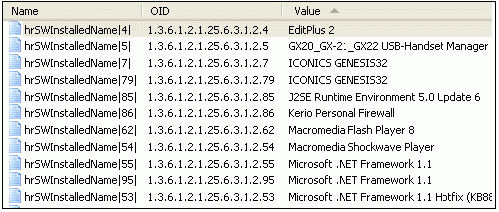
Arrays
If you think about information like the software installed on a machine or like the processes running, you understand that it is impossible to store them into scalar values. In fact, arrays are used to show this information. The name is the same for all the objects, but it is followed by an index that is unique to every object, and it is coming from the last part of the OID. In the figure below is an example of an array for all the software installed on the machine. The object hrSWInstalledName|4| is the fourth element of the array, and its OID ends with a ".4".
Array Values
In this case, the index of the array is an integer ("4"), but in SNMP, the index of an array can be also composed by an IP address, a string, an integer, or a combination of these objects. These indexes are called conceptual rows. It is not important to understand the full meaning of this because SNMP Explorer automatically recognizes the index of an array and shows it to you in a user-friendly way. In the example below, the array contains the UDP connections of the machine, and the index is composed by an IP address and an integer.
|
|
Note: The separator for the indexes is the pipe character " | ", and this identifies the SNMP indexed data within the GENESIS64 suite. |
Array Values with Complex Indexes
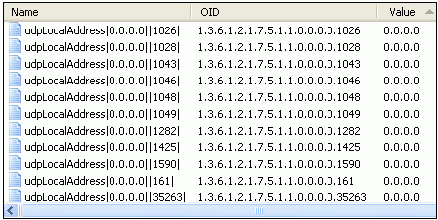
As you can see, the IP addresses and the integers are easily recognizable both in the name and in the end of the OID of the object (as well as a simple integer). You can add the single element of the array to the tags selected by double-clicking on it.
The main problem with this kind of information is that part of the OID (which is the address of the information) is "hard coded" into the names. If the addresses change, the names change, too. So if you try to retrieve the information using the old names, the information is no longer available because the names are old. For example, if the UDP connection on port 1026 is closed, the tag "udpLocalAddress|0.0.0.0||1026|" is not available anymore.
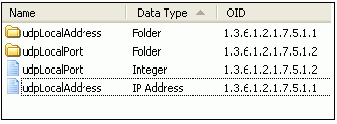
However, the solution to this problem is simple. The arrays are usually contained in a folder that has the same name (but without indexes). Associated with each folder is a special tag that has the same name as the folder. Selecting this tag adds the entire array to the SNMP Configurator. Then, in GraphWorX64 (for example), it becomes possible to select the array and manage it as a normal array.
Array Tags Associated With the Arrays
Tables
Tables are no more than sets of arrays. The table simply carries the information about the conceptual rows and about the type of the arrays. Every table contains a special object called "Entry" that contains the arrays. While the arrays represent the columns of the table, the entry represents its rows. Like the arrays, there are tags associated with the tables that allow you to select the entire table.
Entry Contains All the Columns of the Table, Which Are Arrays
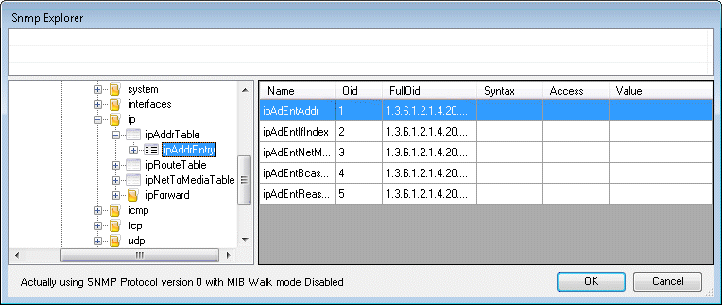
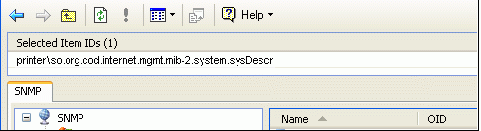
For example, let's try to retrieve the system description from the printer. Since "sysDescr" is a standard information, you can try this example with every SNMP-enabled device (not just the printers). To do this, click on the printer and then expand the tree to reach "sysDescr". Its path is "iso.org.dod.internet.mgmt.mib-2.system.sysDescr". Leaving the mouse on "sysDescr" shows a tooltip with all of the information that is available for "sysDescr" (the information comes from the MIB Items tree). Most of the information is also shown in the list view on the right pane.
Tooltip Shows All the Information About the Object

Select the "sysDescr" tag by double-clicking on it. It displays on the top of the SNMP Explorer. Click OK to send the selected tag(s) to the SNMP Configurator.
Selecting the Tag in the Unified Data Browser
Now in the SNMP Configurator, the SNMP tree is not empty anymore. The SNMP OIDs of the device are automatically converted into GENESIS64 SNMP tags. These two objects are similar (same name, same FullOID, same type...), but while the SNMP OID is stored in the device and it is unreachable by GENESIS64 applications, the SNMP tag is visible in the ICONICS Unified Data Browser and can be employed in every GENESIS64 application like a normal OPC tag.
SNMP Tags in the Configurator

There is a new device (directly imported from the SNMP Explorer) and the "sysDescr" item is placed under it. You can rebuild all the folders that contains sysDescr in the Explorer ("iso", "org", "dod", "internet", "mgmt", "mib-2", "system") by checking the Rebuild MIB tree check box. The result is shown in the figure below.
MIB Folder Structure Rebuilt in SNMP Tree

While this function is useless for one item only, it is useful for auto-organizing data when you import hundreds of OIDs from SNMP Explorer.
See also: