SNMP Settings
Once you have defined the MIB translations, you can explore your network to retrieve data. The SNMP tree control in the SNMP Connector in GENESIS64's Workbench enables you to set up your SNMP devices and data items (SNMP tags). To configure general SNMP settings, select the SNMP Tree Control, as shown in the figure below. From here you can set the IP Range (for example, from 192.168.1.1 to 192.168.10.255) or the subnet (255.255.255.0) or a single IP address. These settings will specify the range of IP addresses that you will scan. You can use DNS to set an SNMP timeout different from the Ping Timeout.
The data that you see under the SNMP tree are exactly the same data you will see in the Unified Data Browser when you will need to select an SNMP tag. Every item here is an SNMP tag and acts like a normal OPC tag when browsed from GENESIS64 applications. You can use SNMP data tags in the same places you use OPC tags.
SNMP Settings
Configure the following SNMP Settings:
-
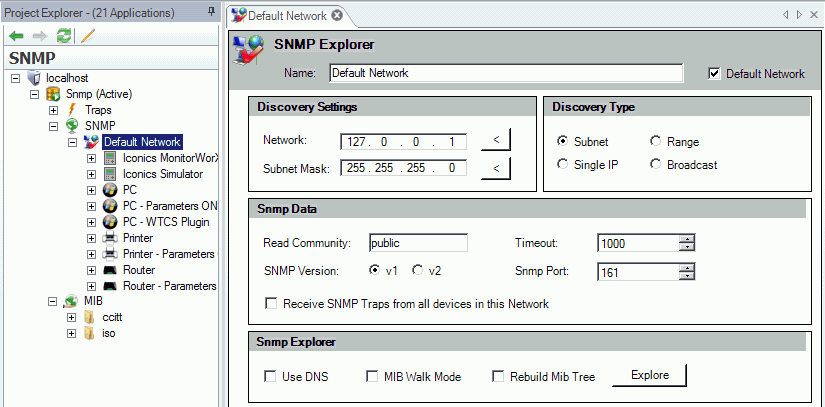
In the DiscoverySettings, you can input addresses based on the Discovery Type (Subnet, Single IP, Range or Broadcast) or use the left-facing arrow button(s) to choose from pre-defined data (like all the subnet masks available or the IP addresses of the local machine).
Under Discovery Type you can:
-
Search all the SNMP-enabled devices within a Subnet,
-
Use a Single IP address to locate a single device through SNMP,
-
Search between a Range of two IP addresses (for example, from 192.168.1.1 to 192.168.10.255), or
-
Locate devices via Broadcast method.
In the Snmp Data settings, you can edit the following:
-
Read Community - This is a kind of password that allows you to access all the agents where the very same community is set. In other words, the devices that have a different Read Community from the one set in the dialog will not be shown after the Network Discovery.
-
Timeout- The discovery function will discard all the devices that answer after this timeout. You can set a different timeout for the SNMP requests (for example, because the SNMP agent speed is lower than the device speed to the ping requests).
-
SNMP Version - You can select from either SNMP v1 (the standard version) or v2 (an update to the original version that includes additional features). The latest "v3" is not yet fully supported by SNMP Connector.
-
SNMPPort- The discovery tries to connect through this port to retrieve SNMP data.
-
You also have the option to Receive SNMP Traps from all devices in this Network. Check or uncheck this option as you desire.
In the SNMP Explorer settings, you can edit the following:
-
Use DNS- Use this check box to show the names of the devices instead of their IP Address.
-
MIB Walk Mode - MIB Walk will produce a list of all supported MIBs and OIDs with current settings for each OID
-
Rebuild MIB Tree- When the data are collected through SNMP Explorer, all the information will be stored in the SNMP tree. You can organize the data like a standard MIB tree by checking this check box. Otherwise you will organize the data by creating your own folders.
See also: