Microchart Configuration for Smart Tile
The Smart Tile Template provides users with the option to create and configure a Microchart (in the TILE - CONTENT settings). Selecting "Microchart" and then clicking the Configure button opens the Microchart Configuration Window, shown below.
Microchart Configuration Window
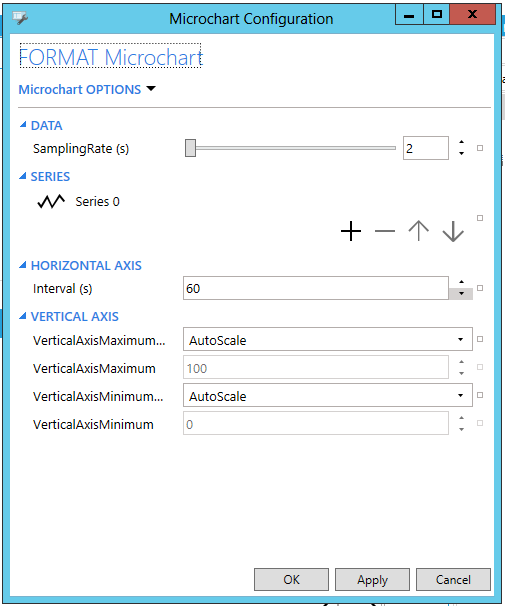
Microchart OPTIONS - This setting becomes a pulldown menu when you add Series, allowing you to switch between settings pages.
DATA
-
Sampling Rate - Use the slider or enter your preferred sampling rate in the text entry field, or use the up/down arrows.
SERIES
Click the + button to add a new Series item. Click the - button to remove a selected Series. When you have added multiple Series, you can use the up and down buttons to resort individual series within a list.
Once a Series has been added, you can click on the  button to edit its settings.
FORMAT Series 0
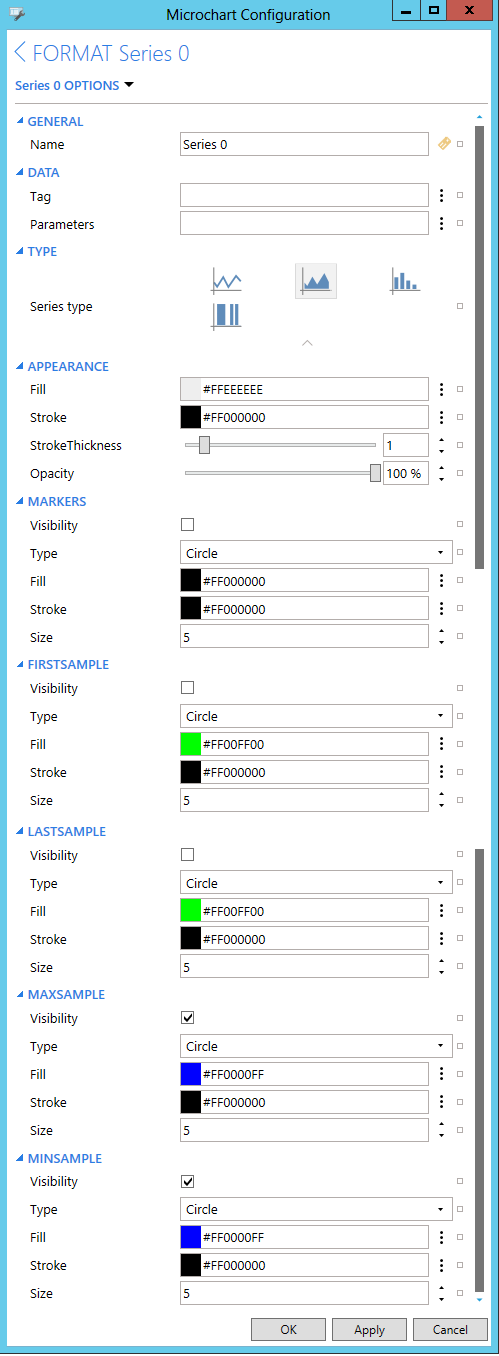
Series 0 OPTIONS - This pulldown menu allows you to change back to the main Microchart OPTIONS settings page within the window or to the settings for additional Series (if they have been added).
GENERAL
-
Name - Enter a name for the Series in the text entry field or click on the
 button to open the Data Browser to browse
for your selected Name/location.
button to open the Data Browser to browse
for your selected Name/location.
DATA
-
Tag - Enter a tag for the series in the text entry field or click on the
 button to open the data browser in order to
browse for your selected tag.
button to open the data browser in order to
browse for your selected tag. -
Parameters - Gets or sets the data point connection parameters. Enter the parameters in the text entry field or click on the
button
to open the data browser in order to browse for your selected parameters.
TYPE
-
Series type - Select from Line, Area, Bar or Event Bar.
APPEARANCE
The following Appearance settings are for Line, Area, and Bar.
-
Fill - Enter a color code in the text entry field for the fill color for the Series or click on the
button to open the Brush Picker window,
which allows you to select a color. -
Stroke - Enter a color code in the text entry field for the stroke color for the Series or click on the
button to open the Brush Picker window,
which allows you to select a color. -
Stroke Thickness - Use the slider to set the stroke thickness or enter it in the text entry field (or use the up/down arrows).
-
Opacity - Use the slider to set the opacity for the Series or enter a percentage in the text entry field (or use the up/down arrows).
The following Appearance settings are for Event Bar.
-
Brush Rules - Click on the + to enter a Brush Rule. Click on the - to remove a selected Brush Rule. If more than one Brush Rule is added, you can use the up/down arrow buttons to move a selected Brush Rule up or down within a list.
-
-
Name - Enter a name for the Brush Rule or click on the
button to open the
Data Browser to navigate to your selected name/source. -
Condition - Enter a condition for the Brush Rule in the text entry field or click on the
button to open
the Data Browser in order to navigate to your selected Condition. -
Brush - Enter a color code in the text entry field for your Brush or click on the
button
in order to open the Brush Picker window, which will allow you
to select your color.
-
-
Opacity - Use the slider to set the opacity for the Series or enter a percentage in the text entry field (or use the up/down arrows).
MARKERS
-
Visibility - Click this checkbox in order to make the sample markers visible.
-
Type - Use the pulldown menu to select from None, Circle, Square, or Triangle.
-
Fill - Enter a color code in the text entry field for the marker fill color or click on the
button
to open the Brush Picker window, which allows you to select a color. -
Stroke - Enter a color code in the text entry field for the marker stroke color or click on the
button
to open the Brush Picker window, which allows you to select a color. -
Size - Enter a size for the marker in the text entry field or click on the up/down arrow buttons.
FIRST SAMPLE/LASTSAMPLE/MAXSAMPLE/MINSAMPLE
-
Visibility - Click this checkbox in order to make the sample visible.
-
Type - Use the pulldown menu to select from None, Circle, Square, or Triangle.
-
Fill - Enter a color code in the text entry field for the sample color or click on the
button
to open the Brush Picker window, which allows you to select a color. -
Stroke - Enter a color code in the text entry field for the sample color or click on the
button
to open the Brush Picker window, which allows you to select a color. -
Size - Enter a size for the sample in the text entry field or click on the up/down arrow buttons.
HORIZONTAL AXIS
-
Interval (s) - Enter an interval (in seconds) for the Horizontal Axis into the text entry field.
VERTICAL AXIS
-
VerticalAxisMaximum (behavior) - Use the pulldown menu to select from Default, Manual, or AutoScale.
-
VerticalAxisMaximum - If you selected Manual, you can enter the VerticalAxisMaximum amount in the text entry field.
-
VerticalAxisMimimum (behavior) - Use the pulldown menu to select from Default, Manual, or AutoScale.
-
VerticalAxisMinimum - If you selected Manual, you can enter the VerticalAxisMinimum amount in the text entry field.
---
Click Apply to apply your newly changed settings.
Click OK to close the window and return to the Smart Tile Template Configuration.
See Also: