Consumption Node for Energy AnalytiX
In ICONICS Energy AnalytiX, use the Consumption node to define meter types. Meter types must be defined before you can configure utility sources, meters, and energy assets.
Consumption Node and Properties for Energy AnalytiX
In the Workbench, expand your project, then AnalytiX, then Energy AnalytiX. Double-click on the Consumption node.
This opens the Consumption properties in the Project Details section of the Workbench. The Consumption properties contain the following tabs:
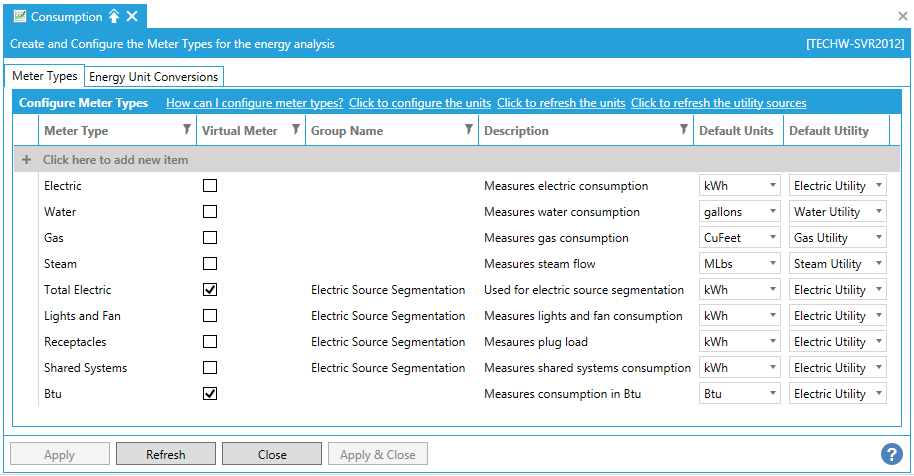
Meter Types Tab
-
Meter Type Name: The name to be used for the meter type.
-
Description: A description of the meter type.
-
Virtual: Virtual meter types are utilized to allow energy calculation definitions based on different meter types. Typically, an energy calculation applies to a specific meter type, such as electric. When using virtual meter types, an end user can define an energy calculation, which may involve entities such as electric or water using measures such as gallons or kWH, for example.
-
Default: The user can select a default unit from the pulldown menu to associate with the related meter type. Any meter tags or calculations referencing the specific meter type will use the selected units as default.
Adding Meter Types
Before you can add meters to the asset tree in AssetWorX, you must define meter types that identify the types of energy that your meters measure. Meter types are simply a category, such as gas meters, water meters, and electric meters.
Meters may also be virtual. See Virtual Meters for more information.
|
|
Note: The meter type is, strictly speaking, only a category of meter such as gas or steam. Do not use the meter type to categorize meters by brand name or utility; the meter manufacturer and utility company are defined for the meter itself. |
To Define Your Meter Types:
-
In the Workbench, expand your project, then AnalytiX, then Energy AnalytiX. Double-click on the Consumption node.
Consumption Properties for Energy AnalytiX
-
Define a new meter type by clicking on the Click here to add new item row. This enables the row so you can enter new information. First, enter a name in the text entry field for the Meter Type.
-
You can then decide whether the newly created meter type will be a Virtual Meter or not.
-
Next, enter a Group Name in the appropriate text entry field.
-
You can then enter a Description of the meter type in the text entry field within that column.
-
Next, you can use the pulldown menu to set the Default Units. Note that you can edit/add to this list by clicking on the "Click to configure the units" link at the top of the configuration form.
-
To add another row, press the Tab key, and then repeat the prior step.
-
Additional information that might help you:
-
To delete a row, click on the area to the left of the row so that the entire row is selected (not just one field), and press the Delete key.
-
If at any time you believe the values to be out of sync with stored values in the database, you can click the Refresh button to retrieve the most up-to-date values.
-
At any time, you can click the Reset button to undo changes that you haven't saved yet.
-
-
When you are done, click Apply to save the changes that you have made or click Apply & Close to save all changes and close the tab.
See Also: