Users
Users can be added to the Local-Default worker Source. Alternatively, users can be imported from an external system (e.g., Microsoft Dynamics 365, Salesforce, Active Directory, etc.). However, only limited changes are permitted for those users. Imported users should be added, modified, or removed in the originating system and those changes will be synchronized with CFSWorX.
To Add a User:
-
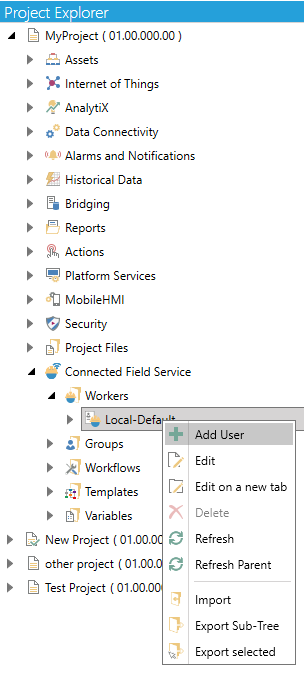
Expand your project in the Workbench, and then expand the Connected Field Service node and then the Workers node.
-
Right-click on the "Local-Default" branch, then click on the Add User button, shown below, in the Edit section of the Home ribbon in the Workbench.
Add User from the Project Explorer
-OR-
Select the source branch (i.e., one added though Dynamics365 or Active Directory), then click on the Add User button, shown below, in the Edit section of the Home ribbon in the Workbench.
Add User Button

-
This opens the User properties window, shown below, in the Workbench. Enter the user's name in the Name text entry field.
User Properties

You can then set multiple properties for the new user including General, Assets, Alarms, Email, and SMS.
General Tab
User Properties - General Tab
General
-
Enabled -True to enable user.
-
User Type -Indicates the source type associated with the user (Database, Dynamics365, or Active Directory).
-
Security Name -Enter a security name, by selecting it from the dropdown list. The seurity name must be specified her in order to user the mobile device health feature of CFSWorX.
-
Acknowledge Code -Enter an acknowledge code in the text entry field. If specified, then this code must be entered when acknowledging an alarm via SMS messaging.
-
Schedule Source -Use the pulldown menu to select the desired schedule type from Undefined, ScheduleWorX, or Dynamics365. Only Dynamics users can be associated with a Dynamics schedule.
-
Availability Schedule -If ScheduleWorX is selected as the Schedule Source, you can enter an Availability Schedule in the text entry field or click on the
 button to open the Data Browser and navigate to your selected Availability
Schedule.
button to open the Data Browser and navigate to your selected Availability
Schedule. -
Schedule Available State -If ScheduleWorX is selected as the Schedule Source, you can enter a Schedule Availability State in the text entry field. It must match one of the Availability States defined in the schedule.
Assets Tab
Assets can be assigned to users to enable filtering workers by assigned assets, or parent assets.
User Properties - Assets Tab

Assets
-
Click on the (Click to add Multiple Tags) link to add more than one tag to the Assets section of the User properties.
-
Click on the (Click to remove duplicates) link to delete any duplicated Assets from this section.
-
Click on the + Click here to add new item link to add an asset to the Assets section of the User properties.
-
Point Name - Enter a Point Name in the now activated text entry field within the cell, or click on the
button to open
the Data Browser and navigate to your selected Point Name. -
Description - Enter a description for the newly added asset to the text entry field within the cell.
Alarms Tab
Alarms can be assigned to users to enable filtering workers by assigned alarms, areas, or alarm server. The Worker Lookup activity in CFSWorX workflows have the option to “Apply Source Restrictions” and “Apply Area Restrictions”, which enables finding only those workers assigned to handle the incoming alarm.
User Properties - Alarms Tab
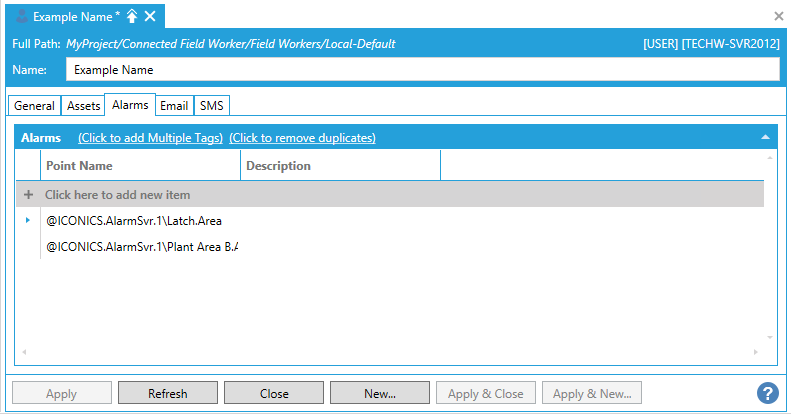
Alarms
-
Click on the (Click to add Multiple Tags) link to add more than one tag to the Alarms section of the User properties.
-
Click on the (Click to remove duplicates) link to delete any duplicated Alarms from this section.
-
Click on the + Click here to add new item link to add an asset to the Alarms section of the User properties.
-
Point Name - Enter a Point Name in the now activated text entry field within the cell, or click on the
button to open
the Data Browser and navigate to your selected Point Name. -
Description - Enter a description for the newly added asset to the text entry field within the cell.
Email Tab
Email addresses defined here are used when attempting to notify a worker via a CFSWorX Workflow that uses a Worker Lookup activity and a Send Email activity.
User Properties - Email Tab
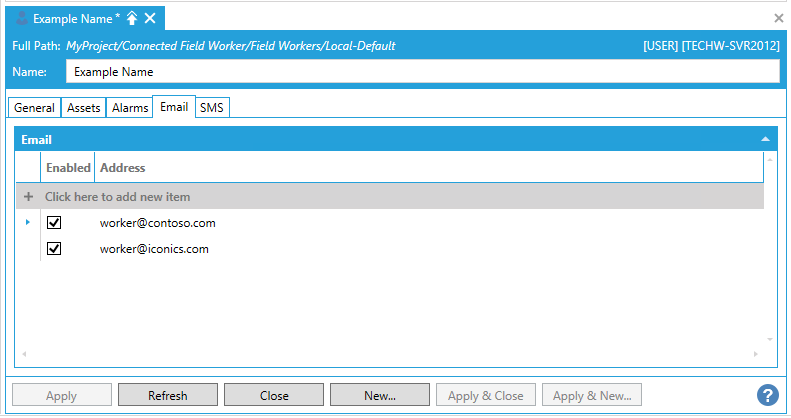
-
Click on the + Click here to add new item link to add new email settings.
-
Enabled - True to enable specific email address.
-
Address - Enter an email address in the text entry field.
SMS Tab
Telephone numbers defined here are used when attempting to notify a worker via a CFSWorX Workflow that uses a Worker Lookup activity and one of the following activities:
-
Send Sms via ATT interface
-
Send Sms
-
Send Twilio message
-
Send Twilio Voice message
-
Send Twilio WhatsApp
User Properties - SMS Tab
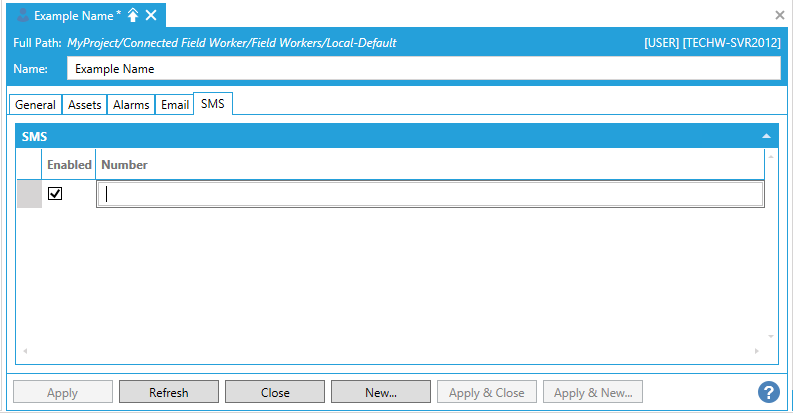
SMS
-
Click on the + Click here to add new item link to add new SMS settings.
-
Enabled - True to enable the selected number.
-
Number - Enter an SMS number in the text entry field.
-
Once you have completed setting your User properties, click on Apply, then Close to return to the Workbench.
Membership
Membership associates a User with a Group. Also, see Enhanced Group Filtering in Worker Lookup.
To Set Membership Settings for a User:
-
Expand your project in the Workbench, and then expand the Connected Field Service node and then the Field Workers node and then the Local-Default source branch. Note: You can also view the group membership for external system (e.g. Dynamics 365, Salesforce, Active Directory, etc.) users, but you can’t modify those memberships in CFSWorX. You must make such changes in the external system (e.g. Dynamics 365, Salesforce, Active Directory, etc.).
-
Right-click on a User and then select Membership... from the pulldown menu.
Add User from the Project Explorer
.png)
-OR-
Select the User, then click on the Membership... button, shown below, in the Edit section of the Home ribbon in the Workbench.
Membership... Button

-
This opens the Set the membership window, shown below.
Set the membership Window

If a User is already associated with a Group, the Group will be listed within the window, along with any associated Proficiency.
Note: Proficiency is supported for Dynamics 365 and Salesforce Characteristics, intended to illustrate the person’s proficiency at a particular skill. The Proficiency is also defined within Dynamics 365 or Salesforce.
To add a Group, use the pulldown menu at the bottom left
of the window to select from current Groups, then click on the  button. You can also remove
a selected Group from the window by highlighting it then clicking the
button. You can also remove
a selected Group from the window by highlighting it then clicking the
 button. You can also refresh the Groups in the pulldown menu by clicking
the
button. You can also refresh the Groups in the pulldown menu by clicking
the  button.
-
Once you have completed assigning Users to Groups, click on the OK button to return to the Workbench.
See Also: