Workers
Users of ICONICS CFSWorX can define all of their workers in the local database using the default "Local-Default" worker source. Alternatively, the have the option of utilizing either a Microsoft Dynamics 365, Active Directory, Salesforce, ServiceNow, or Azure Active Directory source to import a list of Workers from those systems.
Adding a Dynamics 365 Source
To Add a Dynamics 365 Source
-
Expand your project in the Workbench, and then expand the Connected Field Service node.
-
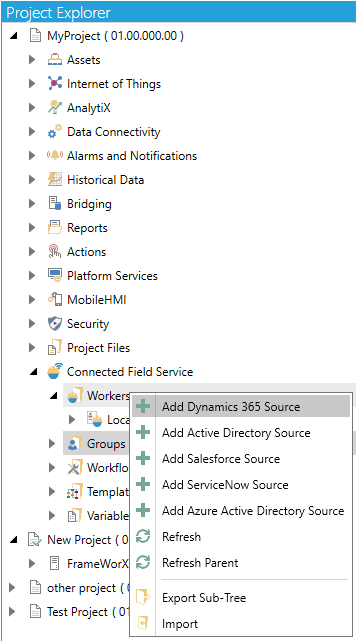
Right-click on the Workers branch, then select Add Dynamics 365 Source from the pulldown menu, as shown below.
Add Dynamics 365 Source from the Project Explorer
-OR-
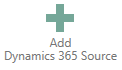
Select the Workers branch in the Project Explorer then click on the Add Dynamics 365 Source button, shown below, in the Edit section of the Home ribbon in the Workbench.
Add Dynamics 365 Source Button
-
This opens the Workers - Dynamics 365 Source configuration window, as shown below, within the Workbench. Enter a name for this configuration in the Name text entry field.
Workers - Dynamics 365 Source Configuration
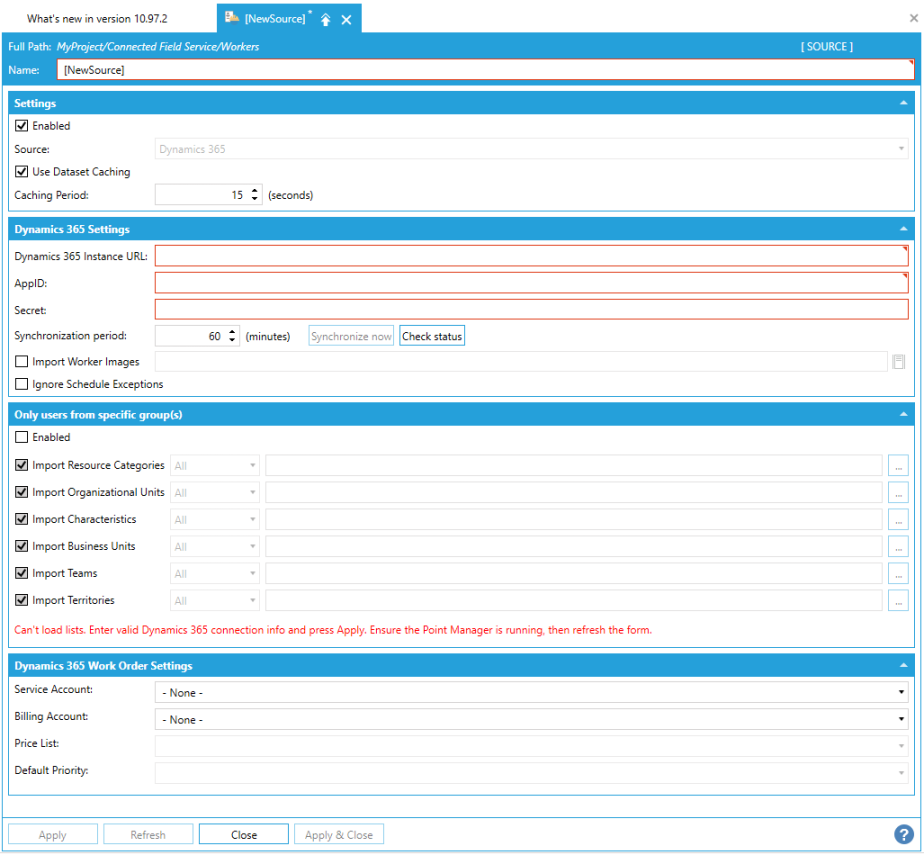
Settings
-
Enabled -True to enable this specific Workers - Dynamics 365 Configuration.
-
Source -This reflects the selected source type. In this example, Dynamics 365 has been selected.
-
Use Dataset Caching - When enabled, dataset query results will be cached temporarily. The cached information will be returned during the Caching Period if the same dataset is requested by any client.
-
Caching Period – this setting defines the length of time to retain the cached dataset. After this period passes, any subsequent request will require rebuilding the dataset values.
Dynamics 365 Settings
Before configuring the Dynamics 365 source in CFSWorX, please refer to Configuring Dynamics 365. You must configure the proper settings in Microsoft Azure and Dynamics 365. The AppID and Secret will be used in the steps below.
-
Dynamics 365 Instance URL -Enter the URL of your selected Dynamics 365 instance in the text entry field.
-
AppID - Enter the Application ID of your Azure App used to connect to Dynamics 365.
-
Secret - Enter the Client Secret of your Azure App used to connect to Dynamics 365.
-
Synchronization period -Enter the synchronization period (in minutes) in the text entry field (or use the up/down arrow buttons). This defines the frequency when workers, groups and related information will be synchronized with Dynamics 365. Click the Synchronize now button to manually trigger the synchronization. The operation will be executed asynchronously and a status message will show whether or not the request started successfully. Note that the status message will not provide information on whether the operation succeeds or fails at a later point (in that instance, users can check TraceWorX for full info).
-
Import Worker Images - If checked, worker images will be imported and saved on the server in the specified location.
-
Ignore Schedule Exceptions - If checked, then Breaks will not be considered when determining if the worker is scheduled or not. This may be useful if you still want to contact a worker while they are on break, but still on duty.
Only users from specific group(s) - Click HERE for more info on Enhanced Group Filtering in Dynamics 365 Sources.
-
Enabled - True to enable selection of import of users from specifically selected groups.
-
Import Resource Categories - If checked, import all workers belonging to the specified Resource Category (also known as a role). If defining a Specific value, then the organizational unit must match the name of a Resource Category defined in Dynamics 365. Enter the values in the text entry field or click on the
 to navigate
to your selected Resource Category/Categories. Multiple Resource Categories
may be specified by separating the names with commas. If All is selected,
then all workers belonging to any Resource Category will be imported.
to navigate
to your selected Resource Category/Categories. Multiple Resource Categories
may be specified by separating the names with commas. If All is selected,
then all workers belonging to any Resource Category will be imported. -
Import Organizational Units - If checked, import all workers belonging to the specified Organizational Unit. If defining a Specific value, then the Organizational Unit must match the name of a category defined in Dynamics 365. Enter the values in the text entry field or click on the
to navigate to your selected resource Organizational Unit(s). Multiple
Organizational Units may be specified by separating the names with
commas. If All is selected, then all workers belonging to any Organizational
Unit will be imported. -
Import Characteristics - If checked, import all workers having the specified Characteristic. If defining a Specific value, then the Characteristic must match the name of a category defined in Dynamics 365. Enter the values in the text entry field or click on the
to navigate
to your selected resource Characteristic(s). Multiple Characteristics
may be specified by separating the names with commas. If All is selected,
then all workers having any Characteristic will be imported. -
Import Business Units - If checked, import all workers having the specified Business Unit. If defining a Specific value, then the Business Unit must match the name of a category defined in Dynamics 365. Enter the values in the text entry field or click on the
to navigate to your selected Business Unit(s).
Multiple Business Units may be specified by separating the names with
commas. If All is selected, then all workers belonging to any Business
Unit will be imported. -
Import Teams - If checked, import all workers having the specified Team. If defining a Specific value, then the Team must match the name of a category defined in Dynamics 365. Enter the values in the text entry field or click on the
to navigate
to your selected Team(s). Multiple Business Units may be specified
by separating the names with commas. If All is selected, then all
workers belonging to any Team will be imported. -
Import Territories - If checked, import all workers having the specified Territory. If defining a Specific value, then the Territory must match the name of a category defined in Dynamics 365. Enter the values in the text entry field or click on the
to navigate
to your selected Territory/Territories. Multiple Territories may be
specified by separating the names with commas. If All is selected,
then all workers belonging to any Territory will be imported.
Note: When using any of the Specific options above, all names must be written with only letters, spaces, and numbers, removing all other characters. For example, “Company X, Inc.” should be written as “Company X Inc”.
Dynamics 365 Work Order Settings
The following options are used for creating work orders:
-
Service Account – This is the account to be serviced, as defined in Dynamics 365.
-
Billing Account – This is the account to be billed, as defined in Dynamics 365.
-
Price List – This is the price list that controls pricing for products and services related to this work order. By default, Dynamics will use the price list specified on the account.
-
Once you have completed setting your Workers - Dynamics 365 Configuration properties, click on Apply, then Close to return to the Workbench.
Adding an Active Directory Source
To Add an Active Directory Source
-
Expand your project in the Workbench, and then expand the Connected Field Service node.
-
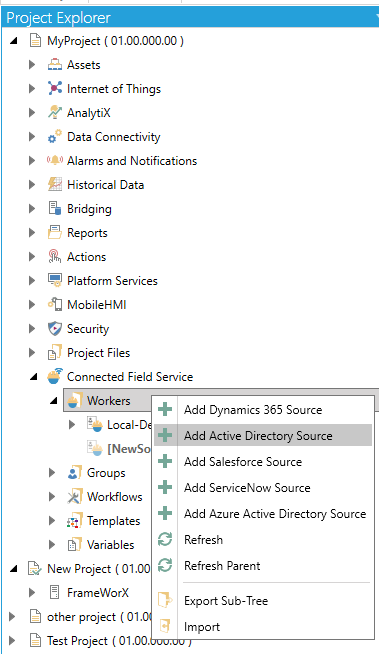
Right-click on the Workers branch, then select Add Active Directory Source from the pulldown menu, as shown below.
Add Active Directory Source from the Project Explorer
-OR-
Select the Workers branch in the Project Explorer then click on the Add Active Directory Source button in the Edit section of the Home ribbon in the Workbench.
Add Active Directory Source Button

-
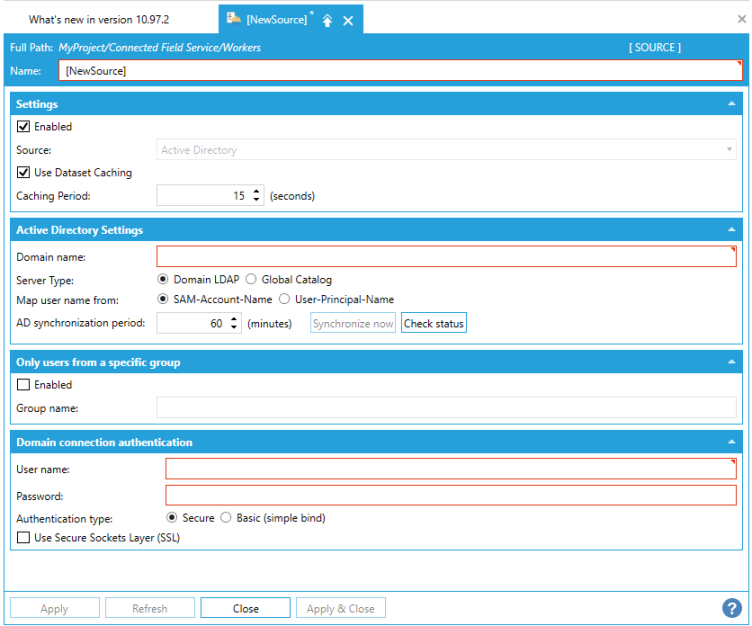
This opens the Workers - Active Directory Source configuration window, as shown below, within the Workbench. Enter a name for this configuration in the Name text entry field.
Workers -Active Directory Source Configuration
Settings
-
Enabled -True to enable this specific Workers - Dynamics 365 Configuration.
-
Source -The pulldown menu should reflect your selected source. In this example, Active Directory has been selected.
-
Use Dataset Caching -Check this box to use worker dataset caching and reduce server load.
-
Caching Period - If "Use Dataset Caching" is selected, you can enter the caching period (in seconds) in the now active text entry field, or use the up/down arrow buttons.
Active Directory Settings
-
Domain Name – This is the domain name. Can be a long or short (Netbios) name.
-
Server Type:
-
Domain LDAP – With this option, our Security will connect to the default controller of the domain.
-
Global Catalog – Security will connect to the Global Catalog. A Global Catalog in Active Directory is a read only cache of all domains in a single domain forest. Use this option, users are in multiple domains inside a single forest, and the Security needs to show them all.
-
Map user name from - For users, Security will use the selected Active Directory attribute as the username. Users which do not have this attribute specified in Active Directory will not be shown.
-
SAM-Account-Name – This will use the “SAM-Account-Name” attribute.
-
User-Principal-Name – This will use the “User-Principal-Name” attribute.
-
AD synchronization period - Enter an Active Directory synchronization period, in minutes, in the text entry field. Click the Synchronize now button to manually trigger the synchronization. The operation will be executed asynchronously and a status message will show whether or not the request started successfully. Note that the status message will not provide information on whether the operation succeeds or fails at a later point (in that instance, users can check TraceWorX for full info).
Only users from a specific group
-
Enabled - Click this checkbox to allow log in only from a named group. Once checked, you can enter the group name in the setting below.
-
Group name - Enter a group name in the text entry field that will contain users allowed to log in.
Domain connection authentication
This section is all about securing the connection between our Security (running as an internal part of the FrameWorX Server) and the Active Directory.
-
User name - Enter a user name in the text entry field. If filled in, this will get used to authenticate access to the Active Directory, so that Workbench and Security can list users, groups and all it needs. If left empty, Security will try to authentication using the identity of the FrameWorX server process. This will work only if the FrameWorX server process is running under a domain account which has access to the Active Directory.
-
Password - Enter a password in the text entry field. If filled in, this will get used to authenticate access to the Active Directory, so that Workbench and Security can list users, groups and all it needs. If left empty, Security will try to authentication using the identity of the FrameWorX server process. This will work only if the FrameWorX server process is running under a domain account which has access to the Active Directory.
-
Authentication type - How the credentials are transferred to Active Directory for verification. These two setting correspond to the options “Secure” and “None” in this link: https://msdn.microsoft.com/en-us/library/system.directoryservices.authenticationtypes.aspx.
-
Secure – Security will use Kerberos, and possibly NTLM to authenticate to Active Directory. This is the recommended setting.
-
Basic (simple bind) – Security will use basic authentication
-
Use Secure Sockets Layer (SSL) - Security will use LDAPS (LDAP over SSL). This needs to be supported by the Active Directory, for details. Details to set this up are outside our concern.
-
Once you have completed setting your Workers - Active Directory Configuration properties, click on Apply, then Close to return to the Workbench.
Adding a Salesforce Source
-
Expand your project in the Workbench, and then expand the Connected Field Service node.
-
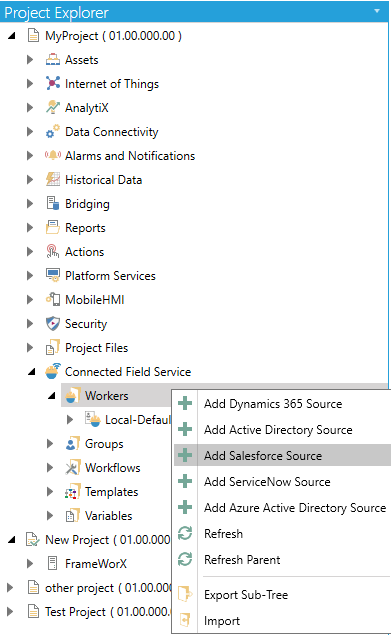
Right-click on the Workers branch, then select Add Salesforce Source from the pulldown menu, as shown below.
Add Salesforce Source from the Project Explorer
-OR-
Select the Workers branch in the Project Explorer then click on the Add Salesforce Source button, shown below, in the Edit section of the Home ribbon in the Workbench.
Add Salesforce Source Button
-
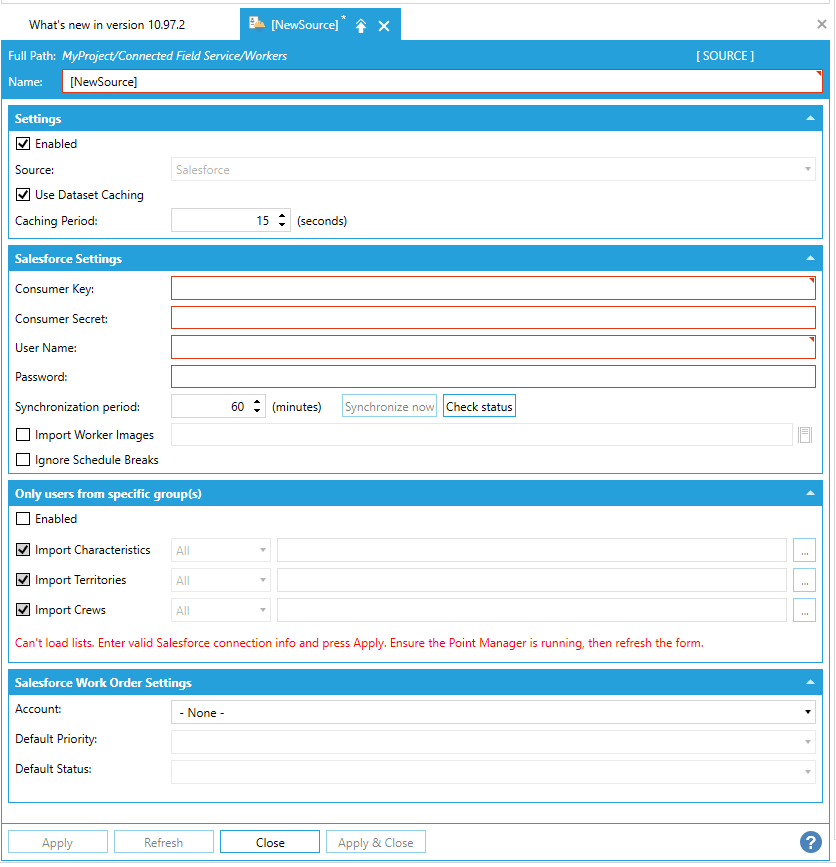
This opens the Workers - Salesforce Source configuration window, as shown below, within the Workbench. Enter a name for this configuration in the Name text entry field.
Workers - Salesforce Source Configuration
Settings
-
Enabled -True to enable this specific Workers - Salesforce Configuration.
-
Source -This reflects the selected source type. In this example, Salesforce has been selected.
-
Use Dataset Caching - When enabled, dataset query results will be cached temporarily. The cached information will be returned during the Caching Period if the same dataset is requested by any client.
-
Caching Period – this setting defines the length of time to retain the cached dataset. After this period passes, any subsequent request will require rebuilding the dataset values.
SalesForce Settings
Before configuring the Salesforce source in CFSWorX, please refer to Configuring Salesforce. You must configure the proper settings in Salesforce. The Consumer Key and Consumer Secret will be used in the steps below.
-
Consumer Key - Enter the Consumer Key of your Connected App used to connect to Salesforce.
-
Consumer Secret - Enter the Client Secret of your Connected App used to connect to Salesforce.
-
Synchronization period -Enter the synchronization period (in minutes) in the text entry field (or use the up/down arrow buttons). This defines the frequency when workers, groups and related information will be synchronized with Salesforce. Click the Synchronize now button to manually trigger the synchronization. The operation will be executed asynchronously, and a status message will show whether or not the request started successfully. Note that the status message will not provide information on whether the operation succeeds or fails at a later point (in that instance, users can check TraceWorX for full info).
-
Import Worker Images - If checked, worker images will be imported and saved on the server in the specified location.
-
Ignore Schedule Exceptions - If checked, then Breaks will not be considered when determining if the worker is scheduled or not. This may be useful if you still want to contact a worker while they are on break, but still on duty.
Only users from specific group(s)
-
Enabled - True to enable selection of import of users from specifically selected groups.
-
Import Characteristics - If checked, import all workers having the specified Characteristic. This is equivalent to a skill in Salesforce. If defining a Specific value, then the Characteristic must match the name of a category defined in Salesforce. Click on the
button to navigate
to your selected resource Characteristic(s). Multiple Characteristics
may be specified by selecting the names in the Select Characteristics
window. If All is selected, then all workers having any Characteristic
will be imported. -
Import Territories - If checked, import all workers belonging to the specified Territory. If defining a Specific value, then the Territory must match the name of a category defined in Salesforce. Click on the
button to navigate to your selected resource Territory/ Territories.
Multiple Territories may be specified by selecting the names in the
Select Territories window. If All is selected, then all workers belonging
to any Territory will be imported. -
Import Crews - If checked, import all workers having the specified Crew. If defining a Specific value, then the Crew must match the name of a category defined in Salesforce. Click on the
button to
navigate to your selected Crew(s). Multiple Crew may be specified
by selecting the names in Select Crews window. If All is selected,
then all workers belonging to any Crew will be imported.
Salesforce Work Order Settings
The following options are used for creating work orders:
-
Account – This is the account associated with the work order, as defined in Salesforce.
-
Default Priority – This is the work order priority, as defined in Salesforce.
-
Default Status – This is work order status, as defined in Salesforce.
4. Once you have completed setting your Workers - Salesforce Configuration properties, click on Apply, then Close to return to the Workbench.
Adding a ServiceNow Source
To Add a ServiceNow Source
-
Expand your project in the Workbench, and then expand the Connected Field Service node.
-
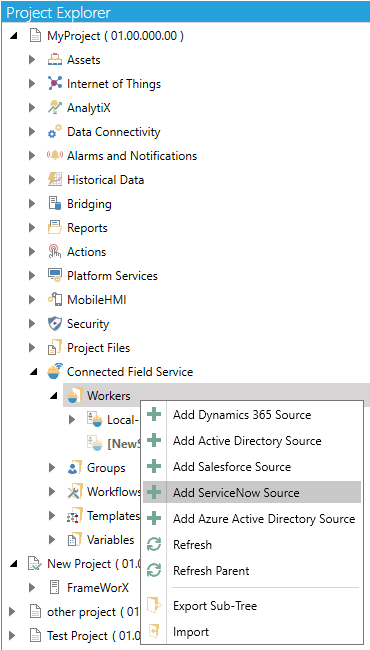
Right-click on the Workers branch, then select Add ServiceNow Source from the pulldown menu, as shown below.
Add ServiceNow Source from the Project Explorer
-OR-
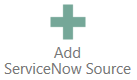
Select the Workers branch in the Project Explorer then click on the Add ServiceNow Source button, shown below, in the Edit section of the Home ribbon in the Workbench.
Add ServiceNow Source Button
-
This opens the Workers - ServiceNow Source configuration window, as shown below, within the Workbench. Enter a name for this configuration in the Name text entry field.
Workers - ServiceNow Source Configuration

Settings
-
Enabled - True to enable this specific Workers - ServiceNow Configuration.
-
Source -This reflects the selected source type. In this example, ServiceNow has been selected.
-
Use Dataset Caching - When enabled, dataset query results will be cached temporarily. The cached information will be returned during the Caching Period if the same dataset is requested by any client.
-
Caching Period – this setting defines the length of time to retain the cached dataset. After this period passes, any subsequent request will require rebuilding the dataset values.
ServiceNow Settings
Before configuring the ServiceNow source in CFSWorX, please refer to Configuring ServiceNow. You must configure the proper settings in ServiceNow. The Client ID and Client Secret will be used in the steps below.
-
ServiceNow Instance URL – Enter the URL of your ServiceNow instance.
-
Client ID - Enter the Client ID of your OAuth API endpoint created for external clients.
-
Client Secret - Enter the Client Secret of your OAuth API endpoint created for external clients.
-
Synchronization period -Enter the synchronization period (in minutes) in the text entry field (or use the up/down arrow buttons). This defines the frequency when workers, groups and related information will be synchronized with ServiceNow. Click the Synchronize now button to manually trigger the synchronization. The operation will be executed asynchronously, and a status message will show whether or not the request started successfully. Note that the status message will not provide information on whether the operation succeeds or fails at a later point (in that instance, users can check TraceWorX for full info).
-
Import Worker Images - If checked, worker images will be imported and saved on the server in the specified location.
-
Ignore Schedule Exceptions - If checked, then Breaks will not be considered when determining if the worker is scheduled or not. This may be useful if you still want to contact a worker while they are on break, but still on duty.
Only users from specific group(s)
-
Enabled - True to enable selection of import of users from specifically selected groups.
-
Import Characteristics - If checked, import all workers having the specified Characteristic. This is equivalent to a skill in ServiceNow. If defining a Specific value, then the Characteristic must match the name of a category defined in ServiceNow. Click on the
button to navigate to your selected resource Characteristic(s).
Multiple Characteristics may be specified by selecting the names in
the Select Characteristics window. If All is selected, then all workers
having any Characteristic will be imported. -
Import Territories - If checked, import all workers belonging to the specified Territory. This is equivalent to Locations in ServiceNow. If defining a Specific value, then the Territory must match the name of a category defined in ServiceNow. Click on the
button to navigate to your selected resource Territory/ Territories.
Multiple Territories may be specified by selecting the names in the
Select Territories window. If All is selected, then all workers belonging
to any Territory will be imported.
NOTE: CFSWorX imports locations covered by work groups and not all locations defined in ServiceNow. It also imports child locations up to one level. -
Import Crews - If checked, import all workers having the specified Crew. This is equivalent to Work Groups in ServiceNow. If defining a Specific value, then the Crew must match the name of a category defined in ServiceNow. Click on the
button to navigate to your
selected Crew(s). Multiple Crew may be specified by selecting the
names in Select Crews window. If All is selected, then all workers
belonging to any Crew will be imported.
ServiceNow Work Order Settings
The following options are used for creating work orders:
-
Short Description – This is short description of work order.
-
Priority – This is the work order priority, as defined in ServiceNow.
NOTE: Selecting a value of None in this form, is equivalent to letting ServiceNow assign a default priority to the work order.
-
Once you have completed setting your Workers - ServiceNow Configuration properties, click on Apply, then Close to return to the Workbench.
Adding an Azure Active Directory Source
To Add an Azure Active Directory Source
-
Expand your project in the Workbench, and then expand the Connected Field Service node.
-
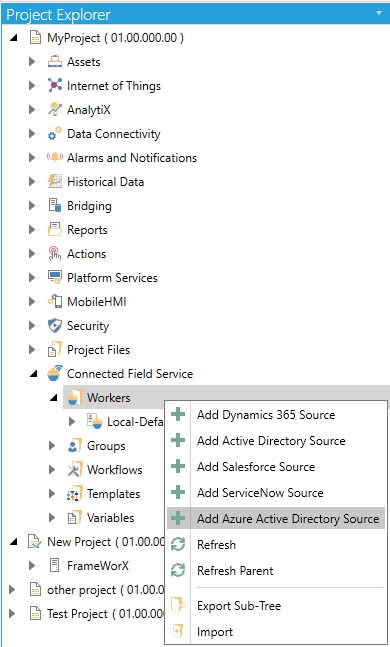
Right-click on the Workers branch, then select Add Azure Active Directory Source from the pulldown menu, as shown below.
Add Azure Active Directory Source from the Project Explorer
-OR-
Select the Workers branch in the Project Explorer then click on the Add Azure Active Directory Source button, shown below, in the Edit section of the Home ribbon in the Workbench.
Add Azure Active Directory Source Button

- This opens the Workers – Azure Active Directory Source configuration window, as shown below, within the Workbench. Enter a name for this configuration in the Name text entry field.
Workers - Azure Active Directory Source Configuration
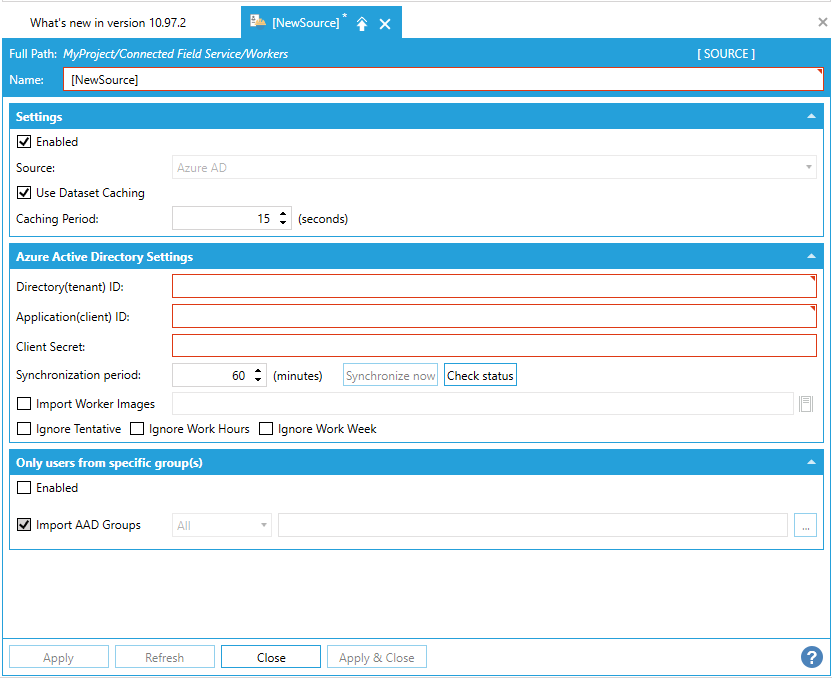
Settings
-
Enabled -True to enable this specific Workers – Azure Active Directory Configuration
-
Source -This reflects the selected source type. Azure Active Directory will be auto selected.
-
Use Dataset Caching - When enabled, dataset query results will be cached temporarily. The cached information will be returned during the Caching Period if the same dataset is requested by any client.
-
Caching Period – this setting defines the length of time to retain the cached dataset. After this period passes, any subsequent request will require rebuilding the dataset values.
Azure Active Directory Settings
Before configuring the Azure AD source in CFSWorX, please refer to Configuring Azure Active Directory. You must configure the proper settings in Microsoft Azure Portal The Application(client) ID, Directory(tenant) ID and Client Secret will be used in the steps below.
-
Application (client) ID - Enter the Application (client) ID in the text entry field.
-
Directory (tenant) ID - Enter the Directory (tenant) ID in the text entry field.
-
Client secret - Enter the Secret in the text entry field.
Only users from specific group(s)
-
Enabled - True to enable selection of import of users from specifically selected groups.
-
Import AAD Groups - If checked, import all workers in the selected Group. Click on the ellipsis button
to navigate to available groups.
Multiple Groups may be specified by selecting the names in the Select
Groups window. If ‘All’ is selected, then all workers will be imported.
Note: Before browsing of groups is allowed, the Azure AD connection information must first be configured and applied. Once the connection has been made, go to the Only users from specific group(s) section, select the Enabled box, find the group type you are interested in, change the dropdown from All to Specific, then use the more (…) button to select the specific groups. Remember to hit Apply when you are finished configuring all filters.
-
Once you have completed setting your Field Workers – Azure Active Directory Configuration properties, click on Apply, then Close to return to the Workbench.
See Also: