BACnet SC Configuration
BACnet SC Configuration Using the Workbench
Network Discovery
Note: The following describes how to configure BACnet settings via the Workbench for Desktop projects. The starting point is the Network Discovery tool.
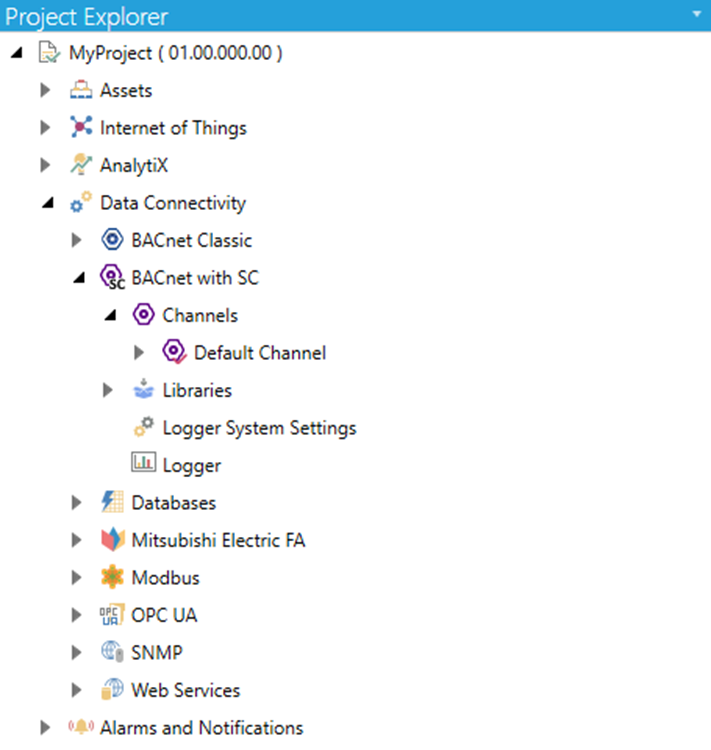
From the Workbench, you need to expand your project and then browse for the device template and find the BACnet configuration provider.
BACnet Provider in the Workbench's Project Explorer
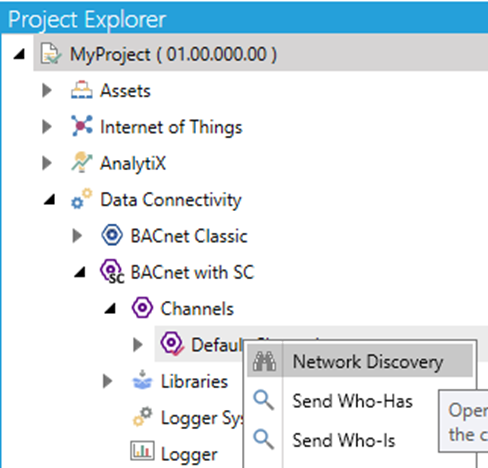
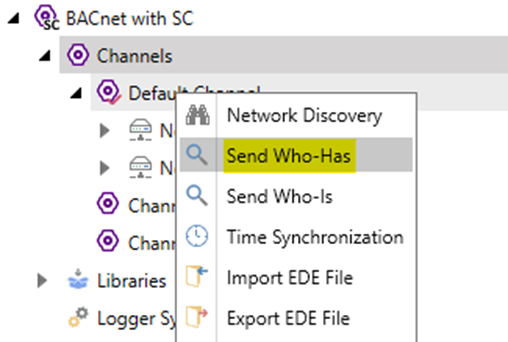
It is possible to discover the devices on each Channel level. So, for example, to browse for the Default Channel, right-click on it and select ‘Network Discovery’.
Starting Network Discovery
A dialog will appear. In this dialog, you can set some filters and start the discovery of the network.
Network Discovery dialog
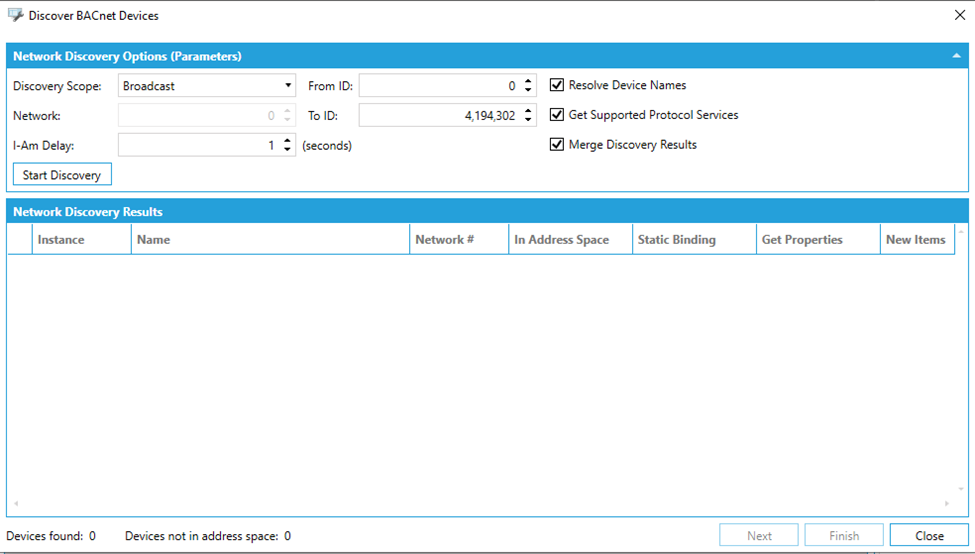
This is the list of filters that can be set before starting Network Discovery:
-
Discovery Scope: Choose between Broadcast, Global Broadcast, Local Network Broadcast and Remote Network Broadcast
- A global broadcast will send whols using an IP global broadcast address of 255.255.255.255 and a BACnet broadcast address.
- A broadcast will send whols messages using an IP subnet broadcast address which is Bitwise OR of the IP address and Bit Complement of the Subnet Mask and a BACnet broadcast address.
- A remote broadcast contains the network number in the BACnet destination address.
- A local network broadcast contains no BACnet network number, only the devices on the local network will respond.
-
Network - If using Remote Network Broadcast as Discovery Scope, you can enter a network number in the text entry field.
-
I-Am Delay [seconds]: Enter a delay (in seconds) in the text entry field. Valid range is between 1 and 30. This is a maximum delay time between two I-Am messages. Network discovery will stop if there is no I-Am message in the specified time.
-
From ID - Enter a starting range for the network discovery.
-
To Id - Enter and ending range for the network discovery.
-
Resolve Device Names - If true, the names of the devices will be resolved, otherwise they will look like {Device: [DeviceInstance]}.
-
Get Supported Protocol Services - If true, the discovery will return the list of services supported by the devices. The information will be stored in the configuration database.
-
Merge Discovery Results - If true, the results of the discovery is merged with the current set of discovered devices.
When you click on the Start Discovery button, a request to the BACnet point manager is sent. The result of the call will populate the grid on the bottom of the dialog.
Network Discovery Dialog (with Discovered Devices)
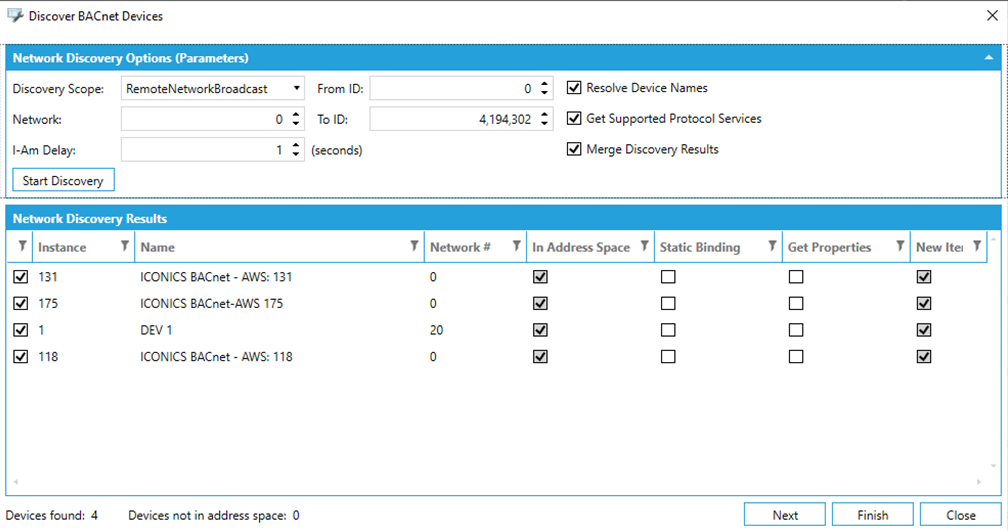
For each discovered device, the grid shows:
-
Instance -Specifies the instance of the device
-
Name - Specifies the name of the device
-
Network # - Specifies the network number of the device
-
In Address Space - True, if the device is already in the address space
-
Static Binding - If true, static binding information will be stored in the configuration database
-
Get Properties - If true, when scanning the devices, we will ask for the list of supported properties for each object of the device
-
New Items - True, if the device is coming from the latest network discovery (when merging the results)
You can easily filter/sort the results in the grid.
You can also select multiple devices (and set Get Properties/Static Binding flag) in one shot through the available context menu.
Network Discovery Dialog (Context Menu)

At this point, you can select all the devices or a subset of them and proceed with the scanning process. You have basically two options:
-
Finish - Clicking on Finish button, the selected device will be scanned and all the available objects will be stored in the configuration database
-
Next - Clicking on Next button, we will go in the next page of the dialog filter the scanning of the selected devices
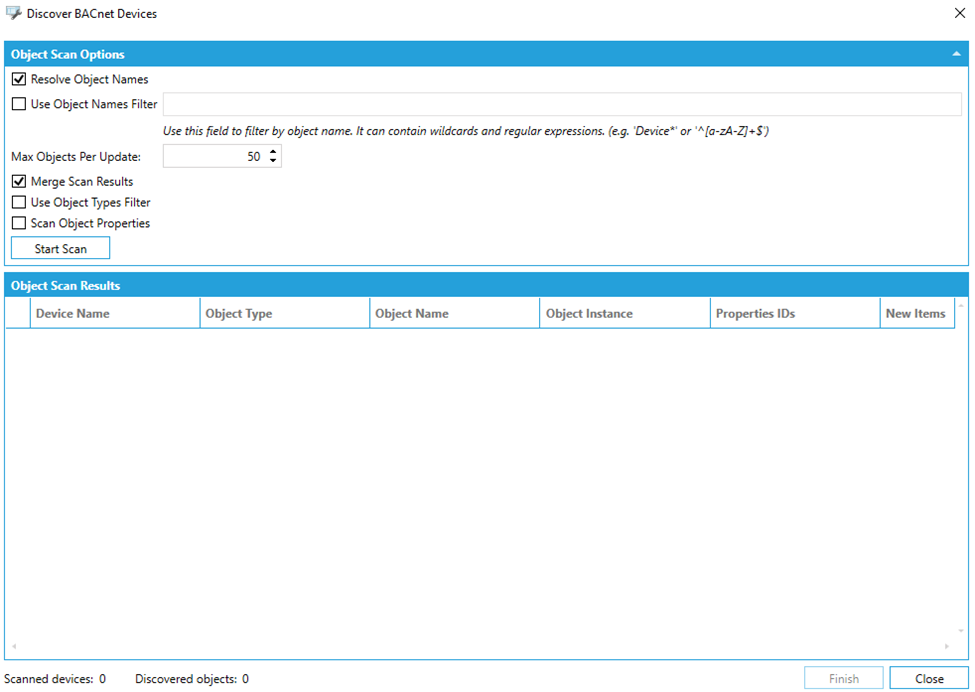
This is what you can see when clicking on the Next button:
Network Discovery Dialog (Scan Devices)
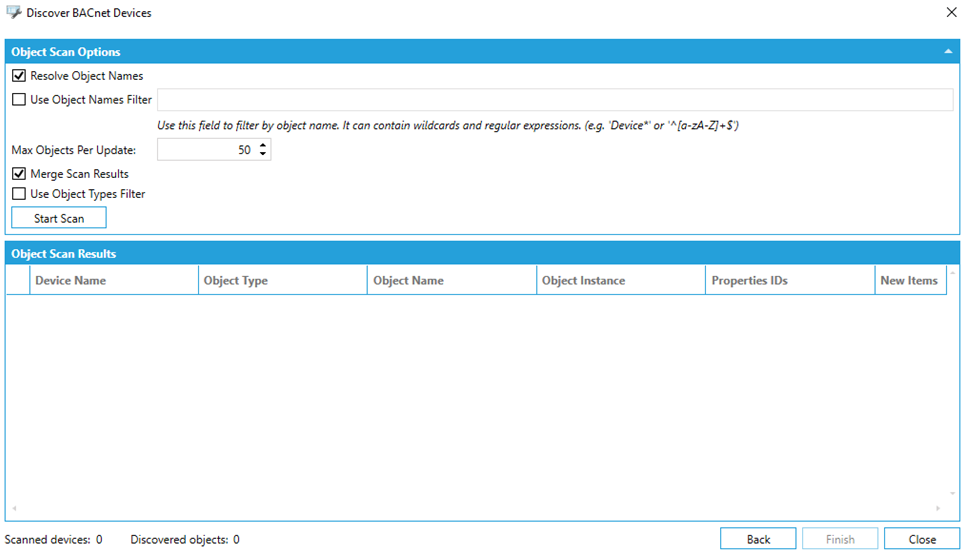
From this section, you can scan the previously selected devices. You can specify several scan options:
-
Resolve Object Names - If true, the device scan should resolve the name of the objects.
-
Use Object Names Filter - If you set it to true, you can use the field to filter by object name. It can contain wildcards and regular expressions. (e.g. ‘Device*’ or ‘^[a-zA-Z]+$’).
-
Max Object Per Update - Defines a maximum number of objects sent to client within one callback/message. In case there is more objects discovered per the device, more than 1 callback/message is sent for the same device .
-
Merge Scan Results - If true, the results of the scan is merged with the current set of scanned objects
-
Use Object Types Filter - If true, you can specify which object types you want to get from the object types filter section
Network Discovery Dialog (Scan Devices) – Object Types Filters
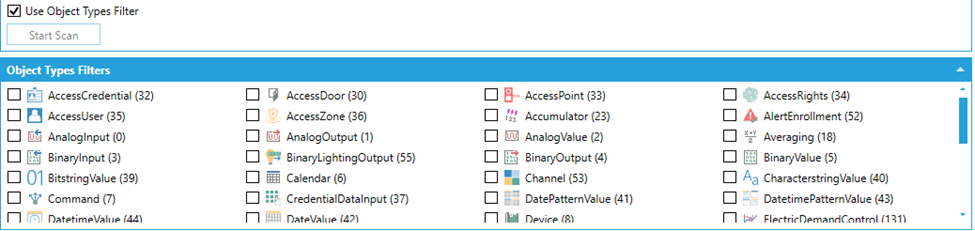
The collection of available Object Types to be filtered comes from the Object Library.
When you click on the Start Scan button, a request to the BACnet point manager is sent. The result of the call will populate the grid on the bottom of the dialog.
Network Discovery Dialog (Scan Devices) – Scan Results
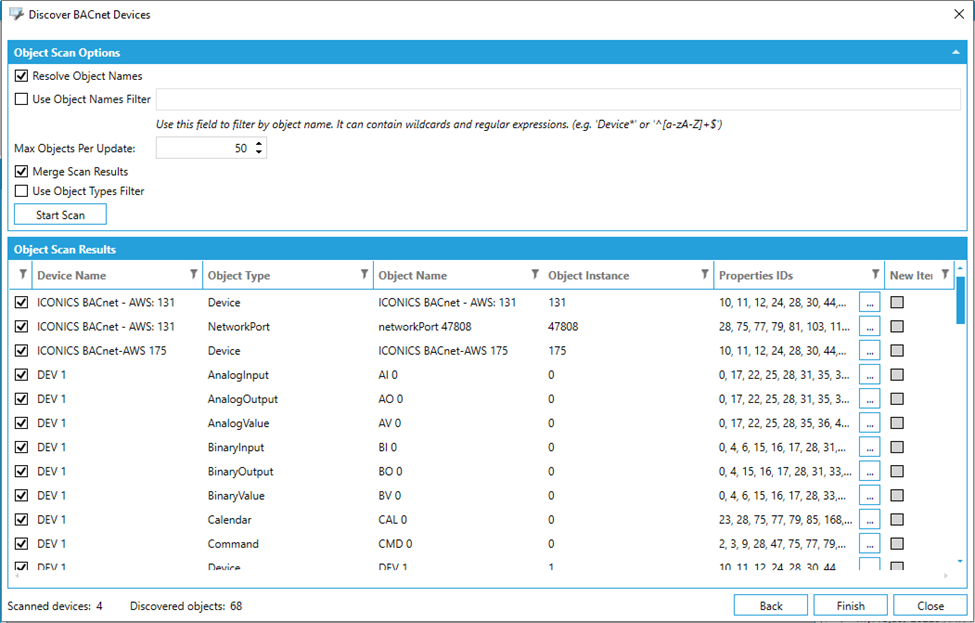
For each scanned object you can see:
-
Device Name - The name of the device containing the object
-
Object Type - The type of the object
-
Object Name - The name of the object
-
Object Instance - The instance of the object
-
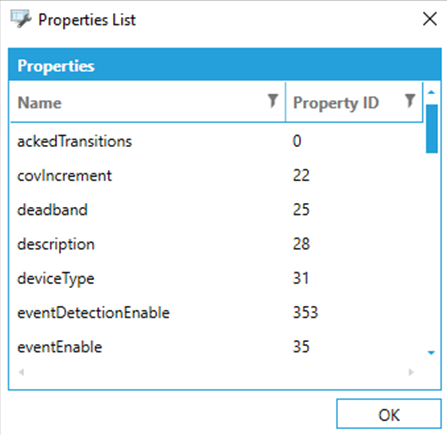
Properties IDs - The list of reported properties of the object as a string representation separated by a comma. You can click on the ellipsis button to see the list of the properties:
Properties List
-
New Item - True, if the object is coming from the latest device scan (when merging the results)
You can easily filter/sort the results in the grid.
You can also select multiple objects in one shot through the available context menu.
Device Scan Dialog (Context Menu)
At this point, you can select all the objects or a subset of them and proceed with import operation. You have basically three options:
-
Finish - By clicking on the Finish button, the selected objects will be imported into the configuration database.
-
Back - Clicking on the Back button returns to the network discovery page.
-
Close - Clicking on the Close button closes the dialog without importing.
If you click on the Finish button, the selected options will be sent to the server and a Task will be generated. The task will process the data and will execute the import operation.
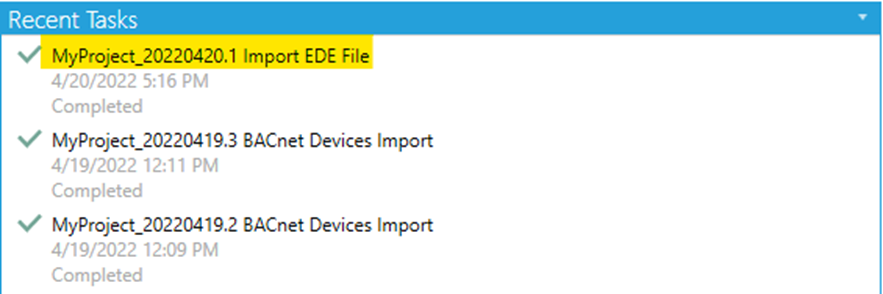
BACnet Devices Import Task
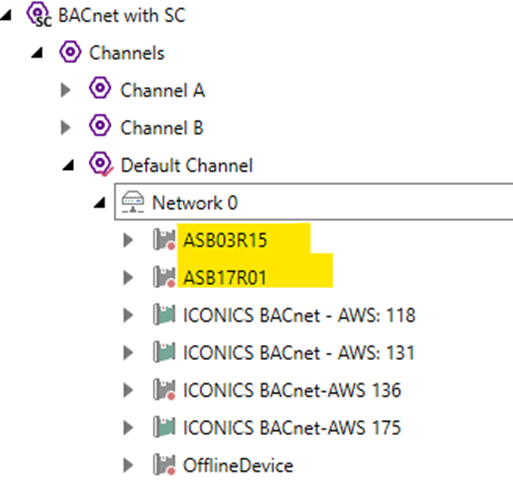
Once the task is completed, all the entities will be now browsable in the project tree.
Project Tree After the Import
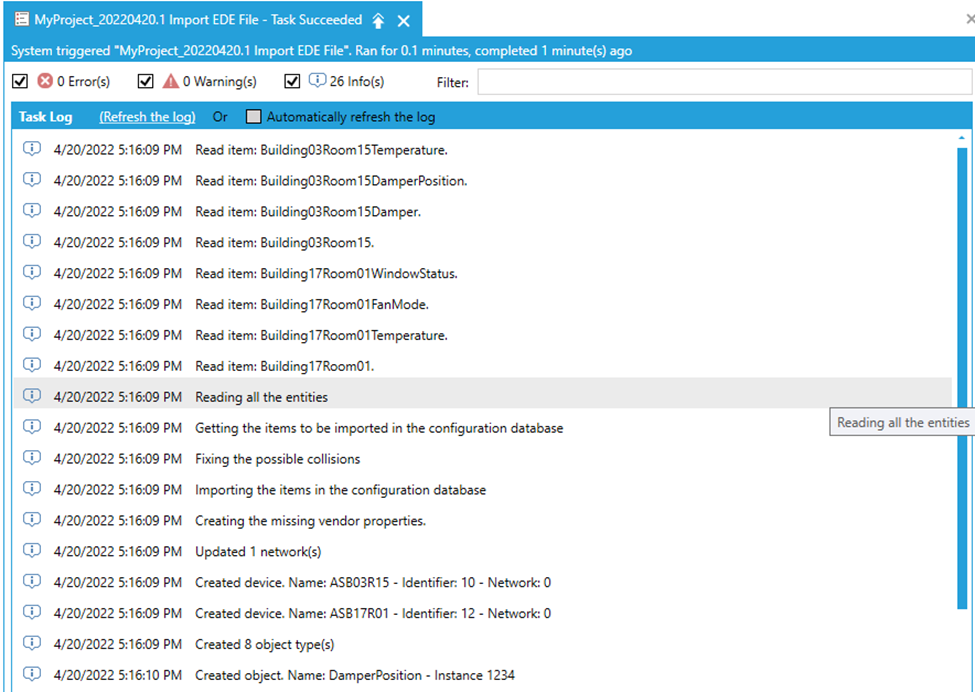
From the task explorer, you can see the log generated during the import process (right-click on the task and select View Log).
Task Log
Note: The import operation will insert the new discovered entities and update the existing. It also provide a mechanism of collision detection in case of colliding names (for Devices and Objects). Since the operation is executed on a separate task, Workbench is fully available and responsive during the execution.
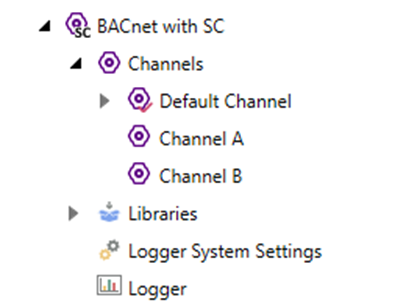
Channel Root
The Channel Root entity is the top most element in BACnet hierarchy. It contains the available Channels.
Channel Root Level in the Project Tree
If you double-click on it, a dialog will be opened.
Channel Root Dialog
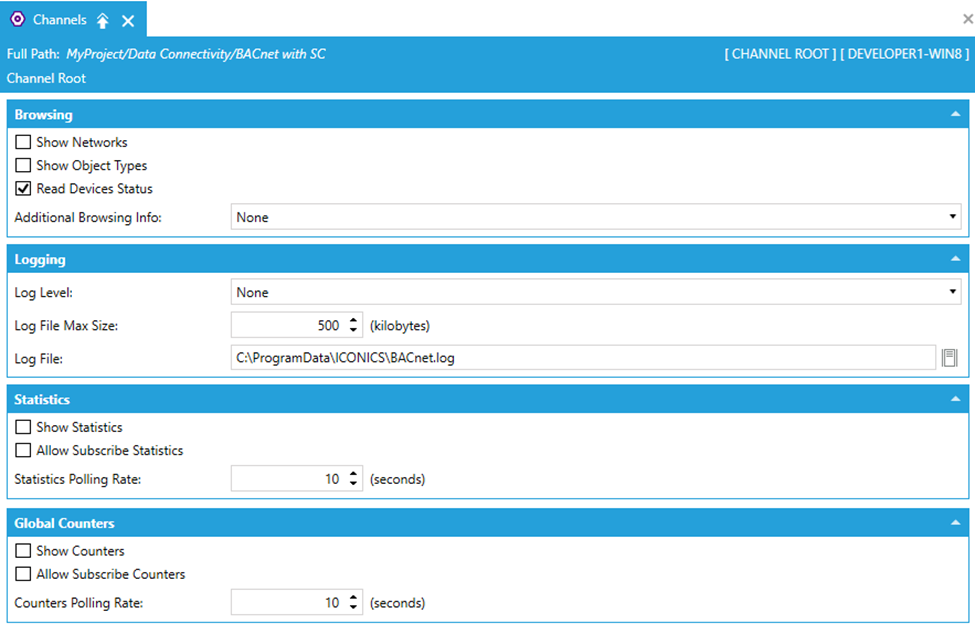
In this dialog, it’s possible to configure some settings that are global for all the available channels. This is the list of the settings:
Browsing
• Show Networks - If true, the Network level will be shown in the runtime tree in the Data Browser.
• Show Object Types - If true, the Object Type level will be shown in the runtime tree in the Data Browser
• Additional Browsing Info - Choose between:
-
None: no additional info will be added to devices/objects/properties in the runtime tree
-
Ids: the id of the device/object/ property will be appended to the name in the runtime tree
-
Instances: the instance of the device/object/property will be appended to the name in the runtime tree
Logging
• Log Level - Specifies the level of logging for the BACnet stack log file. You can choose between None, Error, Info, Warning, Network, Debug levels.
• Log File Max Size [kilobytes] - Specifies the maximum size of the log file. Range can be between 0 and 4194303.
• Log File - Specifies the path of the BACnet stack log file.
Statistics
• Show Statistics - If true, the statistics using API diagnostics will be shown at Channel level.
• Allow Subscribe Statistics - If true, the statistics tags can be subscribed.
• Statistics Polling Rate [seconds] - Specifies the refresh rate of the counters. Range can be between 0 and 4194303. Default is 10.
Global Counters
• Show Counters - If true, the counters will be shown in the Channel Root level.
• Allow Subscribe Counters - If true, the counters tags can be subscribed.
• Counters Polling Rate [seconds] - Specifies the refresh rate of the counters. The range can be between 0 and 4194303. Default is 10.
Click on the Apply button to apply the changes.
Channels
Under the Channel Root level, we can have multiple Channel entities. Each Channel can contain multiple Networks. There should be always a Channel marked as default. It’s possible to identify it easily since the icon contains a red flag.
Channel Level in the Project Tree
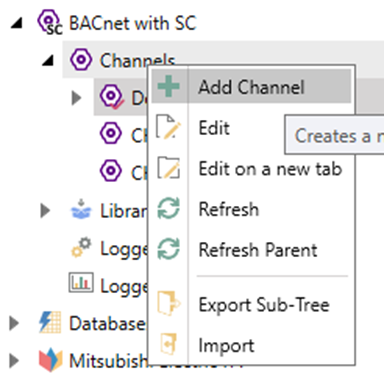
To create a BACnet Channel
To create a new BACnet Channel, right-click on the Channel Root (Channels) and click on Add Channels as shown below:
Add Channel to Database from Project Explorer
- OR -
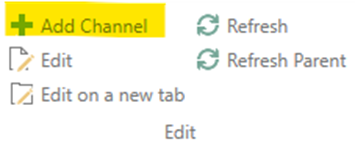
Select the Channels branch, then click on the ‘Add Channel’ button, shown below, in the Edit section of the Home ribbon in Workbench.
The BACnet Channel properties window will appear in the right pane of the Workbench.
To edit a BACnet Channel
If you double-click on it, a dialog will open. The dialog contains four tabs to set up different sets of settings:
-
General Settings
-
Communication Settings
-
Port Settings
-
Time Synchronization Settings
-
Foreign Devices Settings
-
BBMD Devices Settings
General Tab
This tab contains the "General" Channel settings.
Channel dialog (General / Runtime Settings)
.png)
This is the list of the configurable settings:
• Local Device ID - specifies the local device identifier for the BACnet API. Each BACnet device on the network requires a unique device identifier.
• ReadService Type - specifies the service type to read the data. The possible options are Automatic, Read Property, Read Property Multiple, Confirmed COV or Unconfirmed COV. Default is Automatic.
• Re-Subscribe COV Period [seconds] - specifies the re-subscribe period for the change of value (COV) subscriptions in seconds. Default is 3600.
• Default Polling Rate - sets the frequency of communication between BACnet devices and the BACnet connector. Range can be between 0 and 4194303. Default is 30.
• Default Priority - sets a number between 1 and 16 as to the criticality of a device, in comparison with others. Assigning a priority level marks the importance of messages and which will override others. Some numbers are pre-assigned (1, 2, 5, 6, 8), with life safety naturally having highest priority. Other numbers (3, 4, 7 and 9 through 16) are not
assigned and therefore are available for users to set their own priorities. Default is 8.
Priority Level Application
1 Manual Life Safety
2 Automatic Life Safety
3 Available
4 Available
5 Critical Equipment Control
6 Minimum On/Off
7 Available
8 Manual Operator
9 Available
10 Available
11 Available
12 Available
13 Available
14 Available
15 Available
16 Available
• Default Decimal Places - specifies the default number of decimal places of real values. -1 means automatic (calculated from the device’s properties). Default is 1.
• This is the Default Channels - True, if the Channel is the ‘default’ Channel.
Communication Tab
Channel dialog (Communication / Communication Settings)
This is the list of the configurable settings:
-
APDU Timeout [milliseconds] - sets the time the Application Protocol Data Unit driver will wait for response from a connected device before trying again or proceeding to the next request. Range can be between 500 and 300000. Default is 6000.
-
APDU Segment Timeout [milliseconds] - indicates the amount of time in milliseconds between retransmissions of a data frame segment requiring acknowledgement for which no acknowledgement has been received. Range can be between 500 and 30000. Default is 6000.
-
APDU Retries - indicates the maximum number of times that an APDU shall be retransmitted. If the device does not perform retries, then this property shall be set to 0. Range can be between 0 and 10. Default is 3.
-
Expiry Time [seconds] - specifies the time when the unused values are removed from the watch service. Range can be between 0 and 1000000. Default is 300.
-
Consecutive Errors - specifies the upper limit of the consecutive errors to be raised before a device is placed in the offline state. Range can be between 0 and 1000000. Default is 0.
-
Offline Device Polling[seconds] - once the IO server detects a device is offline, it stops all attempts to communicate with this device or any other object in the device. Periodically based on this setting the IO server will re-attempt to establish communications with this device. If successful, the device will be placed online and all required communications to objects in that device will attempt to re-establish. Range can be between 0 and 1000000. Default is 60.
-
Subscribe Timeout[milliseconds] - this is actually the Subscribe Cycle time. The BACnet engine will only process requests, any request including COV subscriptions and Read Property requests, based on a cycle as determined by this setting. For example if this is set at 5000 (5 seconds), all requests will be accumulated for 5 seconds. At the end of this period all requests will be sent to protocol stack for processing. Range can be between 0 and 4194303. Default is 1000.
-
Max Properties Per Requests: specifies the maximum number of properties per request. Range can be between 1 and 50. Default is 20.
-
Who-Is Period [seconds] - specifies the delay between consecutive whoIs requests to the same device. Range can be between 0 and 4194303. Default is 300.
-
Max Parallel Requests - specifies the maximum number of parallel requests made to watch the values of the properties of each device. Range can be between 1 and 128. Default is 5.
-
Time Between Who-Is Send[milliseconds] - specifies the time between whoIs send. Range can be between 0 and 4194303. Default is 100.
-
Max TSM Per Device - the maximum number of BACnet transactions (ReadProperty, COV Subscribe, WriteProperty) that can simultaneously be in active (in a non null state) to a device. When this number is reached, no further transactions will be processed to the device, until one or more transactions are closed. This can be used to throttle activity to a device. Range can be between 1 and 16. Default is 8.
-
Max TSM Per Router - The maximum number of BACnet Transactions (ReadProperty, COV Subscribe, WritePropery), that can simultaneously be in active (in a non null state), and sent through a specific BACnet router. When this number is reached, no further transactions will be sent through that router, until one or more transactions are closed. This can be used to throttle activity through a router. Please note that some devices, such as Automated Logic LGR’s, are acting simply as BACnet routers, so that all requests are going directly to the underlying MSTP serial bus. This feature can be used to control the amount of activity being imposed on these busses. Range can be between 1 and 16. Default is 16.
-
Segmentation - specifies the segmentation supported by the devices; sending, receiving, both or no segmentation supported. Default is Both.
Channel dialog (Communication /Trend Settings)

This is the list of the configurable settings:
-
Read Range Type: specifies the type of read range. It can be Buffer Position + Time, Time + Sequence Number or Time. Default is Buffer Position + Time
-
Trend Read Type: specifies the type of trend read. It can be Automatic, Event Notifications or Polling. Default is Automatic
-
Trend Read Polling Period [milliseconds]: specifies the polling rate to be used when the trend read type is set to Polling. Range can be between 0 and 4194303. Default is 3600.
Channel dialog (Communication / Notification Class Settings)
This is the list of the configurable settings:
-
Manage Recipients’ Lists: true, if we want to manage the recipients’ lists
-
Notification Type: specifies if confirmed notification flag for the subscriptions to the notification classes is enabled. By default is enabled
-
Transitions: specifies the desired notification type for the subscription to the notification classes (to normal, to off normal, to fault)
-
Notify From: specifies the start time for the subscriptions to the notification classes
-
Notify To: specifies the end time for the subscriptions to the notification classes
-
Valid Days: specifies the days when the subscriptions to the notification classes are enabled
-
Runtime Process Identifier: specifies the process identifier value used by the runtime when subscribing to event notification classes
-
Event Notifications: specifies if the runtime will only accept event notifications where the runtime process identifier is in the recipient list or all the event notifications ignoring the process identifier
-
Max Subscribe Time [seconds]: specifies the maximum time for the subscribe to the recipient list in the notification class. Range can be between 30 and 300. Default is 30.
-
Max Unsubscribe Time [seconds]: specifies the maximum time for the unsubscribe from the recipient list of the notification class. Range can be between 30 and 300. Default is 30.
-
Connection Check Period [seconds]: specifies the period in which the connection with the notification class is checked. Range can be between 0 and 86400. Default is 3600.
-
Subscribe Retry Period [seconds]: specifies the retry period for subscribing to the recipient list in the notification class. Range can be between 1 and 3600. Default is 60.
-
Unsubscribe Retry Period [seconds]: specifies the retry period for unsubscribing from the recipient list in the notification class. Range can be between 1 and 3600. Default is 60.
Channel dialog (Communication / Alarm Settings)

This is the list of the configurable settings:
-
AE Summary Type: specifies the type for the initial reading of the alarms. Possible values are Automatic, Get Alarm Summary, Get Enrolment Summary, Get Event Information. Default is Automatic
-
Use timestamp from the ACK notification: if true, device timestamp for alarm ACK will be logged instead of server time. It’s disable by default
Port Tab
Channel dialog (Port / Port Settings)

This is the list of the configurable settings:
• Channel Type - specifies the port type. We support BACnetIP, Ethernet, MSTP, PTP and BACnetSC port types. Default is BACnetIP.
• Channel Network Number - specifies the network number of the port. Default is 0.
• UDP Port -specifies the UDP port number. Default is 47808.
Channel dialog (Port / Ethernet Settings)

• Type - specifies the type of ethernet settings. Possible values are Adapter or IP Address.
• Adapter - enabled if the selected type is Adapter. It specifies the adapter.
• IP Address -enabled if the selected type is IP Address. It specifies the IP Address.
Channel dialog (Port / BACnet SC Settings)
These properties are configurable when the selected Channel Type is BACnet/SC. This is the list of the configurable settings:
-
Primary Hub URI: provides the URI for the primary hub function. The value shall be a UTF-8 string containing a WebSocket URI as of RFC 6455, formatted as of RFC 3986. If no URI is configured, this property shall contain an empty UTF-8 string.
-
Failover Hub URI: provides the URI for the failover hub function. The value shall be a UTF-8 string containing a WebSocket URI as of RFC 6455, formatted as of RFC 3986. If no URI is configured, this property shall contain an empty UTF-8 string.
-
Minimum Reconnect Time [seconds]: specifies the minimum time in seconds between each attempt to establish a BACnet/SC connection. Reconnection strategies and delay between attempts to connect to other BACnet/SC nodes are generally a local matter. Range can be between 2 and 300. Default is 10.
-
Maximum Reconnect Time [seconds]: specifies the maximum time in seconds between each attempt to establish a BACnet/SC connection. Reconnection strategies and delay between attempts to connect to other BACnet/SC nodes are generally a local matter. Range can be between 2 and 300. Max is 600. Default is 300.
-
Connection Wait Timeout [seconds]: identifies the time in seconds that a node waits for a response BVLC message while connecting a BACnet/SC connection. Range can be between 5 and 300. Default is 10.
-
Disconnect Wait Timeout [seconds]: identifies the time in seconds that a node waits for a response BVLC message while disconnecting from a BACnet/SC connection. Range can be between. Range can be between 5 and 300. Default is 10.
-
Initiating Heartbeat Timeout [seconds]: identifies the time in seconds of BVLC message inactivity on a BACnet/SC connection before a Heartbeat-Request message is sent by an initiating BACnet/SC node. Range can be between 3 and 300. Default is 300.
-
Accepting Heartbeat Timeout [seconds]: identifies the time in seconds of BVLC message inactivity on a BACnet/SC connection before an accepting BACnet/SC node will drop the connection. Note that proper operation requires that this be configured to be sufficiently greater than the SC_Initiating_Heartbeat_Timeout of all the nodes that initiate connections to this node. Range can be between 3 and 500. Default is 500.
-
Enable Hub Function: indicates and determines whether (TRUE) or not (FALSE) this port is performing the BACnet/SC hub function.
-
Hub Function Accept URIs: contains an array of WebSocket URIs that represents the possible URIs a BACnet/SC hub connector device could use to connect to the hub function. This property provides a BACnet visible way to store and present the possible BACnet/SC hub function WebSocket URIs. Each WebSocket URI entry shall be a UTF-8 string containing a WebSocket URI as of RFC 6455, formatted as of RFC 3986.
-
Direct Connect Accept URIs: contains an array of WebSocket URIs that are included in the Address-Resolution-Ack response. This array represents the possible URIs an initiating BACnet/SC direct connection device could use to directly connect to this device. Each WebSocket URI entry shall be a UTF-8 string containing a WebSocket URI as of RFC 6455, formatted as of RFC 3986.
-
Operational Certificate: represents the X.509 certificate used to identify the IP host of the port. The value of this property shall be an X.509 certificate in binary DER format. If no operational certificate is configured, this property, if present, shall be a zero length OCTET STRING.
-
CA Certificates: represents the certificate authorities for X.509 certificates the device accepts when it is establishing a secure connection. Each OCTET STRING shall be an X.509 certificate in binary DER format. If no CA certificate is present in an array element, the OCTET STRING shall be of zero length. This property shall support certificates up to 2048 octets in size in each element and shall support at least one entry. Support of larger certificates as well as multiple CA certificates is optional.
Time Synchronization tab
Channel dialog (Time Synchronization / Time Synchronization)

This is the list of the configurable settings:
-
Enabled: true, if the Time Synchronization is enabled
-
Time Interval [minutes]: specifies the period for the automatic time synchronization. Range can be between 1 and 65535. Default is 60.
-
Use UTC Time: if true, we will use UTC time synchronization service for the automatic time synchronization.
Channel dialog (Time Synchronization / Recipients)
This is the list of the configurable settings:
-
Name: the string representation of the recipient
-
Type: specifies the type of the recipient. The possible options are Address or Device.
-
Device Id: specifies the identifier of the device. It’s enabled if the type is Device.
-
MAC: specifies the MAC address. It’s enabled if the type is Address.
-
Network Number: specifies the network number. It’s enable if the type is Address.
Foreign Devices Tab
Channel Dialog (Foreign Devices Settings)

This is the list of the configurable settings:
-
Enabled: true, if the Foreign Devices are enabled.
-
Time-To-Live [seconds]: specifies the number of seconds within which a foreign device must re-register with a BBMD or risk having its entry purged from the BBMD.
Channel dialog (Foreign Devices / Foreign Devices)
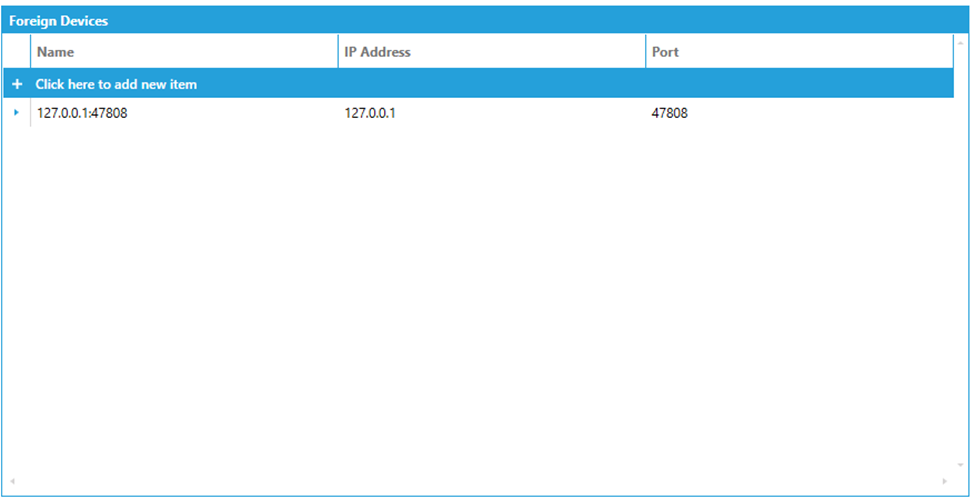
This is the list of the configurable settings:
-
Name: automatically generated combining the IP and the Port
-
IP Address: specifies the IP address of the foreign device. Default is 127.0.0.1.
-
Port: specifies the port of the foreign device. Default is 47808.
BBMD Device Tab
Channel dialog (BBMD Devices / BBMD Devices Options)
.png)
This is the list of the configurable settings:
- Enabled: true if the BBMD Devices are enabled
Channel dialog (BBMD Devices / BBMD Devices)

This is the list of the configurable settings:
-
BDT Address: specifies the BDT (Broadcast Distribution Table) Address of the BBMD device
-
IP Address: specifies the IP Address of the BBMD device
-
Subnet Mask: specifies the subnet mask of the BBMD device
-
Port: specifies the port of the BBMD device
Send Who-Has
The Who-Has service is used by a sending BACnet-user to identify the Device object identifiers and network addresses of other BACnet devices whose local databases contain an object with a given Object_Name or a given Object_Identifier.
It’s possible to send a Who-Has right-clicking on a Channel and selecting ‘Send Who-Has’ from the context menu as shown below:
Send Who-Has action from Channel level
- OR -
Select the Channel for which you want to call the action, then click on the Send Who-Has button, shown below, in the Tools section of the Home ribbon in Workbench
Send Who-Has button

The Send Who-Has dialog appears as shown below:
Send Who-Has dialog
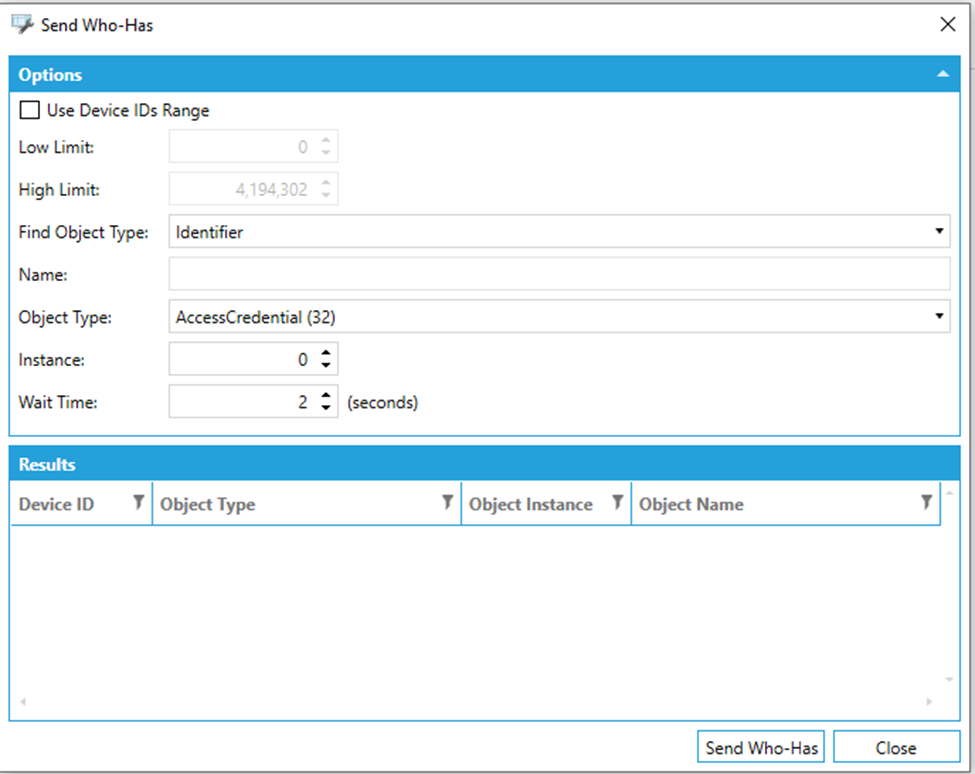
The parameters of the action are:
Use Device IDs Range: true, if we want to use the Device IDs range
Low Limit: together with High Limit, it defines the devices that are qualified to respond with an I-Have service request if the ‘Object Identifier’ or ‘Object Name’ criteria are satisfied. Range can be between 0 and 4194302. Default is 0.
High Limit: together with Low Limit, it defines the devices that are qualified to respond with an I-Have service request if the ‘Object Identifier’ or ‘Object Name’ criteria are satisfied. Range can be between 0 and 4194302. Default is 4194302.
Find Object Type: specifies if we want to filter the devices using the Identifier or the Name of the objects
Name: specifies the ‘Object Name’ criteria to be used to identify the devices that are qualified to respond with an I-Have service request when Find Object Type is set to Name
Object Type: specifies the object type of the ‘Object Identifier’ criteria to be used to identify the devices that are qualified to respond with an I-Have service request when Find Object Type is set to Identifier
Instance: specifies the instance of the ‘Object Identifier’ criteria to be used to identify the devices that are qualified to respond with an I-Have service request when Find Object Type is set to Identifier
Wait Time [seconds]: specifies the wait time to perform the action
Click on the Send Who-Has button to start the action.
The result of the action will be shown in the Result section. For each object it will show:
Device ID: the identifier of the device
Object Type: the type of the object
Object Instance: the instance of the object
Object Name: the name of the object
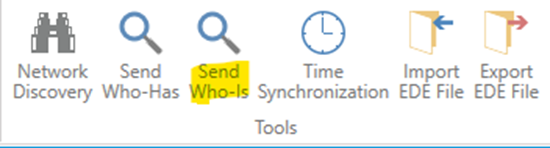
Send Who-Is
The Who-Is service is used by a sending BACnet-user to determine the Device object identifier, the network address, or both, of other BACnet devices that share the same internetwork. The Who-Is service is an unconfirmed service. The Who-Is service may be used to determine the Device object identifier and network addresses of all devices on the network, or to determine the network address of a specific device whose Device object identifier is known, but whose address is not.
It’s possible to send a Who-Is right-clicking on a Channel and selecting ‘Send Who-Is from the context menu as shown below:
Send Who-Is action from Channel level
- OR -
Select the Channel for which you want to call the action, then click on the Send Who-Is button, shown below, in the Tools section of the Home ribbon in Workbench.
Send Who-Is Button
The Send Who-Is dialog appears as shown below:
Send Who-Is dialog
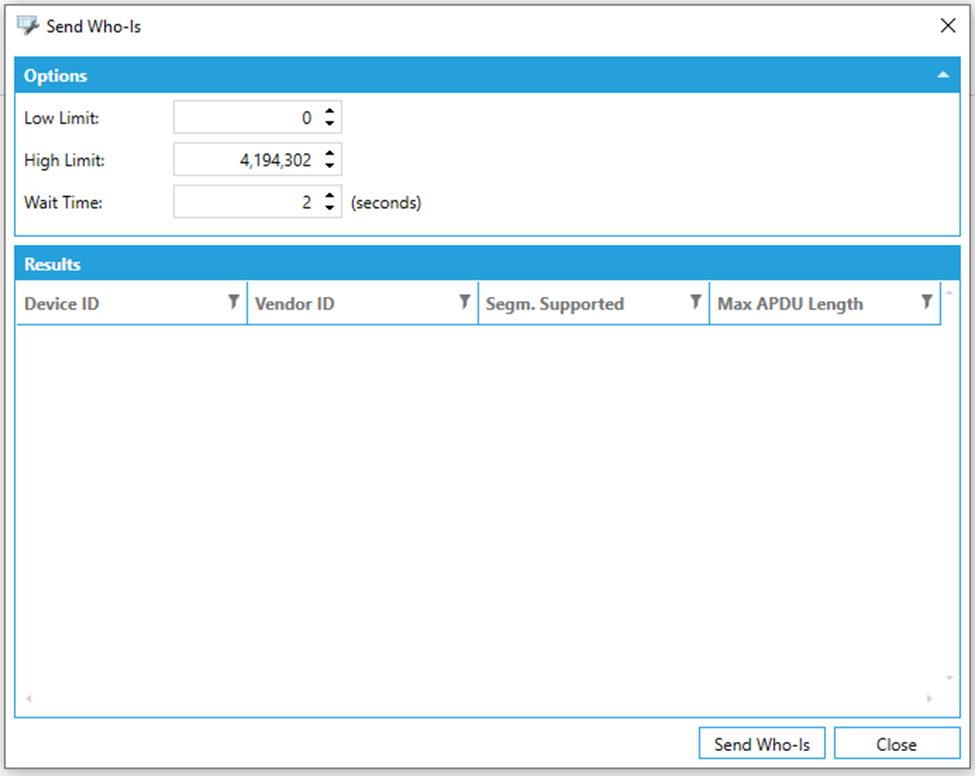
The parameters of the action are:
Low Limit: together with High Limit, it defines the devices that are qualified to respond with an I-Am service request
High Limit: together with Low Limit, it defines the devices that are qualified to respond with an I-Am service request
Wait Time [seconds]: specifies the wait time to perform the action
Click on the Send Who-Is button to start the action.
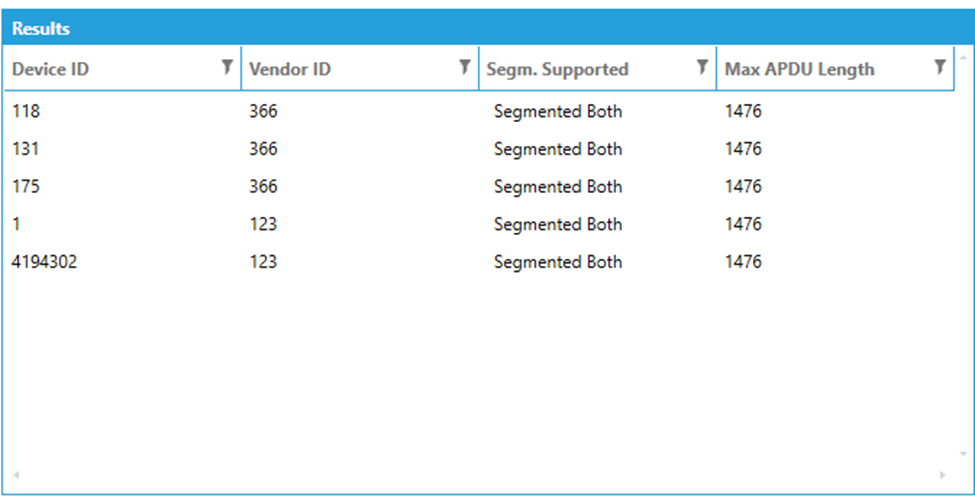
The result of the action will be shown in the Result section. For each device it will show:
Device ID: the identifier of the device
Vendor ID: the identifier of the vendor
Segmentation Supported: the type of supported segmentation
Max APDU Length: the max APDU length, which means the maximum number of octets that may be contained in a single, indivisible APDU.
Send Who-Is Result
Time Synchronization
Time synchronization action can be used to synchronize the Device’s time.
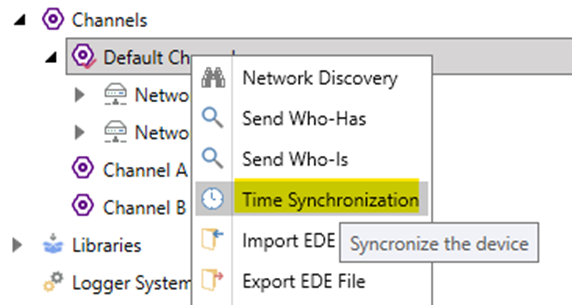
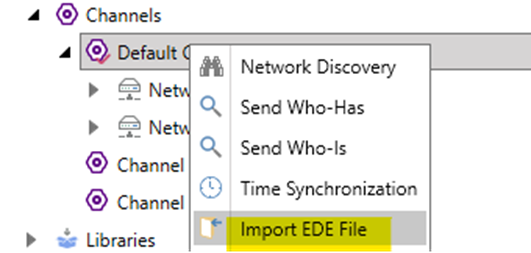
It’s possible to execute a Time Synchronization right-clicking on a Channel and selecting ‘Time Synchronization’ from the context menu as shown below:
Time Synchronization action from Channel level
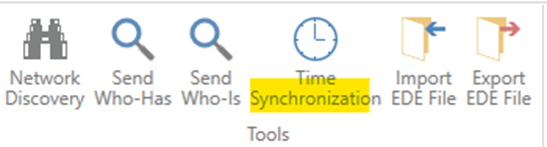
- OR -
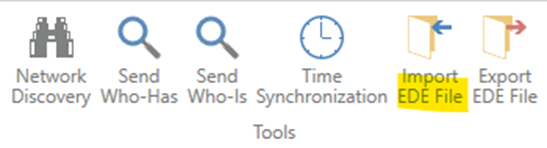
Select the Channel for which you want to call the action, then click on the Time Synchronization button, shown below, in the Tools section of the Home ribbon in Workbench.
Time Synchronization button
The Time Synchronization dialog appears as shown below:
Time Synchronization dialog
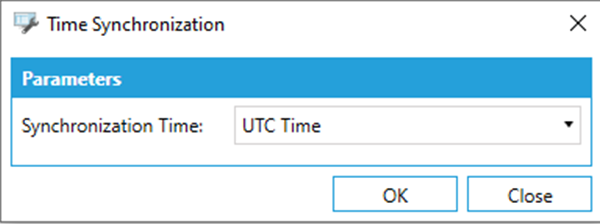
The parameters of the action are:
Synchronization Time - specifies if we want to use Local Time or UTC Time
Click on the OK button to start the action.
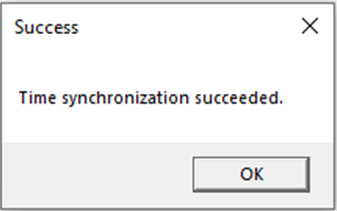
The result of the action will be shown in a message box as shown below:
Time Synchronization result
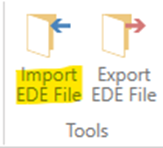
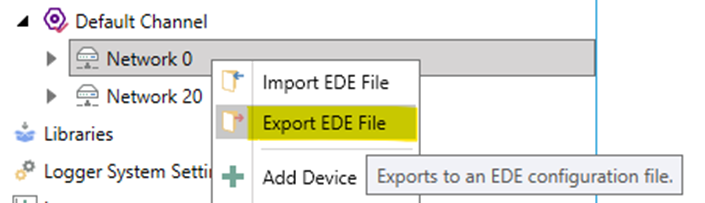
Import EDE File
BACnet SC provider allows you to import and Engineering Data Exchange (.ede) file.
It’s possible to execute an EDE import right-clicking on a Channel and selecting ‘Import EDE File’ from the context menu as shown below:
Import EDE File action from Channel level
- OR -
Select the Channel for which you want to call the action, then click on the Import EDE File button, shown below, in the Tools section of the Home ribbon in Workbench.
Import EDE File button
The Import EDE File dialog appears as shown below:
Import EDE File dialog (Settings)
.png)
The settings are:
EDE File Type: it specifies the type of EDE file to be imported. We support CSV Files and Excel Files.
EDE File: it specifies the path of the EDE file we want to import
Separator: in case of CSV file, it specifies the separator used in the file. Default is comma.
Network Attribute: it specifies which attribute in the EDE file should be used to retrieve the network number.
By clicking on the "Next" button, the system will parse the EDE file and will show all the available devices in it.
Import EDE File dialog (Available Devices)
.png)
For each device we could see:
Name: the name of the device
Instance: the instance of the device (identifier)
In Address Space: true, if the device is already in the address space
Network: the network where the device is
It’s possible to filter the devices by all the properties.
You can manually select the devices you want to import or you can use the context menu to select all, unselect all, invert current selection.
Import EDE File dialog (Available Devices) - Context Menu
 - Context_Menu.png)
Clicking on the Import EDE button, the Import operation will be performed and all the selected devices will be imported in the configuration database.
The operation is executed on a separate task on the server.
Import EDE File Task
We can see the log of the operation right-clicking on the task and selecting ‘View Log’ from the context menu. The log will appear as shown below.
Import EDE Log
If the action has been executed successfully the address space will be updated with the data contained in the EDE file:
Import EDE Address Space
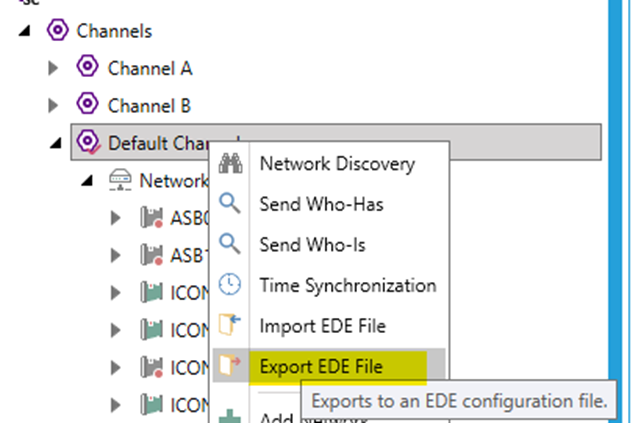
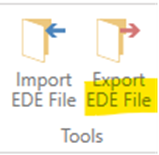
Export EDE File
BACnet SC provider allows you to export the configuration data in an Engineering Data Exchange (.ede) file.
It’s possible to execute an EDE export right-clicking on a Channel and selecting ‘Export EDE File’ from the context menu as shown below:
Export EDE File action from Channel level
- OR -
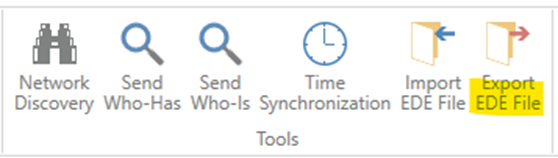
Select the Channel for which you want to call the action, then click on the Export EDE File button, shown below, in the Tools section of the Home ribbon in Workbench.
Export EDE File button
The Export EDE File dialog appears as shown below:
Export EDE File dialog (Available Devices)
.png)
In the dialog we can see the list of available devices in the selected Channel.
For each device we can see:
Device ID: the identifier of the device
Name: the name of the device
Network: the network where the device is
It’s possible to filter the devices by all the properties.
You can manually select the devices you want to import or you can use the context menu to select all, unselect all, invert current selection.
Export EDE File dialog (Available Devices) - Context Menu
 - Context_Menu.png)
By clicking on the "Next" button we can do some settings before performing the export operation:
Export EDE File dialog (Settings)
.png)
It’s possible to specify:
Included Properties: the properties to be included (Description, Unit…)
Concurrency Level: the concurrency level used by the task to retrieve the value of the properties of the object selected above (it’s enabled if there’s at least one included property)
Continue On Error: true, if we want the operation to continue in case of errors when reading the value of properties (it’s enabled if there’s at least one included property)
Exportable Objects: the collection of exportable objects retrieved by the devices selected in the previous page of the wizard. For each object we can see:
o Name: the name of the object
o Instance: the instance of the object
o Object Type: the type of the object
o Device Name: the name of the device containing the object
o Device ID: the identifier of the device containing the object
It’s possible to filter the objects using all the properties
You can manually select the objects you want to export or you can use the context menu to select all, unselect all, invert current selection.
Export EDE File dialog (Exportable Objects) - Context Menu
 - Context_Menu.png)
Clicking on the Export button, the Export operation will be performed and all the selected objects will be exported in the EDE file.
The operation is executed on a separate task on the server.
Export EDE File Task
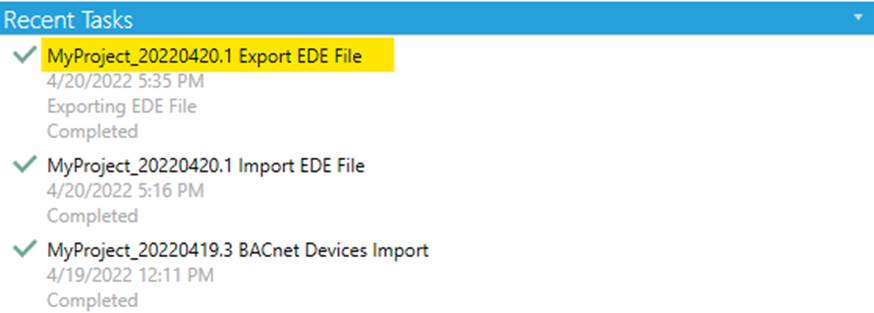
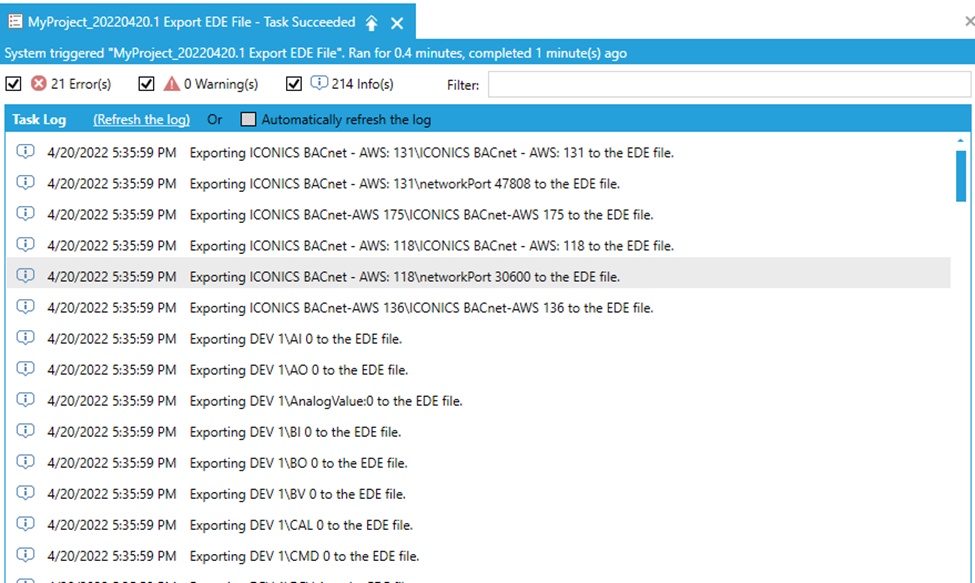
We can see the log of the operation right-clicking on the task and selecting ‘View Log’ from the context menu. The log will appear as shown below.
Export EDE Log
To download the generated EDE file, you need to right click on the task and select download generated file. Then you just need to specify the location where to download the generated file.
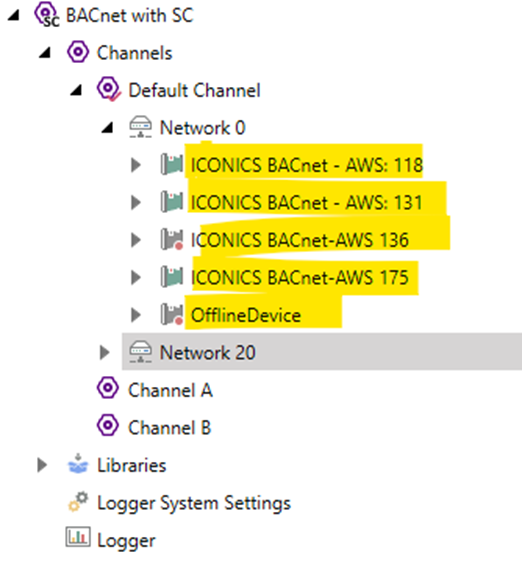
Networks
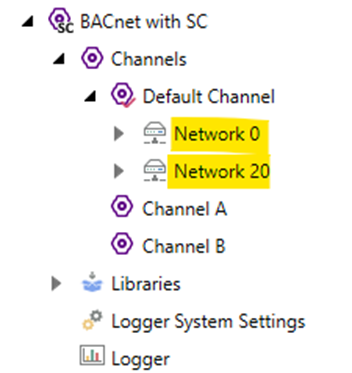
Under a Channel, there can be multiple Network entities. Each Network can contain multiple Devices.
Network Level in the Project Tree
To create a BACnet Network
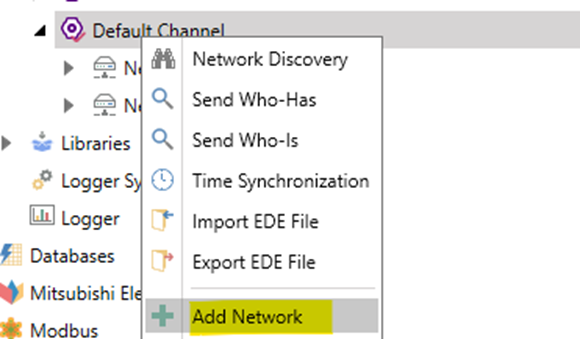
To create a new BACnet Network, right click on a Channel and click on Add Network as shown below:
Add Network to Database from Project Explorer
-
- OR -
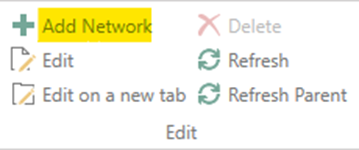
Select the Channel branch, then click on the Add Network button, shown below, in the Edit section of the Home ribbon in Workbench.
Add Network button
The BACnet Network properties window will appear in the right pane of Workbench.
To edit a BACnet Network
If you double click on it, a dialog will open.
Network Dialog
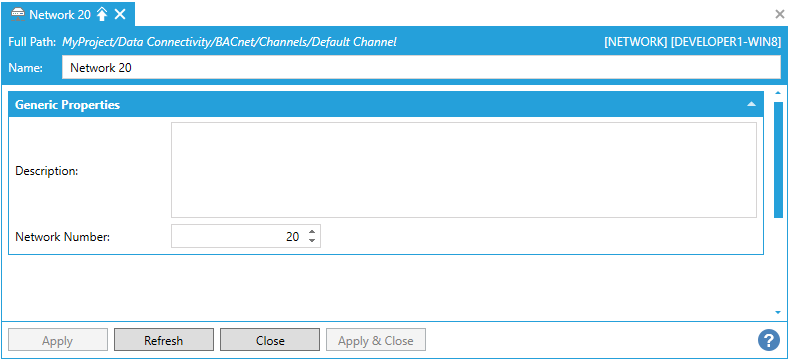
The dialog contains some settings that you can configure. This is the list of the settings:
Name - The name of the Network
Description - The description of the Network
Network Number - the number of the Network
Click on the Apply button to apply the changes.
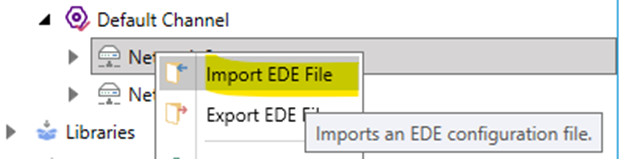
Import EDE File from Network level
It’s possible to execute an Import EDE File action in a Network. The only difference with the same action in the Channel level described above is that we don’t need to specify an attribute to retrieve the network number, since the network number is retrieved by the network itself.
Import EDE File action from Network level
Select the Network for which you want to call the action, then click on the Import EDE File button shown below in the Tools section of the Home ribbon in Workbench.
Import EDE File button
Export EDE File from Network level
It’s possible to execute an Export EDE File action in a Network. The only difference with the same action in the Channel level described above is that the collection of available devices in retrieved from the selected network and not from all the networks in a channel.
Export EDE File action from Network level
Select the Network for which you want to call the action, then click on the Export EDE File button, shown below, in the Tools section of the Home ribbon in Workbench.
Export EDE File button
Devices
Under a Network, there can be multiple Device entities. Each Device can contain multiple Object Types.
Device Level in the Project Tree
To create a BACnet Device
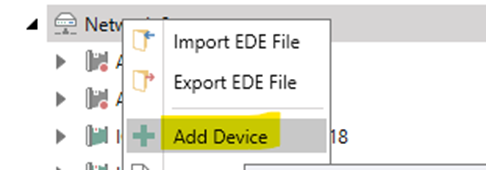
To create a new BACnet Device, right click on a Network and click on Add Device as shown below:
Add Device to Database from Project Explorer
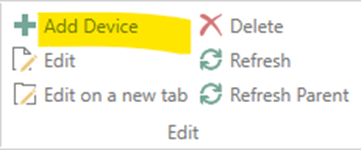
- OR -
Select the Network branch, then click on the Add Device button shown below in the Edit section of the Home ribbon in Workbench.
Add Device button
The BACnet Device properties window will appear in the right pane of Workbench.
To edit a BACnet Device
If you double-click on it, a dialog will open
The dialog contains some settings that you can configure. This is the list of the settings:
Generic Properties
Device dialog (Generic Properties)
.png)
Name - the name of the Device
Description -the description of the Device
DeviceID - specifies the BACnet identifier of the device
VendorID - specifies the identifier of the vendor
Model Name - specifies the model name. It is assigned by the vendor to represent the model of the device
Firmware Revision - specifies the firmware revision. It is assigned by the vendor to represent the level of firmware installed in the device
Static Binding
Device dialog (Static Binding)
.png)
Enable Static Binding - true, to enable the Static Binding settings
Network - the number of the network where the device is
MAC [hexadecimal] - specifies the BACnet MAC Address of the device used for the static binding
Router Static Binding
Device dialog (Router Static Binding)
.png)
Enable Router Static Binding - true, to enable the Router Static Binding settings
Router to Networks - specifies the network numbers for the routers
First Router MAC [hexadecimal] - specifies the MAC Address when the device is a router
Override Settings
Device dialog (Override Settings)
.png)
Read Service Type - overrides the Read Service Type value defined at Channel level
Re-Subscribe COV Period[seconds]: overrides the Re-Subscribe COV Period value defined at Channel level
Polling Rate[seconds]: overrides the Polling Rate value defined at Channel level
Priority - overrides the Priority value defined at Channel level
Max Parallel Requests - overrides the Max Parallel Requests value defined at Channel level
Max Properties Per Request - overrides the Max Properties Per Request value defined at Channel level
Override Time Zone Information - overrides the Time Zone Information value defined at Channel level
Override Trend Settings
Device dialog (Override Trend Settings)
.png)
Enable Trends - if true, the trends are enabled for the device
Trend Read Type - overrides the Trend Read Type value defined at Channel level
Read Range Type - overrides the Read Range Type value defined at Channel level
Trend Read Polling Period - overrides the Trend Read Polling Period defined at Channel level
Override Notification Class Settings
Device dialog (Override Notification Class Settings)
.png)
Manage Recipients’ Lists - overrides the Manage Recipients’ Lists value defined at Channel level
Override Alarm Settings
Device dialog (Override Alarm Settings)
.png)
Enable Alarms - if true, the alarms are enabled for the device
AE Summary Type - overrides the AE Summary Type defined at Channel level
Use Timestamp from ACK Notification - overrides the Use Timestamp from ACK notification value defined at Channel level
Device Counters
Device dialog (Device Counters)
.png)
Show Counters - specifies if the counters are visible or not at Device level
Allow Subscribe Counters - specifies if the counters at Device level can be subscribed
Counters Polling Rate - specifies the polling rate of the counters at Device level. Range can be between 0 and 4194303. Default is 10.
Click on the Apply button to apply the changes.
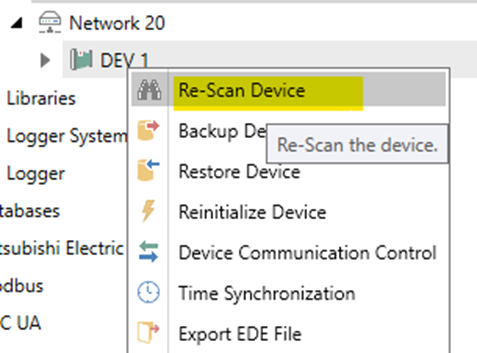
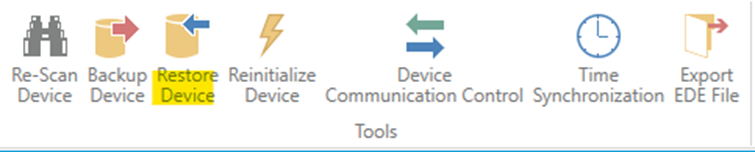
Re-Scan Device
Workbench provider let the user to execute again a scan operation on a BACnet Device.
It is possible to execute a Re-Scan right-clicking on a Device and selecting ‘Re-Scan Device’ from the context menu as shown below:
Re-Scan Device action from Device level
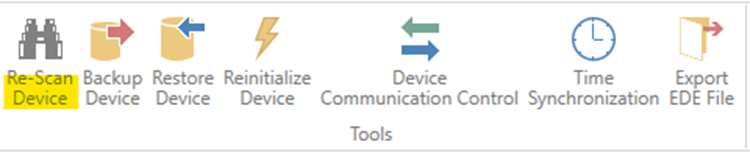
Select the Device for which you want to call the action, then click on the Re-Scan Device button, shown below, in the Tools section of the Home ribbon in Workbench.
Re-Scan Device button
The Re-Scan Device dialog appears as shown below:
Re-Scan Device dialog
The dialog is the same dialog already described in the Network Discovery section.
It works in the same way and at the end of the operation, it will execute a separate task on the server to update the configuration of the device in the database.
Backup Device
Workbench provider let the user execute a backup operation on a BACnet Device.
It’s possible to execute a Backup right-clicking on a Device and selecting ‘Backup Device’ from the context menu as shown below:
Backup Device action from Device level
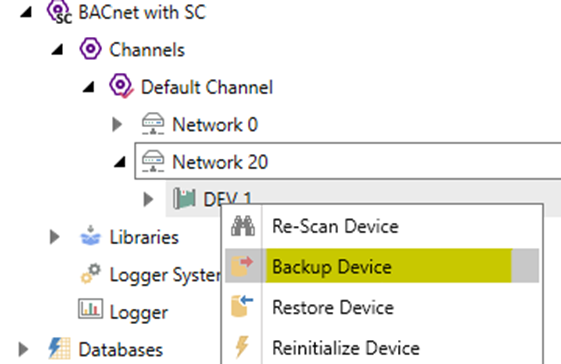
Select the Device for which you want to call the action, then click on the Backup Device button shown below in the Tools section of the Home ribbon in Workbench.
Backup Device button

The parameters of the action are:
File: specifies the directory where the backup of the device will be stored
Password: the password to be used to execute the operation
Click on the OK button to start the action.
The result of the action will be shown in a message box.
Restore Device
Workbench provider lets the user execute a restore operation on a BACnet Device.
It is possible to execute a Restore right clicking on a Device and selecting ‘Restore Device’ from the context menu as shown below:
Restore Device action from Device level
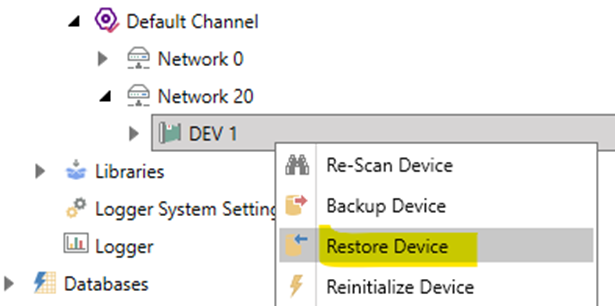
Select the Device for which you want to call the action, then click on the Restore Device button, shown below, in the Tools section of the Home ribbon in Workbench.
Restore Device button
The Restore Device dialog appears as shown below:
Restore Device dialog
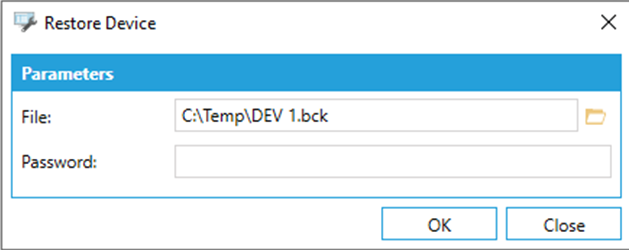
The parameters of the actions are:
- File - specifies the path of the BACnet device file to be restored
- Password - the password to be used to execute the operation
Click on the OK button to start the action.
The result of the action will be shown in a message box.
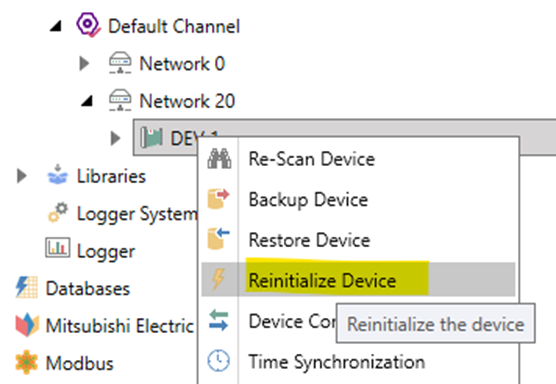
Reinitialize Device
Workbench provider lets the user execute a Reinitialize operation on a BACnet Device.
It is possible to execute a Reinitialize right clicking on a Device and selecting ‘Reinitialize Device’ from the context menu as shown below:
Reinitialize Device action from Device level
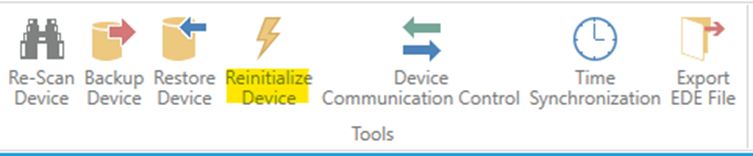
- OR -
Select the Device for which you want to call the action, then click on the Reinitialize Device button, shown below, in the Tools section of the Home ribbon in Workbench.
Reinitialize Device button
The Reinitialize Device dialog appears as shown below:
Reinitialize Device dialog
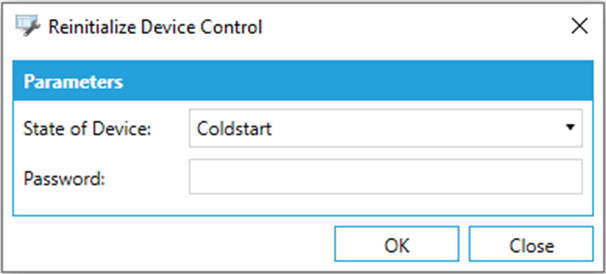
The parameters of the action are:
State of Device - specifies the desired state of the device after its reinitialization. The value of the parameter may be one of:
o Coldstart
o Warmstart
o Activate Changes
o Start Backup
o End Backup
o Start Restore
o End Restore
o Abort Restore
Password - the password to be used to execute the operation
Click on the OK button to start the action.
The result of the action will be shown in a message box.
Device Communication Control
Workbench provider lets the user execute a Device Communication Control operation on a BACnet Device.
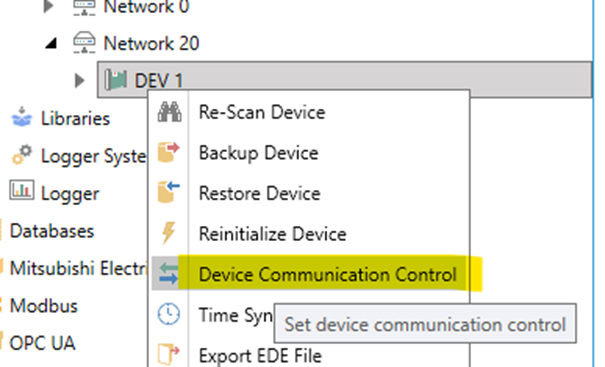
It is possible to execute a Device Communication Control by right clicking on a Device and selecting ‘Device Communication Control’ from the context menu as shown below:
Device Communication Control action from Device level
Select the Device for which you want to call the action, then click on the Device Communication Control button shown below in the Tools section of the Home ribbon in Workbench.
Device Communication Control button

The Device Communication Control dialog appears as shown below:
Device Communication Control dialog
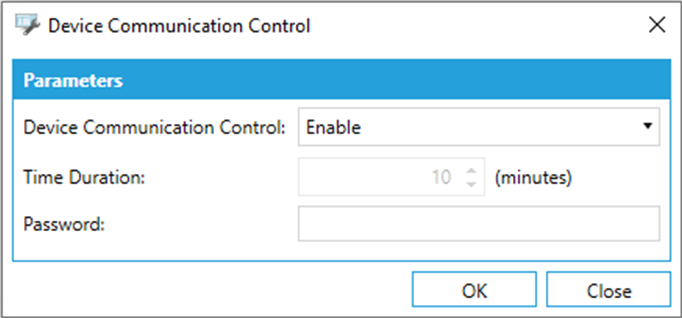
The parameters of the action are:
Device Communication Control - it’s used to specify whether the responding BACnet-user is to enable all, disable initiation or disable all the communication on the network interface.
Time Duration [minutes] - specifies the number of minutes that the remote device shall ignore all APDUs except DeviceCommicationControl and, if supported, ReinitializeDevice APDUs.
Password - the password to be used to execute the operation
Click on the OK button to start the action.
The result of the action will be shown in a message box.
Time Synchronization from Device level
Workbench provider let the user execute a Time Synchronization operation on a BACnet Device.
It’s possible to execute a Time Synchronization right-clicking on a Device and selecting ‘Time Synchronization’ from the context menu as shown below:
Time Synchronization action from Device level

Select the Device for which you want to call the action, then click on the Time Synchronization button, shown below, in the Tools section of the Home ribbon in Workbench.
Time Synchronization button

The Time Synchronization dialog appears as shown below:
Time Synchronization dialog
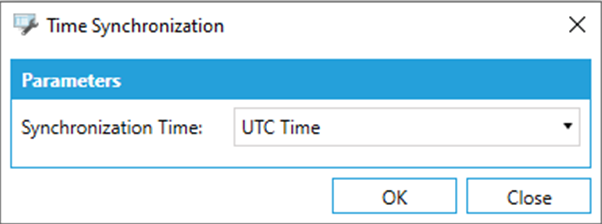
The parameters of the action are:
Synchronization Time - specifies if we want to use Local Time or UTC Time
Click on the OK button to start the action.
The result of the action will be shown in a message box as shown below:
Time Synchronization result
Export EDE File from Device level
BACnet SC provider allows you to export the configuration data in an Engineering Data Exchange (.ede) file.
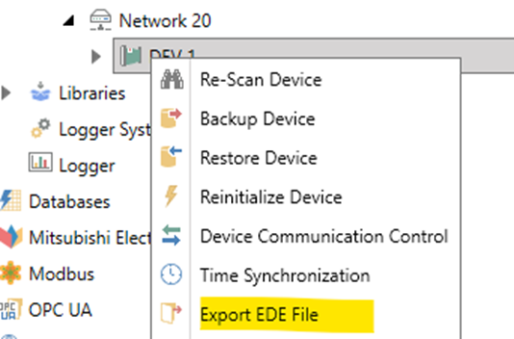
It is possible to execute an EDE export right-clicking on a Device and selecting ‘Export EDE File’ from the context menu as shown below:
Export EDE File action from Device level
Select the Device for which you want to call the action, then click on the Export EDE File button, shown below, in the Tools section of the Home ribbon in Workbench.
Export EDE File button

The Export EDE File dialog appears.
The behavior is the same as it is at Channel Device. The only difference is that in this case, we will have just one device in the list of Available Devices (the selected one).
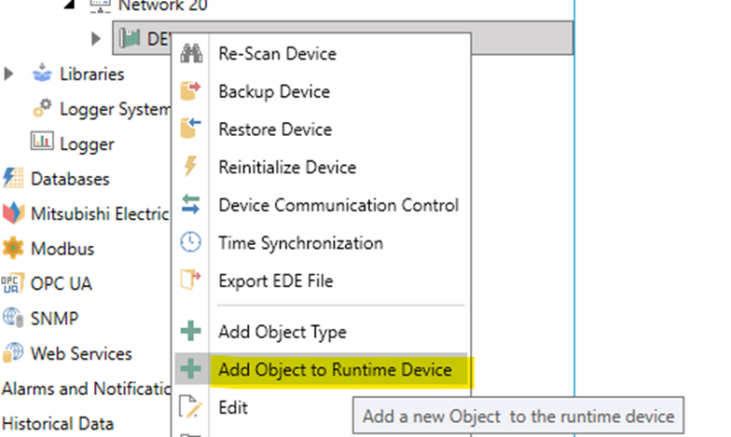
Add Object to Runtime Device
Workbench provider lets the user add object on a runtime BACnet Device.
It is possible to execute the action by right clicking on a Device and selecting ‘Add Object To Runtime Device’ from the context menu as shown below:
Add Object to Runtime Device action from Device level
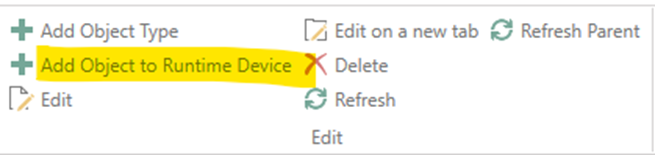
Select the Device for which you want to call the action, then click on the Add Object to Runtime Device button, shown below, in the Edit section of the Home ribbon in Workbench.
Add Object to Runtime Device button
The Add Object to Runtime Device dialog appears as shown below:
Add Object to Runtime Device dialog
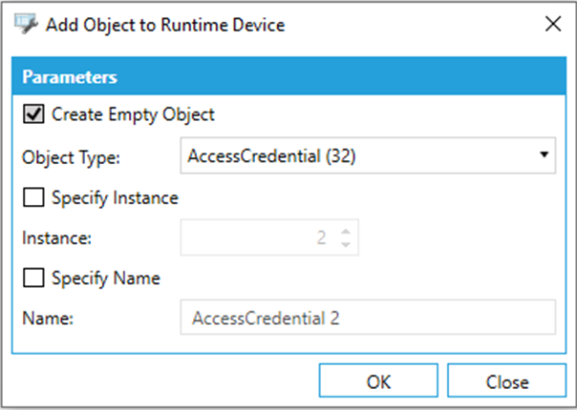
The parameters of the action are:
Create Empty Object - true, if we want to create an object without setting any value of the properties of the object. It’s true and disabled by default for ‘simple’ object types, while it’s enabled for ‘special’ object types, such as Event Log, Event Enrollment, Notification Class, Trend Log and Trend Log Multiple.
Object Type - the type of the object we are going to create. It can enable/disable ‘Create Empty Object’ parameter, in case it’s selected a ‘simple’ or a ‘special’ object type.
Specify Instance - true, if we want to explicitly assign an instance to the object. Otherwise it’s automatically retrieved by the application.
Instance - specifies the instance of the object (set manually or automatically)
Specify Name - true, if we want to explicitly assign a name to the object. Otherwise it’s automatically set by the application (as ‘[ObjectTypeName] [Instance]’)
Name - specifies the name of the object (set manually or automatically)
If the selected object type is a ‘simple’ object type, then click on the OK button to start the action.
Otherwise you need to click on ‘Next’ button to set the properties of the ‘special’ object type.
In this case, depending on the select object type, another dialog is shown to the user.
Add Object to Runtime - Event Log dialog
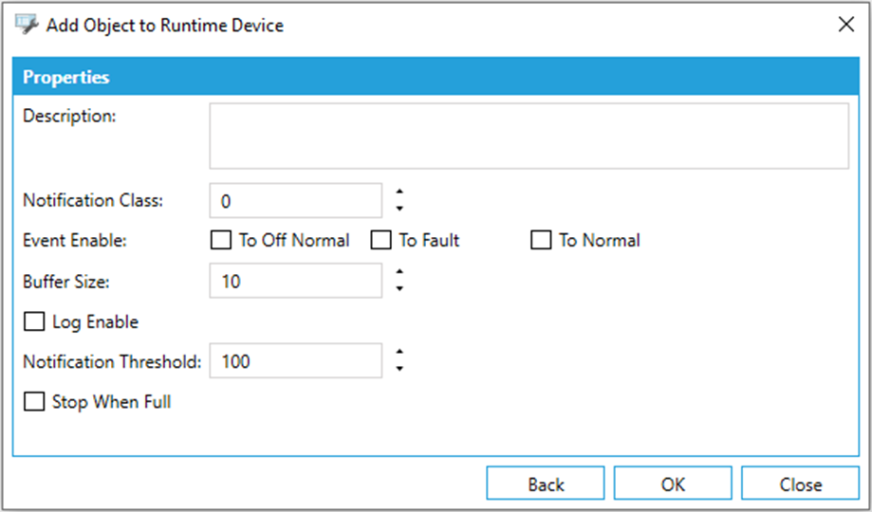
The properties in case of Event Log are:
Description
Notification Class
Event Enable (To Off Normal, To Fault, To Normal)
Buffer Size
Log Enable
Notification Threshold
Stop When Full
Add Object to Runtime - Event Enrollment dialog
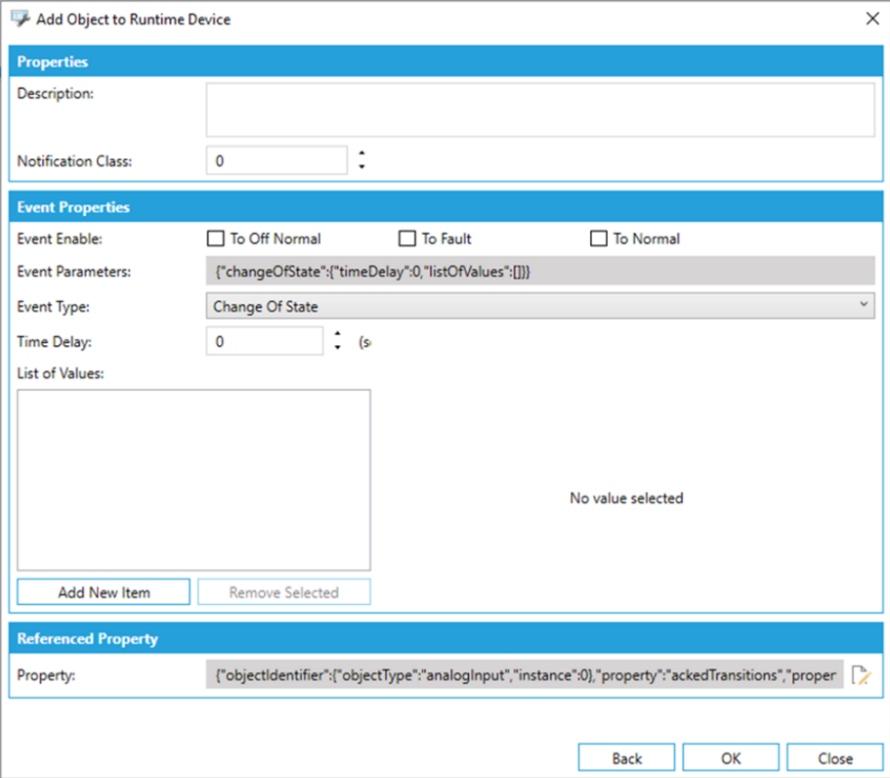
The properties in case of Event Enrollment are:
Description
Notification Class
Event Enable (To Off Normal, To Fault, To Normal)
Event Parameters
Event Type
Time Delay
List of Values
Referenced Property
Add Object to Runtime - Notification Class dialog
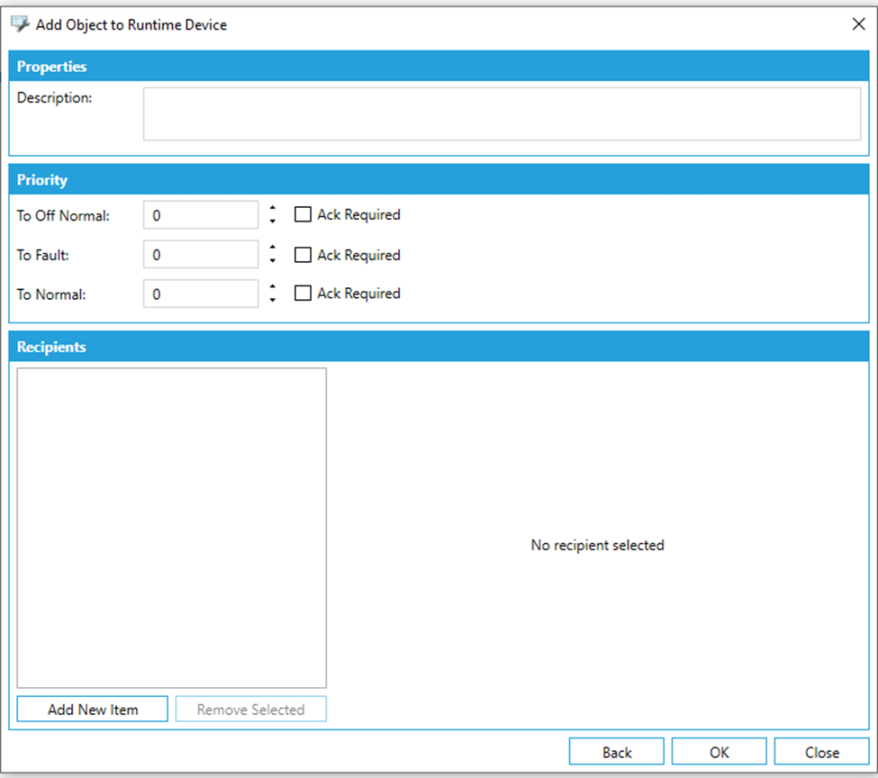
The properties in case of Notification Class are:
Description
Priority - To Off Normal + Ack Required
Priority - To Fault + Ack Required
Priority - To Normal + Ack Required
Recipients
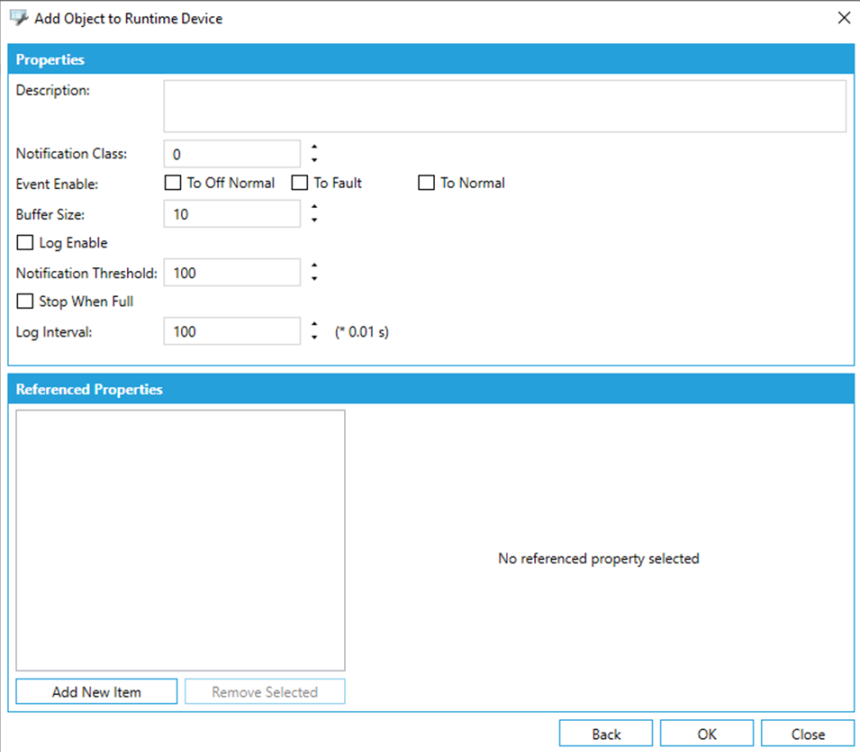
Add Object to Runtime - Trend Log dialog

The properties in case of Trend Log object are:
Description
Notification Class
Event Enable (To Off Normal, To Fault, To Normal)
Buffer Size
Log Enable
Notification Treshold
Stop When Full
Log Interval
Device Object Property Reference
Add Object to Runtime - Trend Log Multiple dialog
The properties in case of Trend Log object are:
Description
Notification Class
Event Enable (To Off Normal, To Fault, To Normal)
Buffer Size
Log Enable
Notification Treshold
Stop When Full
Log Interval
Referenced Properties
Object Types
Under a Device, we can have multiple Object Types entities. Each Object Type can contain multiple Objects.
Object Type Level in the Project Tree
To create a BACnet Object Type
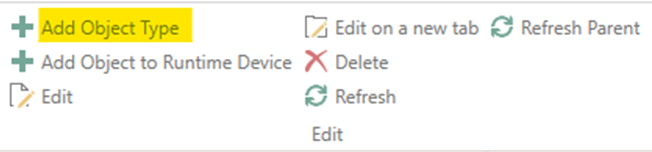
To create a new BACnet Object Type, right click on the Device and click on Add Channels as shown below:
Add Object Type from Project Explorer

Select the Device branch, then click on the ‘Add Object Type’ button shown below in the Edit section of the Home ribbon in Workbench.
The BACnet Object Type properties window will appear in the right pane of Workbench.
To edit a BACnet Object Type
Object Type Dialog
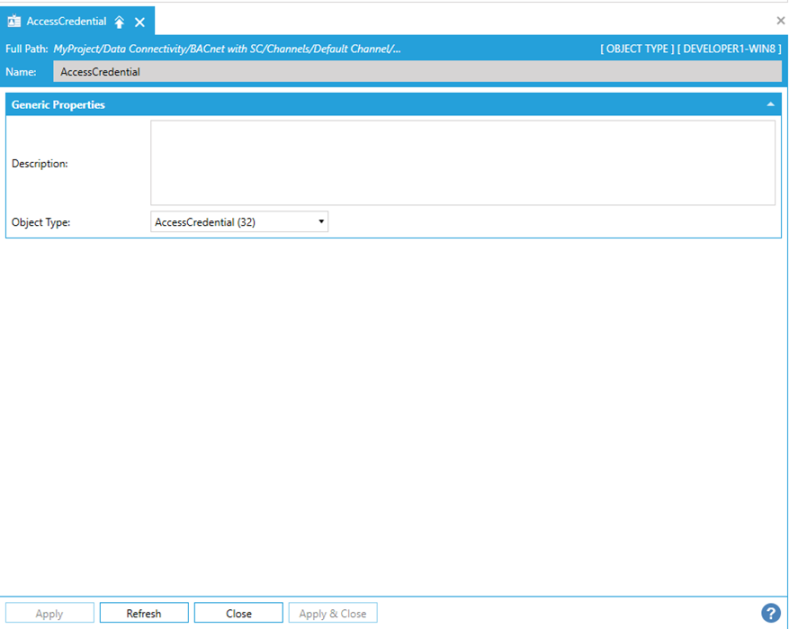
The dialog contains some settings that you can configure. This is the list of the settings:
Name -The name of the Object Type (automatically generated)
Description - The description of the Object Type
Object Type - The associated object type (the list of available object types comes from the Object Library)
Click on the Apply button to apply the changes.
Add Object to Runtime Device action
Workbench provider lets the user add object on a runtime BACnet Device. It is possible to create it in the Object Type level too.
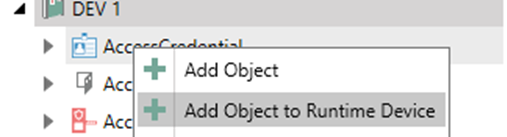
It is possible to execute the action by right clicking on "Object Type" and selecting ‘Add Object To Runtime Device’ from the context menu as shown below:
Add Object to Runtime Device action from Object Type level
Select the Object Type for which you want to call the action, then click on the Add Object Runtime Device button shown below in the Edit section of the Home ribbon in Workbench.
Add Object to Runtime Device button
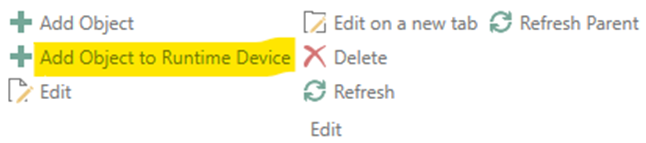
The Add Object to Runtime Device dialog appears, and the behavior is the same as described for the same action at Device level.
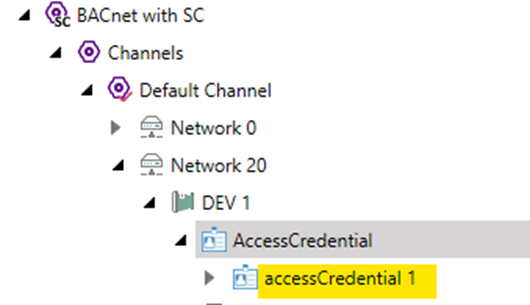
Objects
Under an Object Type, there can be multiple Objects entities. Each Object can contain multiple Properties.
Object Level in the Project Tree
To create a BACnet Object
To create a new BACnet Object, right click on the Object Type and click on Add Object as shown below:
Add Object from Project Explorer

Select the Object Type branch, then click on the Add Object button shown below in the Edit section of the Home ribbon in Workbench.
The BACnet Object properties window will appear in the right pane of Workbench.
To edit a BACnet Object Type
If you double-click on it, a dialog will open.
The dialog contains some settings that you can configure. This is the list of the settings:
Generic Properties
Object dialog (Generic Properties)
.png)
Generic Properties
Name - The name of the Object
Description - The description of the Object
Object Type - specifies the type of the object. The list of available object types is defined in the Library.
Instance - specifies the instance of the object.
Object ID - specifies the identifier of the object which is a combination of the object type and the object instance
Use default object type properties - if true, the collection of exposed properties of the object is retrieved from the Library instead from the properties children of the object in the configuration database
Override Settings
Object dialog (Override Settings)

Override Settings
Read Service Type - overrides the Read Service Type value defined in the Channel/Device levels
Re-Subscribe COV Period[seconds]:overrides the Re-Subscribe COV Period value defined in the Channel/Device levels
Polling Rate - overrides the Polling Rate value defined in the Channel/Device levels
Priority - overrides the Priority value defined in the Channel/Device levels
Click on the Apply button to apply the changes.
View Property Sheet
Workbench provider let the user get/set the values of the properties of an object in a BACnet Device.
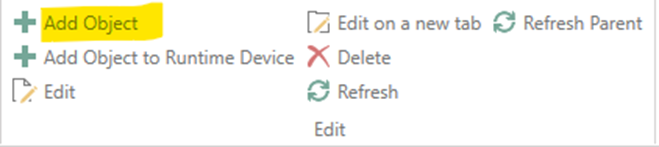
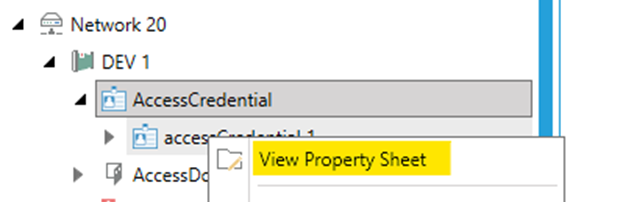
It’s possible to execute a View Property Sheet action right-clicking on an Object and selecting ‘View Property Sheet’ from the context menu as shown below:
View Property Sheet action from Object level
Select the Object which you want to call the action for, then click on the View Property Sheet button shown below in the Tools section of the Home ribbon in Workbench.
The View Property Sheet dialog appears as shown below:
View Property Sheet dialog
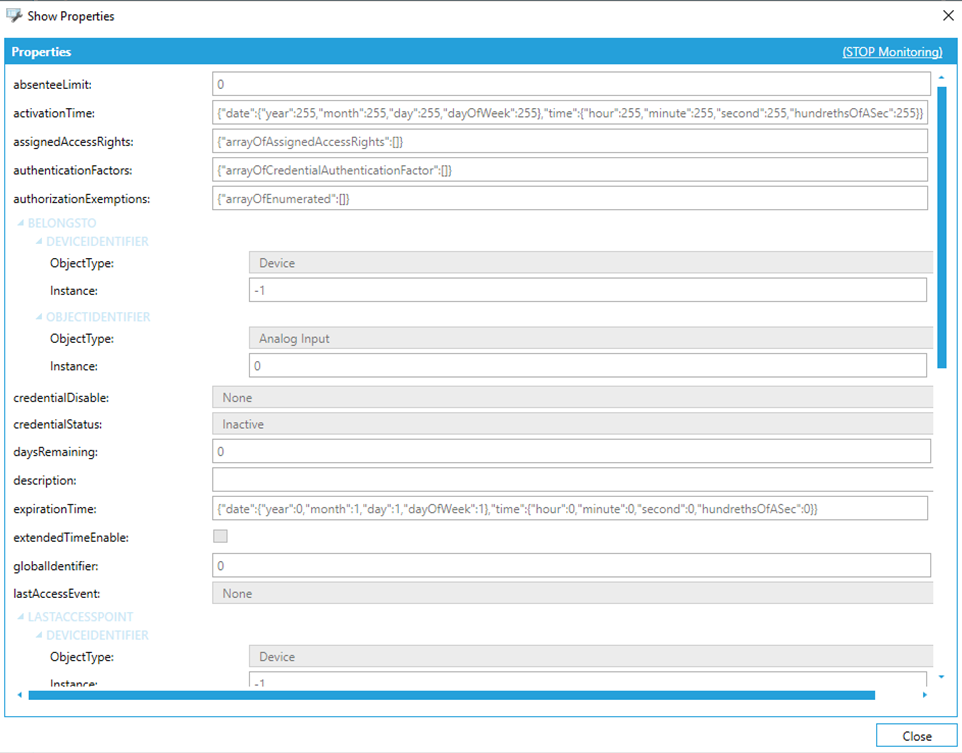
The Property Sheet dialog will show all the available properties of the selected object with their values.
The user can start/stop the monitoring clicking on the link button in the right upper corner.
When the monitoring is disabled, the property grid is enabled and the user can modify the existing values and eventually apply the changes to send the new values to the BACnet device.
There are several controls to properly read/modify the values of the properties depending on their type.
Here is a list of the controls supported in the current version:
BACnet Date Time
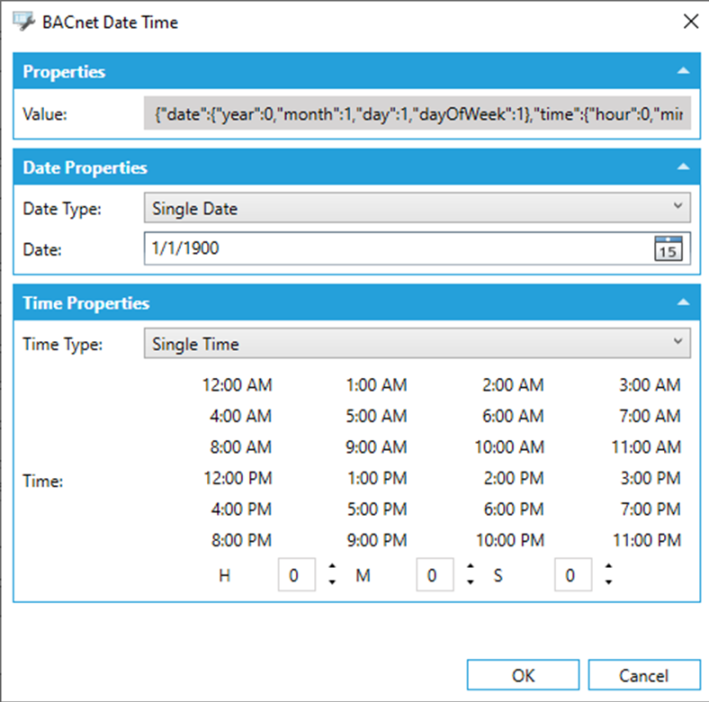
These are the properties:
Value - the JSON representation of the BACnet Date Time value
Date Type - the type of date. The possible values are: Single Date, Wildcard Date, Any Date
Date - the date value
Time Type - the type of time. The possible values are: Single Time, Wildcard Time, Any Time
Time - the time value
BACnet Collection
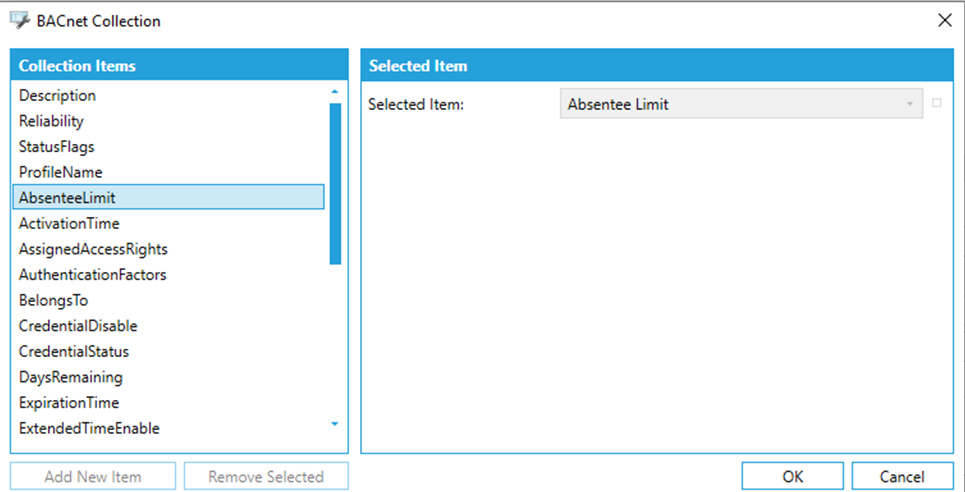
It shows:
- Collection Items: the items in the collection
- Selected Items: the properties of the selected item
It is possible to add new items, remove existing items, update existing items.
BACnet Event TimeStamps
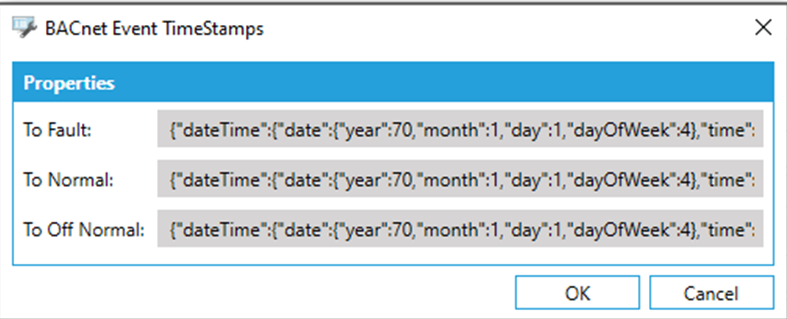
These are the properties:
To Fault: the JSON representation of the BACnet Date Time value linked to the To Fault
To Normal: the JSON representation of the BACnet Date Time value linked to the To Normal
To Off Normal: the JSON representation of the BACnet Date Time value linked to the To Off Normal
BACnet Priority Array
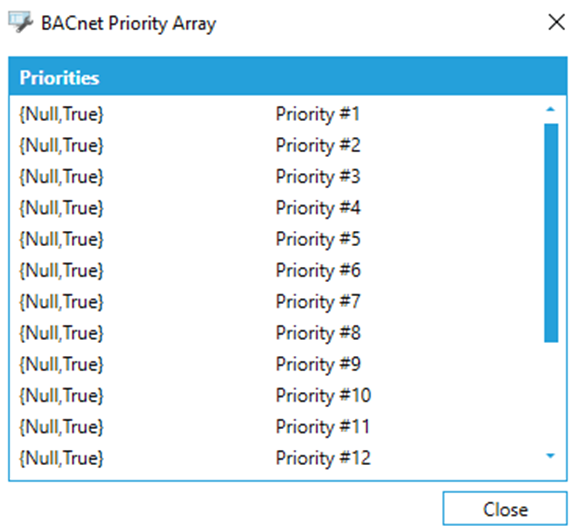
It shows the array of the BACnet priorities.
BACnet Octects
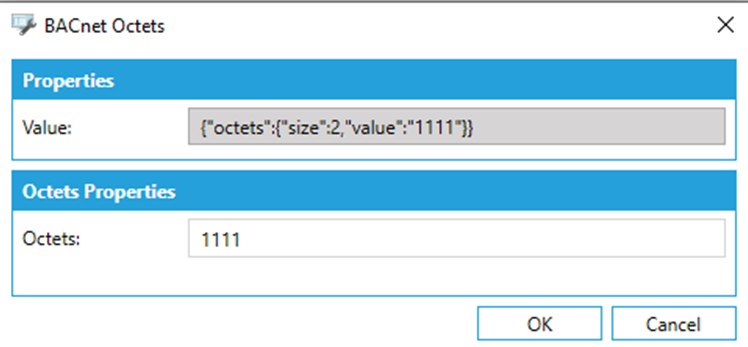
These are the properties:
- Value - the JSON representation of the BACnet Octects value
- Octects - the inner octets value
BACnet TimeStamp
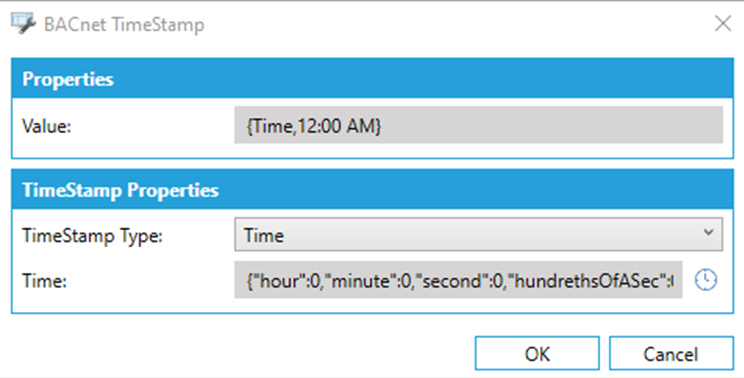
These are the properties:
Value - the JSON representation of the BACnet TimeStamp value
TimeStamp Type - the type of timestamp. The possible values are: Date Time, Time, Sequence Number
Time - in case of Time type, it specifies the time value
DateTime - in case of Date Time type, it specifies the date time value
Sequence Number - in case of Sequence Number type, it specifies the sequence number
BACnet Limit Enable
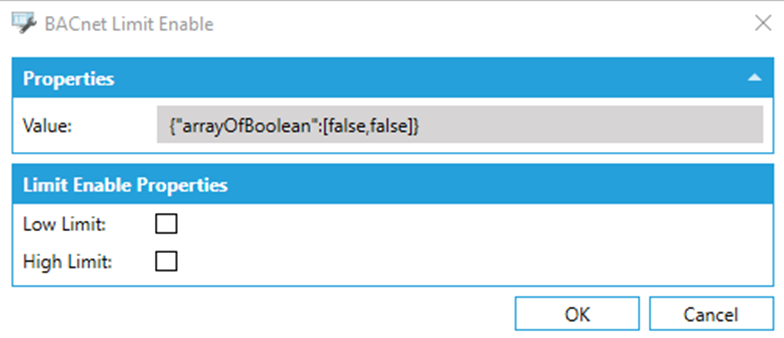
These are the properties:
Value - the JSON representation of the BACnet Limit Enable value
Low Limit - true, if low limit is enabled
High Limit - true, if the high limit is enabled
BACnet Engineering Units
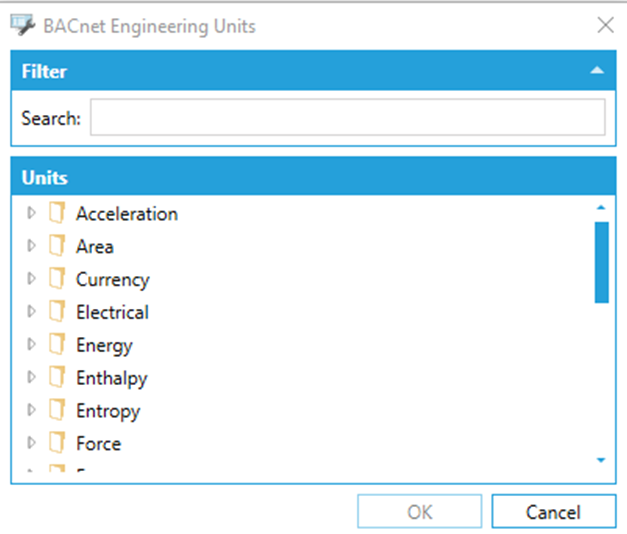
The available units are grouped by type (Acceleration, Area, Currency, Electrical, Energy…).
It’s possible to filter them, using the search filter.
BACnet Present Value
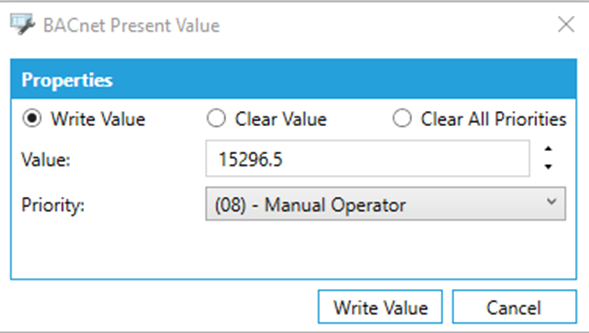
There are some parameters that can be set to write the present value of an object:
Type of Write: Write Value, Clear Value, Clear All Priorities
Value: the present value to be written
Priority: the priority of the write (between 1 and 16)
Click on the ‘Write Value’ button, to send a write command to set the new present value.
BACnet Calendar Entry
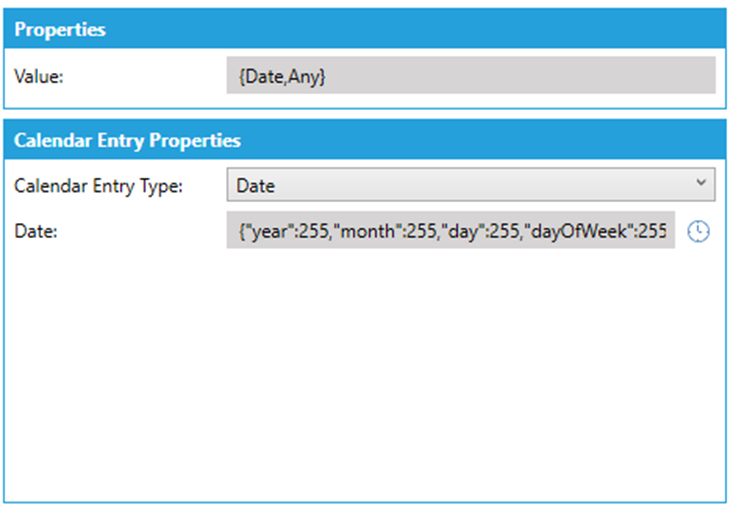
These are the properties:
Value: the JSON representation of the BACnet Calendar Entry value
Calendar Entry Type: it specifies the type of calendar entry. The possible values are: Date, Date Range, Week N Day.
Date: when the calendar entry type is ‘Date’, it specifies the date
Start Date: when the calendar entry type is ‘Date Range’, it specifies the start date
End Date: when the calendar entry type is ‘Date Range’, it specifies the end date
Month: when the calendar entry type is ‘Week N Day’, it specifies the month
Week of Month: when the calendar entry type is ‘Week N Day’, it specifies the week of the month
Day of Week: when the calendar entry type is ‘Week N Day’, it specifies the day of the week
BACnet Name Value
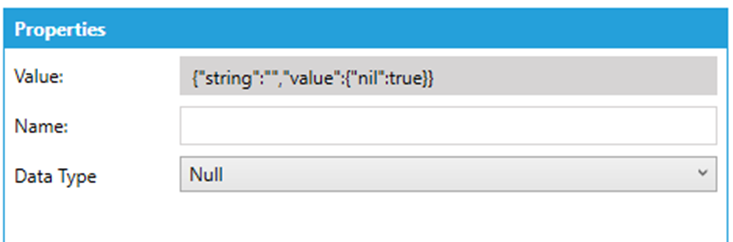
These are the properties:
Value: the JSON representation of the BACnet Name Value value
Name: it specifies the name
Data Type: it specifies the data type of the value. The possible values are: Bits, Bool, Date, Date Time, Double, Enumerated, Integer, Null, Object Identifier, Octets, Real, String, Time, Unsigned
Bits: when the data type is ‘Bits’, it specifies the bits value
Bool: when the data type is ‘Bool’, it specifies the bool value
Date: when the data type is ‘Date’, it specifies the date value
Date Time: when the data type is ‘Date Time’, it specifies the date time value
Double: when the data type is ‘Double’, it specifies the double value
Enumerated: when the data type is ‘Enumerated’, it specifies the enumerated value
Integer: when the data type is ‘Integer’, it specifies the integer value
Object Type: when the data type is ‘Object Identifier’, it specifies the object type of the object identifier value
Instance: when the data type is ‘Instance’, it specifies the instance of the object identifier value
Octets: when the data type is ‘Octets’, it specifies the octets value
Real: when the data type is ‘Real’, it specifies the real value
String: when the data type is ‘String’, it specifies the string value
Time: when the data type is ‘Time’, it specifies the time value
Unsigned: when the data type is ‘Unsigned’, it specifies the unsigned value
BACnet Channel Value
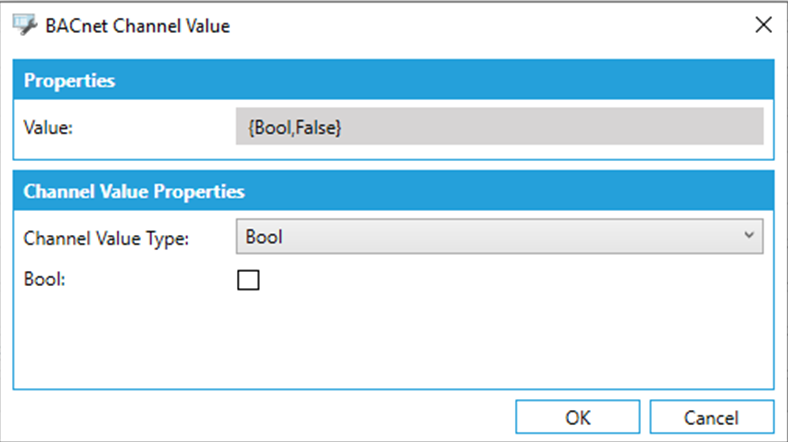
These are the properties:
Value: the JSON representation of the BACnet Channel Value value
Channel Value Type: it specifies the data type of the Channel Value. The possible values are: Bits, Bool, Date, Date Time, Double, Enumerated, Integer, Lighting Command, Null, Object Identifier, Octets, Real, String, Time, Unsigned
Bits: when the data type is ‘Bits’, it specifies the bits value
Bool: when the data type is ‘Bool’, it specifies the bool value
Date: when the data type is ‘Date’, it specifies the date value
Date Time: when the data type is ‘Date Time’, it specifies the date time value
Double: when the data type is ‘Double’, it specifies the double value
Enumerated: when the data type is ‘Enumerated’, it specifies the enumerated value
Integer: when the data type is ‘Integer’, it specifies the integer value
Lighting Command: when the data type is ‘Lighting Command’, it specifies the JSON representation of the lighting command value
Object Type: when the data type is ‘Object Identifier’, it specifies the object type of the object identifier value
Instance: when the data type is ‘Instance’, it specifies the instance of the object identifier value
Octets: when the data type is ‘Octets’, it specifies the octets value
Real: when the data type is ‘Real’, it specifies the real value
String: when the data type is ‘String’, it specifies the string value
Time: when the data type is ‘Time’, it specifies the time value
Unsigned: when the data type is ‘Unsigned’, it specifies the unsigned value
BACnet Lighting Command
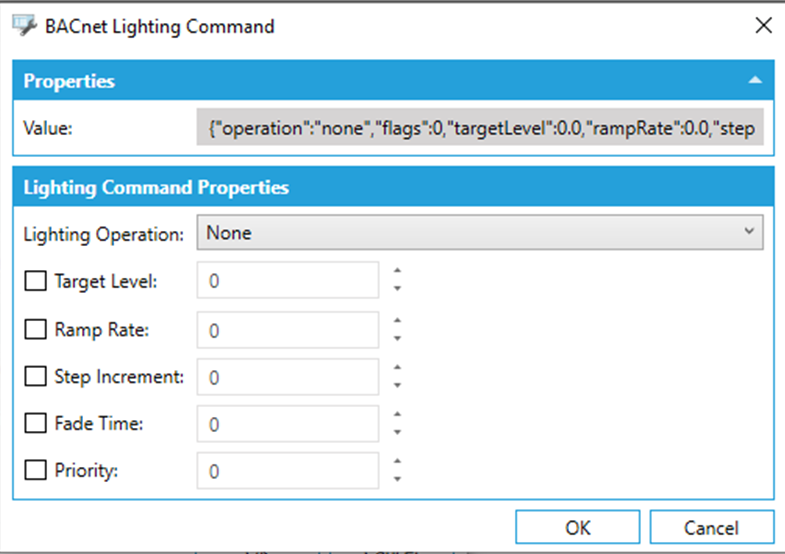
These are the properties:
Value: the JSON representation of the BACnet Lighting Command value
Lighting Operation: it specifies the lighting operation. The possible values are: None, Fade To, Ramp To, Step Up, Step Down, Step On, Step Off, Warn, Warn Off, Warn Relinquish, Stop.
Target Level: if enabled, it specifies the target level
Ramp Rate: if enabled, it specifies the ramp rate
Step Increment: if enabled, it specifies the step increment
Fade Time: if enabled, it specifies the fade time
Priority: if enabled, it specifies the priority
BACnet Optional Unsigned
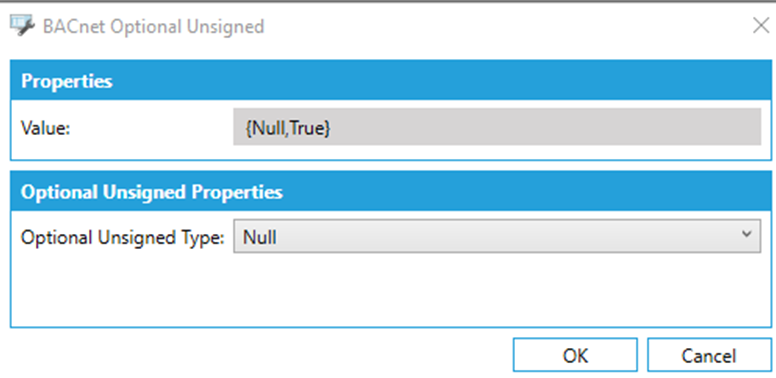
These are the properties:
Value: the JSON representation of the BACnet Optional Unsigned value
Optional Unsigned Type: it specifies the optional unsigned type. The possible values are Null and Not Null.
Unsigned: if the optional unsigned type is Not Null, then it specifies the unsigned value
BACnet Date

These are the properties:
Value: the JSON representation of the BACnet Date value
Date Type: it specified the type of date. The possible values are Single Date, Wildcard Date, Any Date.
Date: if the date type is Single Date, then it specifies the date value
Month: if the date type is Wildcard Date, then it specified the month of the date value
Day: if the date type is Wildcard Date, then it specified the day of the date value
Year: if the date type is Wildcard Date, then it specified the year of the date value
Day of Week: if the date type is Wildcard Date, then it specified the day of the week of the date value
BACnet Time
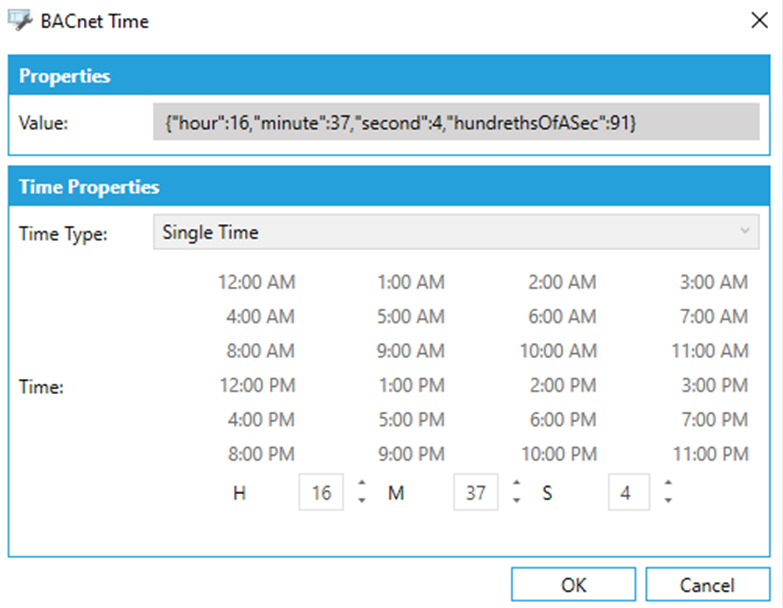
These are the properties:
Value: the JSON representation of the BACnet Time value
Time Type: it specifies the type of time. The possible values are Single Time, Wildcard Time, Any Time.
Time: if the time type is Time, it specifies the time value
BACnet Object Types Supported
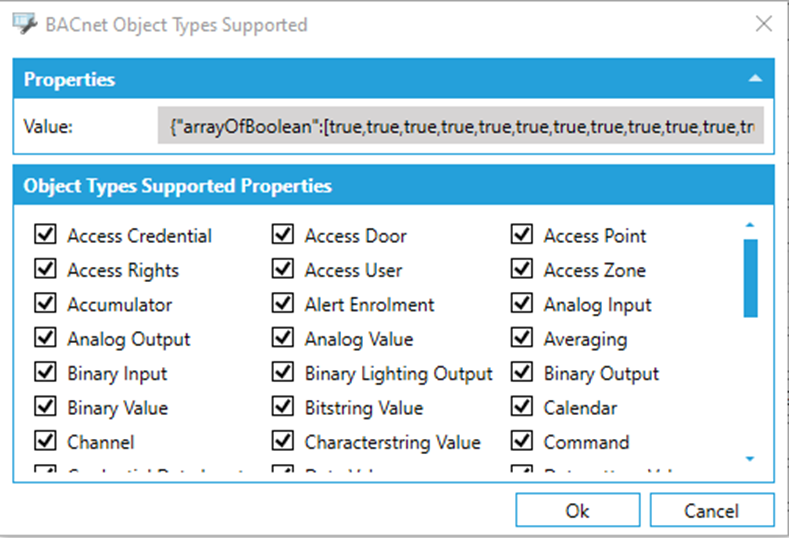
These are the properties:
- Value: the JSON representation of the BACnet Object Types Supported value
For each object types, if true, then the object type is supported.
BACnet Services Supported
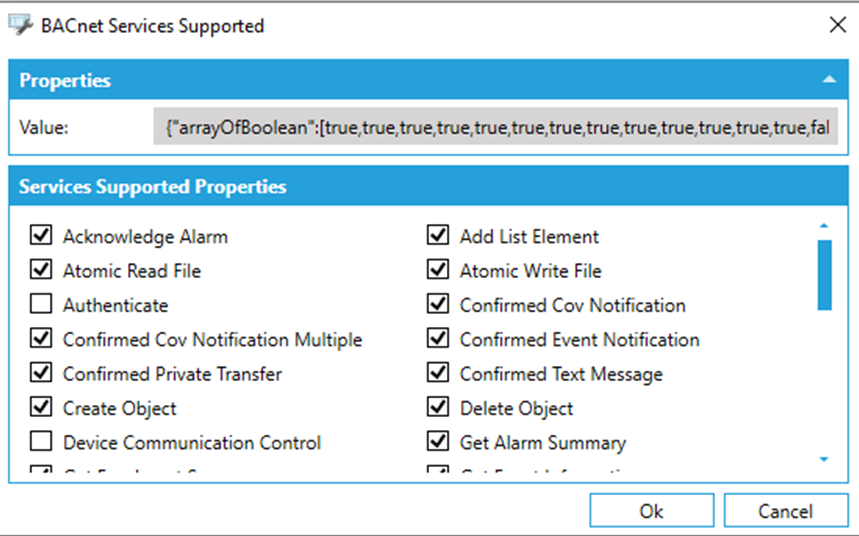
These are the properties:
Value: the JSON representation of the BACnet Services Supported value
For each service, if true, then the service is supported.
BACnet Fault Parameter
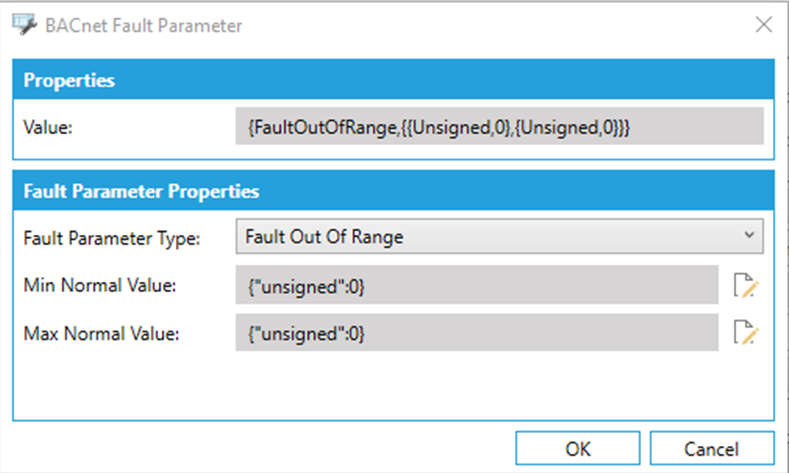
These are the properties:
Value: the JSON representation of the BACnet Fault Parameter value
Fault Parameter Type: it specified the type of fault parameter. The possible values are: None, Fault Characterstring, Fault Extended, Fault Life Safety, Fault Listed, Fault Out of Range, Fault State, Fault Status Flags.
List of Fault Values (strings): if the fault parameter type is Fault Characterstring, it specifies the collection of character strings of the fault parameter value
Vendor ID: if the fault parameter type is Fault Extended, it specifies the identifier of the Vendor of the fault parameter value
Extended Fault Type: if the fault parameter type is Fault Extended, it specifies the extended fault type of the fault parameter value
Policy: if the fault parameter type is Fault Extended, it specifies the policy of the fault parameter value
Model Property Reference: if the fault parameter type is Fault Life Safety, it specifies the model property reference of the fault parameter value
List of Fault Values (enums): if the fault parameter type is Fault Life Safety, it specifies the collection of life safety values of the fault parameter value
Fault Listed: if the fault parameter type is Fault Listed, it specifies the JSON representation of the device object property reference of the fault parameter value
Min Normal Value: if the fault parameter type is Fault Out of Range, it specifies the JSON representation of the minimum event parameter out of range value of the fault parameter value
Max Normal Value: if the fault parameter type is Fault Out of Range, it specifies the JSON representation of the maximum event parameter out of range value of the fault parameter value
Fault State: if the fault parameter type is Fault State, it specifies the JSON representation of the collection of property states of the fault parameter value
Fault Status Flags: if the fault parameter type is Fault Status Flags, it specifies the JSON representation of the object identifier of the fault parameter value
BACnet Device Object Property Reference
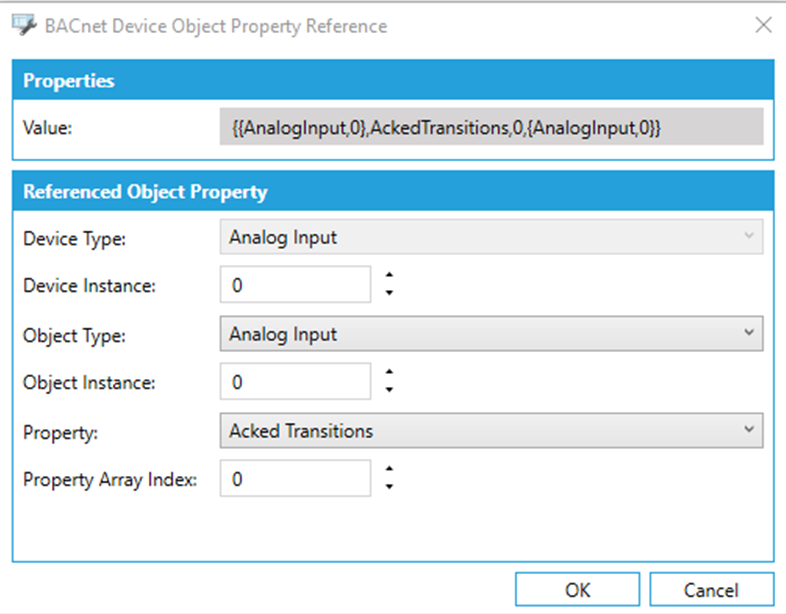
These are the properties:
Value: the JSON representation of the BACnet Device Object Property Reference value
Device Type: it specifies the type of the referenced device
Device Instance: it specifies the instance of the referenced device
Object Type: it specifies the object type of the referenced object
Object Instance: it specifies the instance of the referenced object
Property: it specifies the property type of the referenced property
Property Array Index: it specifies the array index of the referenced property
BACnet Event Parameter Out Of Range Value
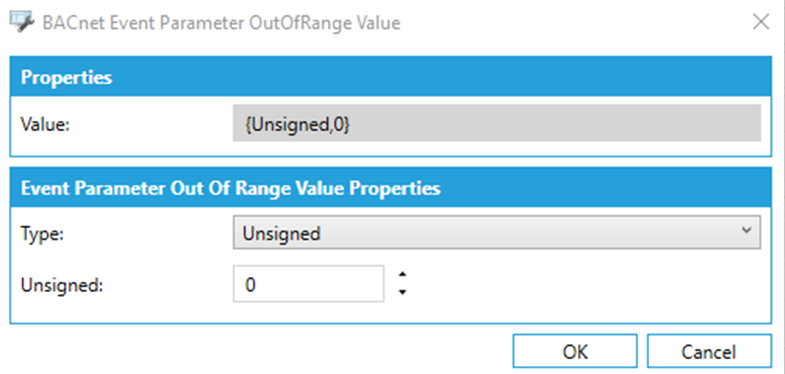
These are the properties:
Value: the JSON representation of the BACnet Event Parameter Out Of Range Value value
Type: it specifies the type of the values of the event parameter out of range value. The possible values are Double, Integer, Real, Unsigned
Unsigned: if the type of the event parameter out of range is Unsigned, it specifies its unsigned value
Double: if the type of the event parameter out of range is Double, it specifies its double value
Integer: if the type of the event parameter out of range is Integer, it specifies its integer value
Real: if the type of the event parameter out of range is Real, it specifies its real value
BACnet Property State

These are the properties:
Value: the JSON representation of the BACnet Property State value
Type: it specifies the type of the property state value. The possible values are: Integer, Unsigned, various Enumerations
Integer: if the type of the property state is Integer, it specifies its integer value
Unsigned: if the type of the property state is unsigned, it specifies its unsigned value
Enum Value: if the type of the property state is one of available enumerations, it specifies its enumeration value
BACnet Shed Level
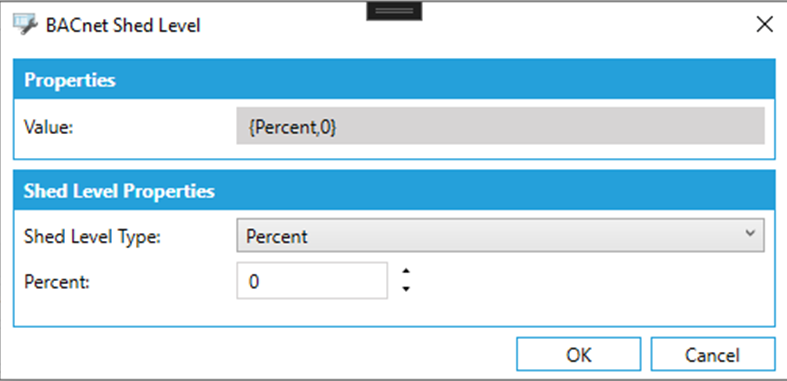
These are the properties:
Value: the JSON representation of the BACnet Shed Level value
Shed Level Type: it specifies the type of shed level. The possible values are: Percent, Amount, Level
Percent: if the shed level is Percent, it specifies the Percent value of the shed level
Amount: if the shed level is Amount, it specifies the Amount value of the shed level
Level: if the shed level is Level, it specifies the Level value of the shed level
BACnet Date Range
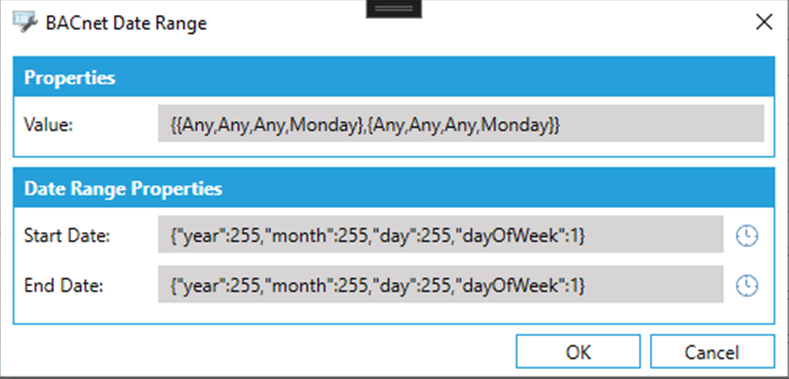
These are the properties:
Value: the JSON representation of the BACnet Date Range value
Start Date: the JSON representation of the start date of the date range value
End Date: the JSON representation of the end date of the date range value
BACnet Special Event
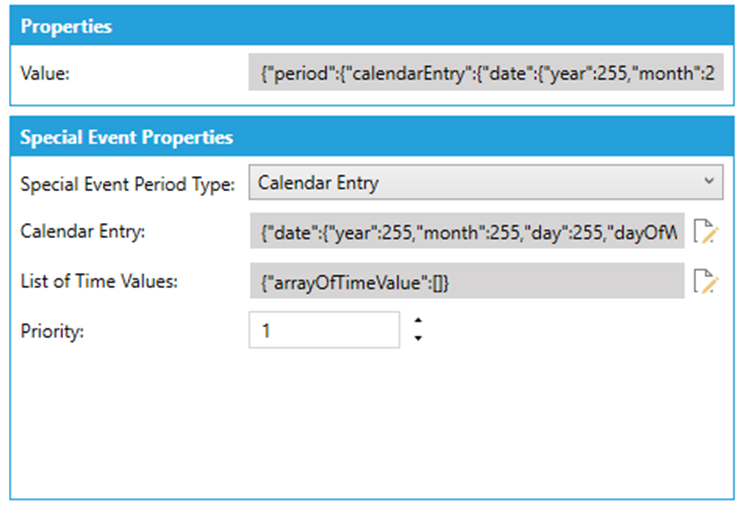
These are the properties:
Value: the JSON representation of the BACnet Special Event value
Special Event Period Type: it specifies the type of special event period. The possible values are: Calendar Entry or Calendar Reference
Calendar Entry: if the special event period type is Calendar Entry, it specifies the JSON representation of the calendar entry of the special event period
List of Time Values: if the special event period type is Calendar Entry or Calendar Reference, it specifies the JSON representation of the collection of time values of the special event period
Priority: if the special event period type is Calendar Entry or Calendar Reference, it specified the priority of the special event period
Object Type: if the special event period type is Calendar Reference, it specifies the object type of the referenced calendar of the special event period
Instance: if the special event period type is Calendar Reference, it specifies the instance of the referenced calendar of the special event period
BACnet Time Value
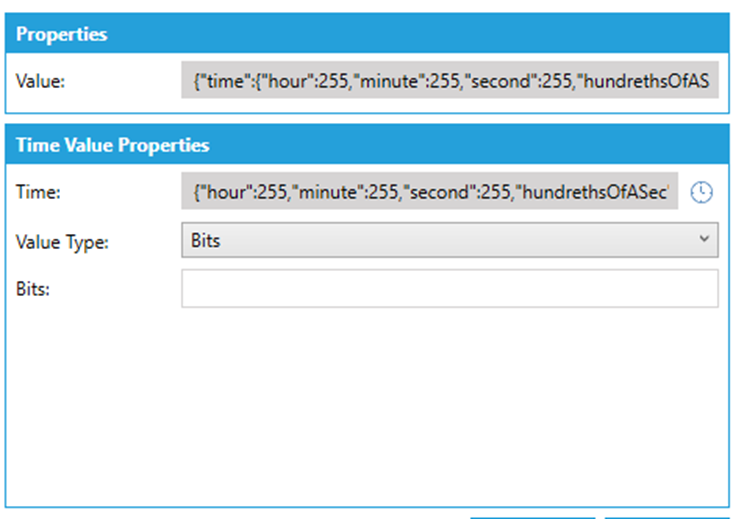
These are the properties:
Value: the JSON representation of the BACnet Time Value value
Time: it specifies the JSON representation of the time of the time value
Value Type: it specifies the type of the time value. The possible values are: Bits, Bool, Date, Double, Enumerated, Integer, Null, Object Identifier, Octets, Real, String, Time, Unsigned
Bits: when the data type is ‘Bits’, it specifies the bits value
Bool: when the data type is ‘Bool’, it specifies the bool value
Date: when the data type is ‘Date’, it specifies the date value
Double: when the data type is ‘Double’, it specifies the double value
Enumerated: when the data type is ‘Enumerated’, it specifies the enumerated value
Integer: when the data type is ‘Integer’, it specifies the integer value
Object Type: when the data type is ‘Object Identifier’, it specifies the object type of the object identifier value
Instance: when the data type is ‘Instance’, it specifies the instance of the object identifier value
Octets: when the data type is ‘Octets’, it specifies the octets value
Real: when the data type is ‘Real’, it specifies the real value
String: when the data type is ‘String’, it specifies the string value
Time: when the data type is ‘Time’, it specifies the time value
Unsigned: when the data type is ‘Unsigned’, it specifies the unsigned value
BACnet Timer State Change Value
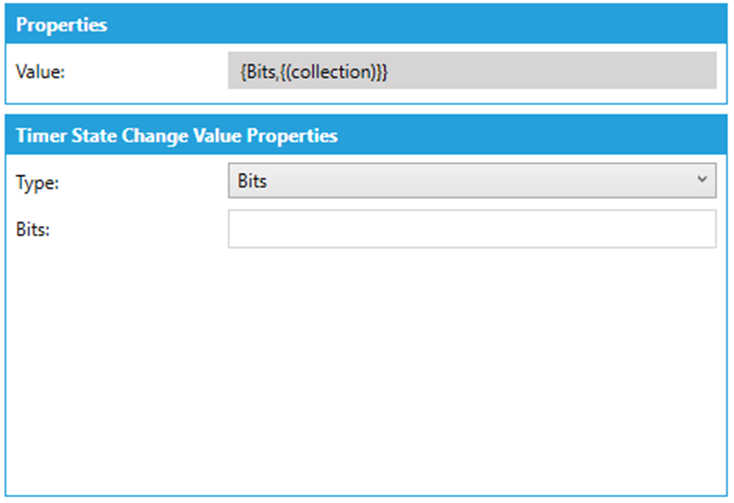
These are the properties:
Value: the JSON representation of the BACnet Timer State Change Value value
Type: it specifies the type of timer state change value. The possible values are: Bits, Bool, Constructed, Date, Date Time, Double, Enumerated, Integer, Lighting Command, No Value, Null, Object Identifier, Octets, Real, String, Time, Unsigned
Bits: when the data type is ‘Bits’, it specifies the bits value
Bool: when the data type is ‘Bool’, it specifies the bool value
Date: when the data type is ‘Date’, it specifies the date value
Date Time: when the data type is ‘Date Time’, it specifies the date time value
Double: when the data type is ‘Double’, it specifies the double value
Enumerated: when the data type is ‘Enumerated’, it specifies the enumerated value
Integer: when the data type is ‘Integer’, it specifies the integer value
Lighting Command: when the data type is ‘Lighting Command’, it specifies the JSON representation of the lighting command value
Object Type: when the data type is ‘Object Identifier’, it specifies the object type of the object identifier value
Instance: when the data type is ‘Instance’, it specifies the instance of the object identifier value
Octets: when the data type is ‘Octets’, it specifies the octets value
Real: when the data type is ‘Real’, it specifies the real value
String: when the data type is ‘String’, it specifies the string value
Time: when the data type is ‘Time’, it specifies the time value
Unsigned: when the data type is ‘Unsigned’, it specifies the unsigned value
Application Tag: when the data type is ‘Constructed’, it specifies the application tag of the constructed value
Constructed Value: when the data type is ‘Constructed’, it specifies the JSON representation of the constructed value
BACnet Constructed Value
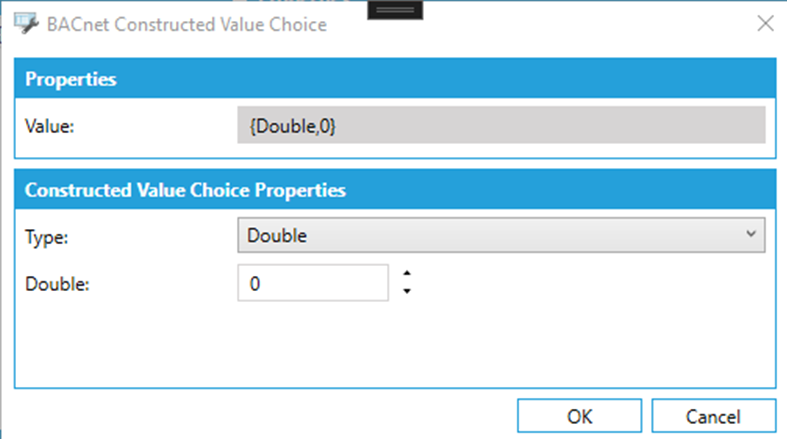
These are the properties:
Value: the JSON representation of the BACnet Timer State Change Value value
Type: it specifies the type of the constructed value. The possible values are: Bits, Bool, Constructed, Date, Double, Enumerated, Integer, Null, Object Identifier, Octects, Real, String, Time, Unsigned
Bits: when the data type is ‘Bits’, it specifies the bits value
Bool: when the data type is ‘Bool’, it specifies the bool value
Date: when the data type is ‘Date’, it specifies the date value
Date Time: when the data type is ‘Date Time’, it specifies the date time value
Double: when the data type is ‘Double’, it specifies the double value
Enumerated: when the data type is ‘Enumerated’, it specifies the enumerated value
Integer: when the data type is ‘Integer’, it specifies the integer value
Object Type: when the data type is ‘Object Identifier’, it specifies the object type of the object identifier value
Instance: when the data type is ‘Instance’, it specifies the instance of the object identifier value
Octets: when the data type is ‘Octets’, it specifies the octets value
Real: when the data type is ‘Real’, it specifies the real value
String: when the data type is ‘String’, it specifies the string value
Time: when the data type is ‘Time’, it specifies the time value
Unsigned: when the data type is ‘Unsigned’, it specifies the unsigned value
Delete Object from Runtime Device
Workbench provider lets the user delete an object from a runtime BACnet Device.
It is possible to execute a Delete Object from Runtime Device right-clicking on an Object and selecting ‘Delete Object from Runtime Device’ from the context menu as shown below:
Delete Object from Runtime Device action from Object level

- OR -
Select the Object for which you want to call the action, then click on the Delete Object from Runtime Device button shown below in the Edit section of the Home ribbon in Workbench.
Delete Object from Runtime Device button
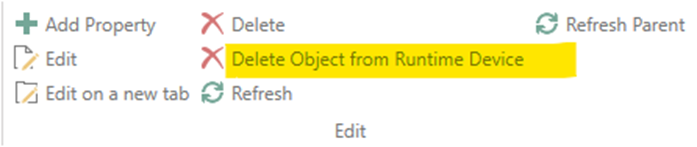
You will be asked if you want to continue with the deletion of the object:
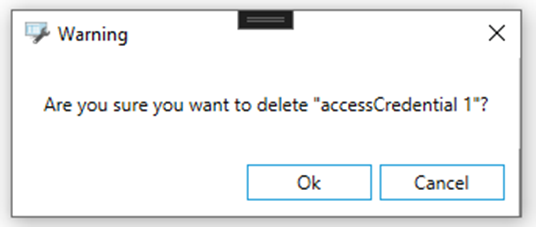
If you click on OK button, then the object will be deleted from the runtime BACnet device.
Properties
Under an Object, there can be multiple Property entities.
If you double-click on it, a dialog will open.
The dialog contains some settings that you can configure. This is the list of the settings:
Generic Properties
Name - The name of the Property
Description - The description of the Property
Property ID - the identifier of the associated property from the Library. It’s even possible to edit/add properties from this dialog clicking on the icons. A dialog will be shown to the user
Array Index - specifies the array index of the property. Range can be between -1 and 4194303. Default is -1.
Add a BACnet Vendor Property
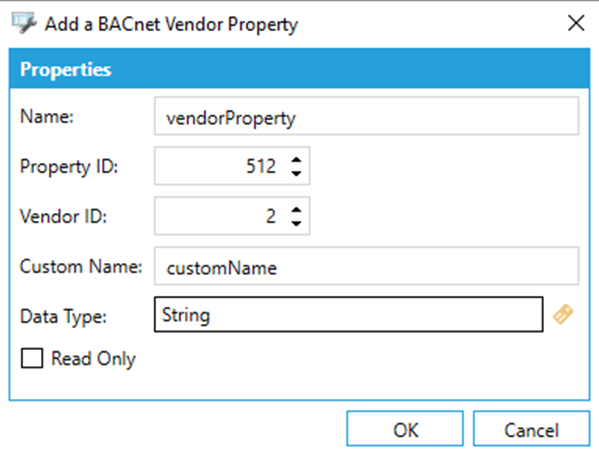
o Name: specifies the name of the property
o Property ID: specifies the identifier of the property. Range can be between 512 and 4194303
o Vendor ID: specifies the vendor identifier
o Custom Name: specifies the custom name of the property (to be used as display name)
o Data Type: specifies the data type of the property
o Read Only: if true, the property will be set as read-only
Override Settings
Property dialog (Override Settings)
.png)
Read Service Type - overrides the Read Service Type value defined in the Channel/Device/Object levels
Re-Subscribe COV Period[seconds]:overrides the Re-Subscribe COV Period value defined in the Channel/Device/Object levels
Polling Rate[seconds]: overrides the Polling Rate value defined in the Channel/Device/Object levels
Priority: overrides the Priority value defined in the Channel/Device/Object levels
Click on the Apply button to apply the changes.
Libraries
Under the root level, there’s another section available called ‘Libraries’.
Libraries in the Project Tree
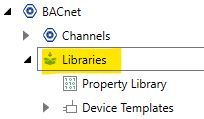
The Libraries level contains two sub-levels:
Property Library - Here, you can configure the available properties
Device Templates - Here, you can configure a set of templates for the devices (currently, only the standard device template is available)
Property Library
The Property Library is available under the Libraries root level.
Property Library in the Project Tree
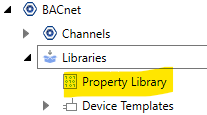
If you double-click on it, a dialog will open.
Property Library Dialog
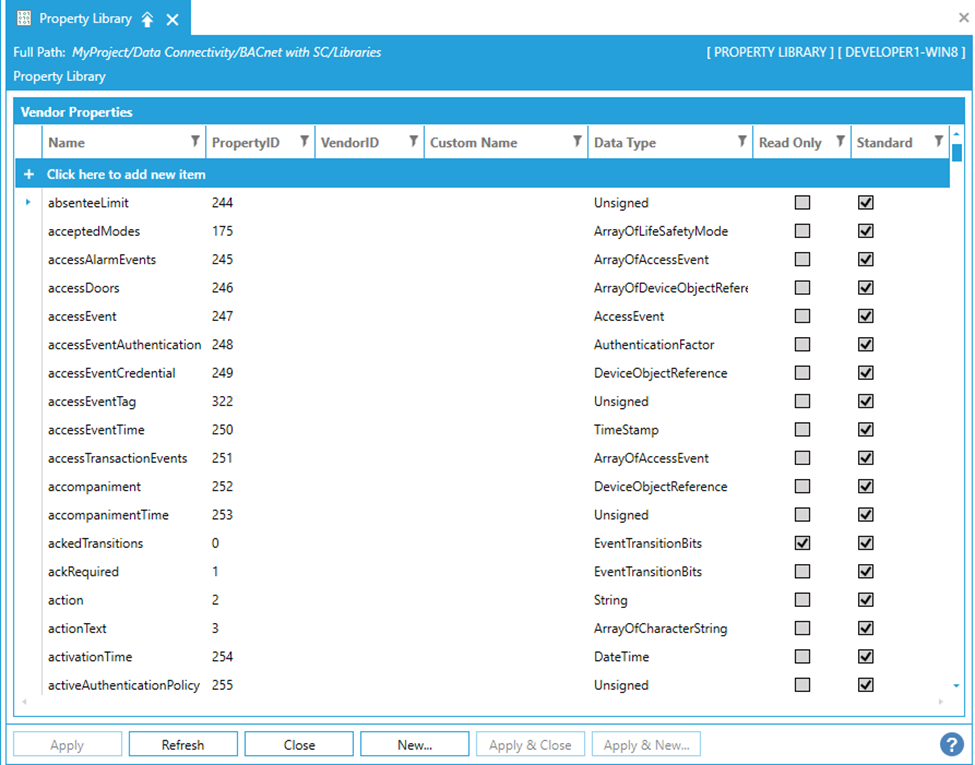
In this dialog, we can configure the available properties (modify the existings or add / remove new ones). We can have two different kinds of properties: Standard and Custom. The standard properties cannot be added/remove. You cannot even modify them except the Custom Name. The Custom properties are otherwise fully supported (you can add/remove/edit them).
In this dialog, we can configure the available properties (modify the existings or add / remove new ones). We can have two different kinds of properties: Standard and Custom. The standard properties cannot be added/remove. You cannot even modify them except the Custom Name. The Custom properties are otherwise fully supported (you can add/remove/edit them).
For each property, we have these properties:
Name - The name of the property.
PropertyID - The identifier of the property.
VendorID - The identifier of the vendor.
Custom Name - The custom name of the property.
Data Type - The data type of the property
Read Only - True if the property is read-only
Standard - True if the property is a standard property.
Click on the Apply button to apply the changes.
The properties with PropertyID in the range [0..511] are automatically marked as ‘Standard’ and cannot be removed/modified by the users.
Device Templates
The Device Templates level is the virtual root level of the Device templates. It could contain multiple Device Templates. In current version we have only the Default Device Template (we cannot add new templates).
Device Templates in the Project Tree
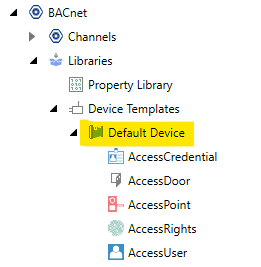
Device Template
The Device Template entity is under the virtual root level Device Templates. Currently, we can have only one Device Template (the default one) and there are no configurable properties. It contains multiple Object Type Templates.
Device Template in the Project Tree
To create an Object Type Template
To create a new Object Type, right-click on the Default Device and click on Add Object Type as shown below:
Add Object Type from Project Explorer

- OR -
Select the Default Device branch, then click on the ‘Add Object Type’ button shown below in the Edit section of the Home ribbon in Workbench.
Add Object Type button
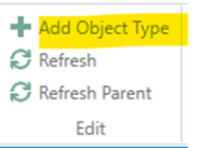
The Object Type properties window will appear in the right pane of Workbench.
To edit an Object Type Template
If you double-click on it, a dialog will open.
Object Type Template
The Object Type Template entity is under a Device Template entity.
Object Type Template in the Project Tree

If you double-click on it, a dialog will open.
Object Type Template dialog
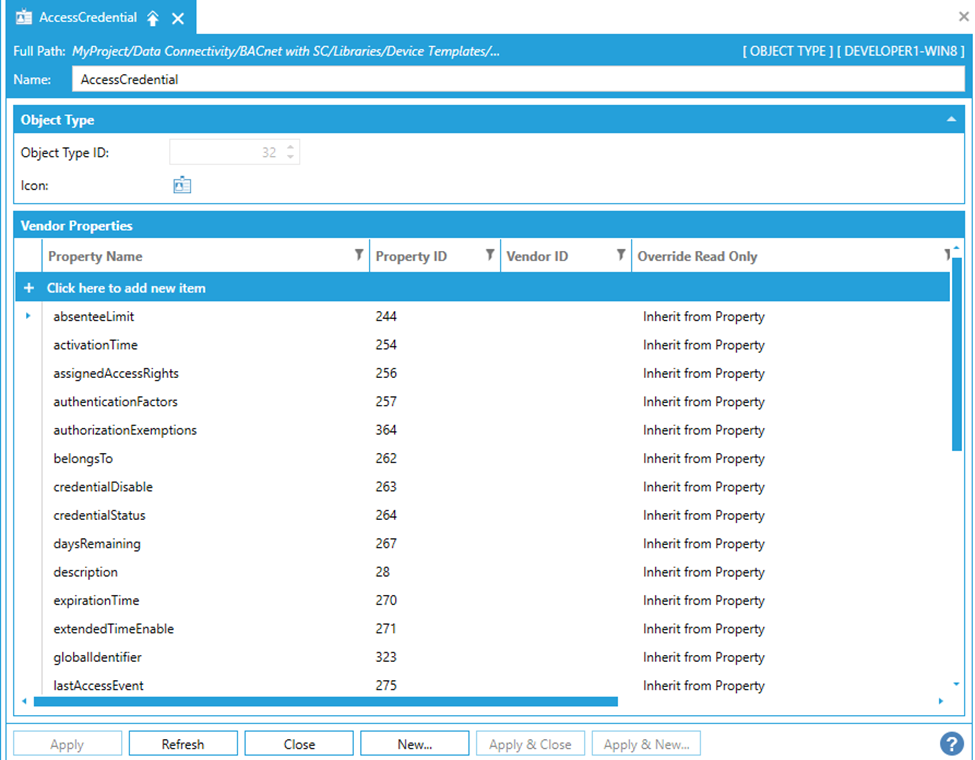
The dialog contains some settings that you can configure. This is the list of the settings:
Object Type
Object Type ID - The identifier of the object type
Icon - The icon to be shown in the provider
Vendor Properties
The grid contains the list of supported properties for the object type.
For each property we can see:
Property Name: the name of the property
Property ID: the identifier of the property
Vendor ID: the identifier of the vendor
Override Read Only: it specifies if the property should override the read-only setting of the linked property. The possible values are:
o Inherit from Property: to inherit the value from the referenced property
o ReadOnly: to overwrite the value of the referenced property and set it to read-only
o Writable: to overrider the value of the referenced property and set it to writable
Override Data Type: true if we want to override the data type specified in the referenced property
Data Type: if Override Data Type is set to true, it specifies the data type that overrides the data type specified in the referenced property
Click on the Apply button to apply the changes.
Logger System Settings
The Logger System Settings level is one of the top most element in BACnet hierarchy.
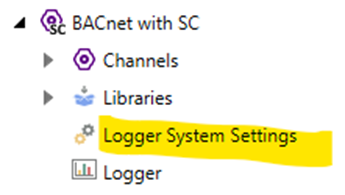
If you double-click on it, a dialog will open.
Logger System Settings dialog
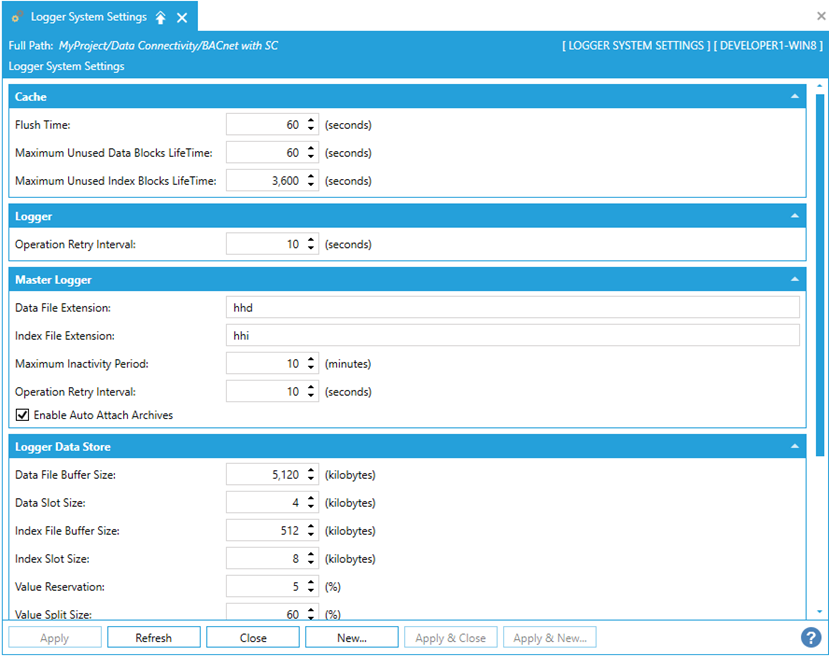
It contains the logger system settings.
The properties are grouped by:
- Cache
- Logger
- Master Logger
- Logger Data Store
- Master Logger Data Store
Here are the settable properties listed for each group:
Cache
- Flush Time - Specifies the time interval (in seconds) after which the cache is cleared. Enter the time interval in the text entry field or use the up/down arrow buttons.
- Maximum Unused Data Blocks LifeTime - Specifies the maximum lifetime (in seconds) of unused data blocks. Enter the maximum lifetime in the text entry field or use the up/down arrow buttons.
- Maximum Unused Index Blocks LifeTime - Specifies the maximum lifetime (in seconds) of unused index blocks. Enter the maximum lifetime in the text entry field or use the up/down arrow buttons.
Logger
- Operation Retry Interval - Specifies the time interval (in seconds) after which the logger attempts to re-execute a failed operation. Enter the time interval in the text entry field or use the up/down arrow buttons.
Master Logger
- Data File Extension - Specifies the extension for logged data files. Enter a data file extension in the text entry field.
- Index File Extension - Specifies the extension for index files. Enter an index file extension in the text entry field.
- Maximum Inactivity Period - Specifies the maximum inactivity period (in minutes) allowed for the master logger. Enter the maximum inactivity period in the text entry field or use the up/down arrow buttons.
- Operation Retry Interval - Specifies the time interval (in seconds) after which the master logger attempts to re-execute a failed operation. Enter the operation retry interval in the text entry field or use the up/down arrow buttons.
- Enable Auto Attach Archives - Specifies if automatic attach/detach feature is on.
Logger Data Store
- Data File Buffer Size - Specifies the size (in kilobytes) of the data file buffer. Enter the size in the text entry field or click on the up/down buttons.
- Data Slot Size - Specifies the size (in kilobytes) of the data slot. Enter the size in the text entry field or click on the up/down buttons.
- Index File Buffer Size - Specifies the size (in kilobytes) of the index file buffer. Enter the size in the text entry field or click on the up/down buttons.
- Index Slot Size - Specifies the size (in kilobytes) of the index slot. Enter the size in the text entry field or click on the up/down buttons.
- Value Reservation - Specifies values reservation as a percentage. Enter the percentage in the text entry field or click on the up/down buttons.
- Value Split Size - Specifies values split size as a percentage. Enter the percentage in the text entry field or click on the up/down buttons.
Master Logger Data Store
- Data File Buffer Size - Specifies the size (in kilobytes) of the data file buffer. Enter the size in the text entry field or click on the up/down buttons.
- Data Slot Size - Specifies the size (in kilobytes) of the data slot. Enter the size in the text entry field or click on the up/down buttons.
- Index File Buffer Size - Specifies the size (in kilobytes) of the index file buffer. Enter the size in the text entry field or click on the up/down buttons.
- Index Slot Size - Specifies the size (in kilobytes) of the index slot. Enter the size in the text entry field or click on the up/down buttons.
- Value Reservation - Specifies values reservation as a percentage. Enter the percentage in the text entry field or click on the up/down buttons.
- Value Split Size - Specifies values split size as a percentage. Enter the percentage in the text entry field or click on the up/down buttons.
Once you have completed making updates to the Logger System Settings, click on the Apply button then on the Close button to return to the Workbench.
Logger
The Logger level is one of the top most element in BACnet hierarchy.
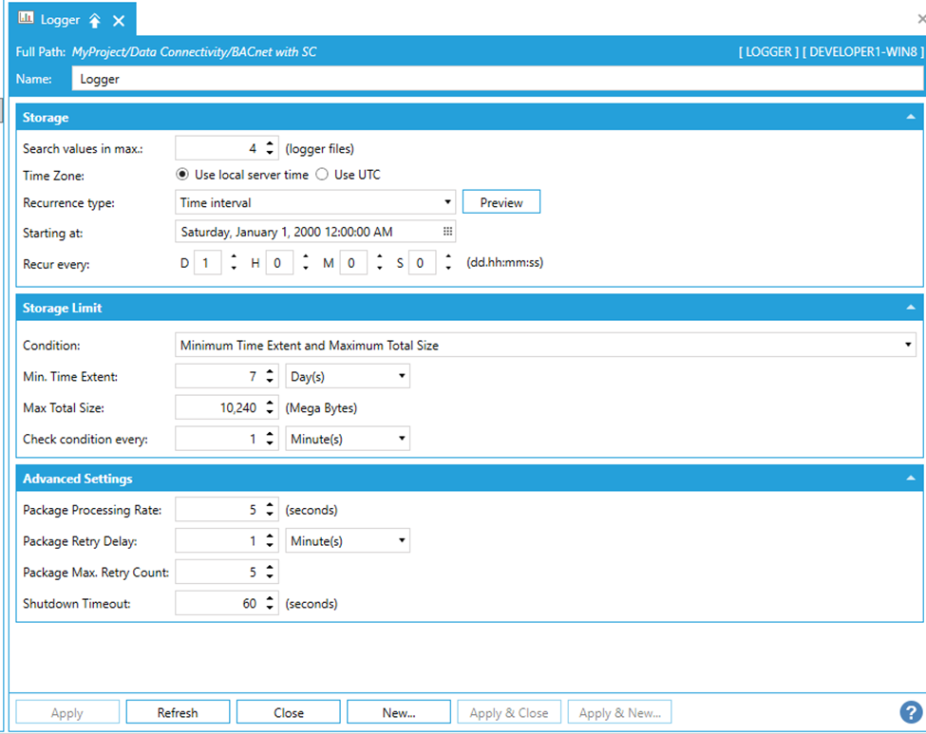
It contains the logger settings.
The properties are grouped by:
- Storage
- Storage Limit
- Advanced Settings
Here the settable properties for each group:
Storage
- Search values in max - Enter a maximum (in logger files) in the text entry field or use the up/down arrow buttons.
- Time Zone - Select either 'Use local server time' or 'Use UTC'.
- Recurrence type - Use the pulldown menu to select from One time only, Time interval, or Specific dates and times. Click the Preview button to open the Recurrence Preview window to see your set recurrences.
- Starting at - Enter a date and time in the text entry field or click on the button to open the date and time control to select your preferred date and time.
- Recur every - Enter a value in the text entry field and then use the nearby pulldown menu to select units [Second(s), Minute(s), Hour(s), Day(s), Week(s), Month(s), or Year(s)].
If 'Specific dates and times' is selected for Recurrence type:
- Pick specific times - Click this checkbox in order to set specific times. This activates the Seconds field below.
- Seconds - Enter a value in the text entry field or click on the button, which allows you to make a multi selection of units.
Storage Limit
- Condition - Use the pulldown menu to select from 'Minimum Time Extent and Maximum Total Size', 'Minimum Time Extent', or 'None'.
- Min. Time Extent - Enter a value in the text entry field (or use the up/down arrow buttons) then use the pulldown menu to select units from Minute(s), Hour(s), or Day(s).
- Max. Total Size - Enter a value in the text entry field in megabytes (or use the up/down arrow buttons).
- Check condition every - Enter a value in the text entry field (or use the up/down arrow buttons) then use the pulldown menu to select units from Second(s), Minutes(s), Hour(s), or Day(s).
Advanced Settings
- Package Processing Rate:Enter a value in the text entry field in seconds (or use the up/down arrow buttons).
- Package Retry Delay: Enter a value in the text entry field (or use the up/down arrow buttons) then use the pulldown menu to select units from Second(s), Minutes(s), Hour(s), or Day(s).
- Package Max. Retry Count: Enter a value in the text entry field (or use the up/down arrow buttons).
- Shutdown Timeout: Enter a value in the text entry field in seconds (or use the up/down arrow buttons).
Click Apply to save your changes then Close to return to the Workbench.
Alarms
Displaying BACnet Alarms can be done via the AlarmWorX64 Viewer within GraphWorX64. The control has the capability to view and manipulate OPC and BACnet alarms.
Each Event State thrown by a given BACnet object received by AlarmWorX64 Viewer is displayed in a separate row in order to notify the operator that there were several changes of state. If a row has a red background (this is by default, look & feel can be completely overridden in AlarmWorX64 Viewer configuration) then the given Alarm or Event is in Alarm State and has not been acknowledged yet.
If a row has a white background but the text is written in red then it is still in an Alarm State, but it has been already acknowledged.

If a row has a white background but the text is written in red then it is still in an Alarm State, but it has been already acknowledged.

Alarms or Events in Alarm State can’t be cleared from the list.
If a row has a white background and the text is black, it means that the given Alarm or Event state is not actual, but occurred in the past. This information can be cleared from the list.

AlarmWorX64 Viewer does not visually differentiate between Alarms or Events. The graphical representation is same for both.
Configuring BACnet and Other UA Alarms in the Alarm Logger
When logging extra attributes from BACnet and other UA alarms into the ICONICS Alarm Logger, users should make certain to configure the same attribute list for ALL Event Categories.
Use {null} if an individual attribute is missing from the list.
Skip Event Category if no required attributes exist in the list.
Logging Extra Attributes for Event Category "BACnetAlarmType"
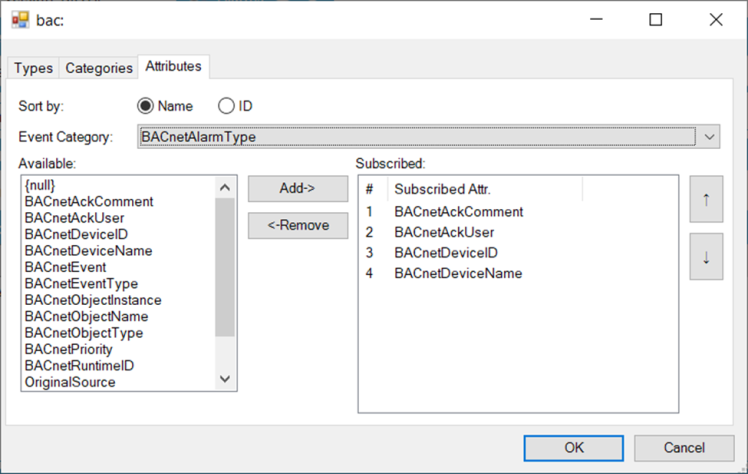
BACnet Event Category ‘OutOfRange’ contains the same extra attributes so they should be configured.
BACnet Event Category "OutOfRange"
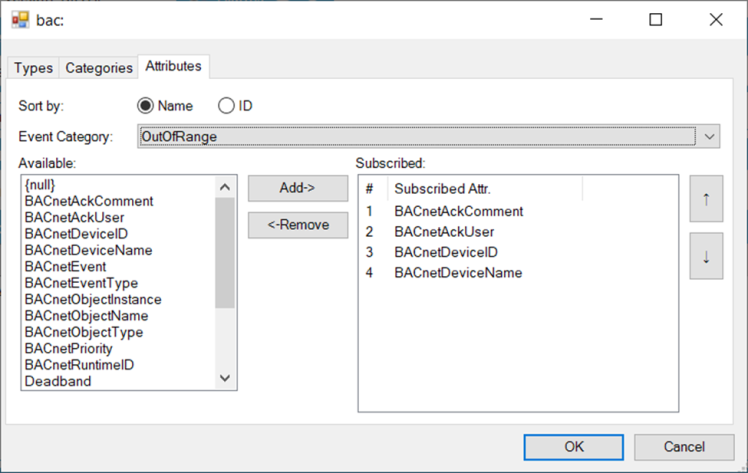
BACnet Event Category ‘BaseConditionType’ does not contain the needed extra attributes, so this does not need to be configured.
BACnet Event Category BaseConditionType
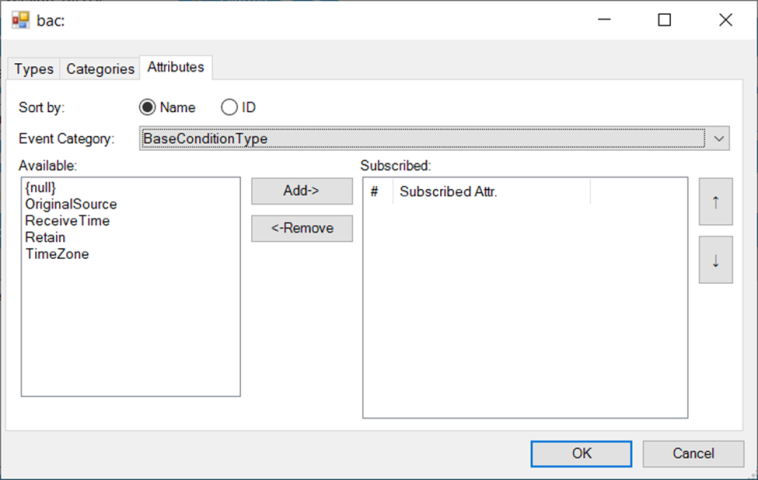
Displaying Alarms
To Display BACnet Alarms, Do the Following:
1. Launch GraphWorX64.
2. Insert the AlarmWorX64 Viewer control by choosing it in the ‘Controls’ tab and draw a rectangle in the canvas to place an AlarmWorX64 Viewer.
3. Double-click the displayed viewer control in order to open its properties and settings.
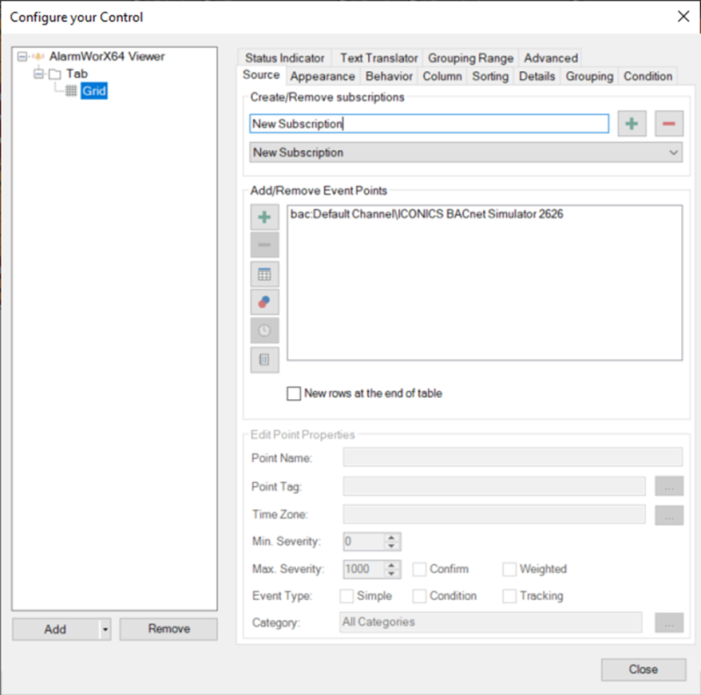
4. In the opened dialog, select the ‘Grid’ tree item.
5. Now, click the button with the ‘+’ sign in the ‘Create/Remove Subscriptions’ section and choose ‘Real Time Subscription’ from the opened context menu.
6. Select the ‘Local Alarm Server’ listbox item in the ‘Add/Remove Event Points’ section and click the ‘-‘ sign in the same section to remove an existing subscription.
7. Now, press the ‘+’ button in the ‘Add/Remove Event Points’ section. This will open the Data Browser.
8. In Data Browser’s tree view (under “Data Points tab)”, expand “My Computer”.
9. Under “My Computer” further expand “Data Connectivity”.
10. Under “Data Connectivity” further select the “BACnet with SC” to subscribe for all the alarms from the whole BACnet/SC point manager. If so, click OK to confirm the dialog. Or you can continue to select individual channels, devices, or objects from which you want to obtain /filter the alarms. If so, …
11. Expand the “BACnet with SC” and browse for the desired channel, device, or object. Double click the desired channel/device/object or click OK to confirm the dialog.
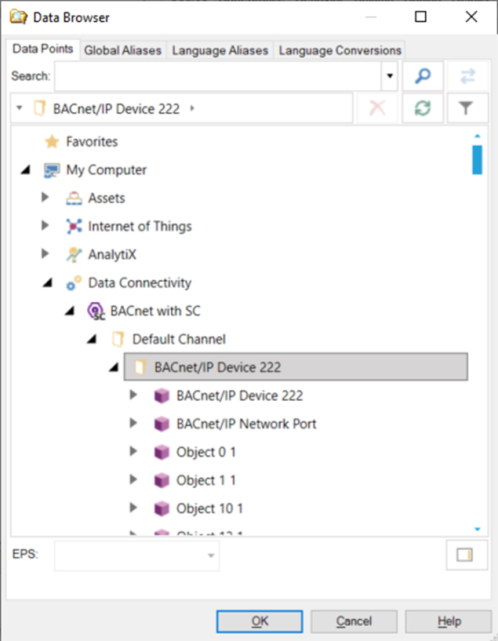
Acknowledging Alarms
There are several ways how to acknowledge alarms in AlarmWorX64 Viewer:
a. Simply double-click your desired row with unacknowledged notification.
b. Right-click your desired row with unacknowledged notification and choose ‘Acknowledge’ from the context menu, then confirm the displayed dialog or change conditions within the displayed dialog in order to acknowledge more alarms or events at the same time.
c. In GraphWorX64’s ribbon, switch to the ‘AlarmWorX64 Runtime’ tab, select the desired row and click ‘Acknowledge’ button in the ribbon bar.
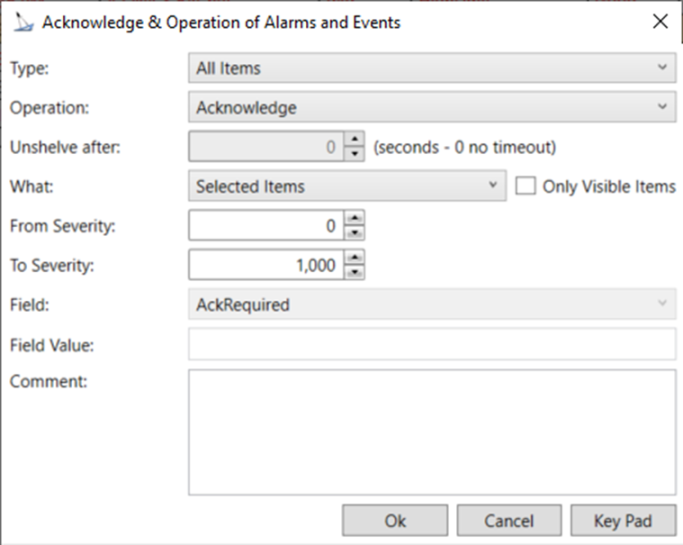
Trends
Displaying BACnet Trends can be done by the TrendWorX64 Viewer within GraphWorX64. The control has the capability to view real time or historical OPC data as well as to visualize BACnet Trends. Alternatively, you can also display any historical data exposed by the IoT Subscriber Point Manager.
An important thing to know here is that all data are initially requested from the Trend Log object buffer when BACnetSC Point Manager is started. When the Notification Threshold hits, then new buffer data are requested. TrendWorX64 Viewer provides an interface for moving this data across to the user so he or she can seek and zoom to a specific portion of any loaded data (described in 'Displaying a specific portion of the data').
It is also important to know that Trends are by default switched off in the Point Manager configuration. They can be switched on in WBD on device level. If the checkbox is checked, then all TrendLog and TrendLogMultiple objects are subscribed to the device. That means there should only be the required TL and TLM objects in the configuration.
In the picture below, the trends are enabled on device level which cause subscribing to one TrendLog object and one TrendLogMultiple object (as highlighted in the picture).

Displaying Trends from Trend Log Objects
To display BACnet trends, do the following:
1. Launch GraphWorX64.
2. Insert the TrendWorX64 Viewer control by choosing it in the ‘Controls’ tab and draw a rectangle in the canvas to place a TrendWorX64 Viewer.
3. Double-click the displayed viewer in order to open its properties and settings.
4. In the opened dialog window, right-click the ‘Chart’ tree item and choose ‘Add’ -> ’Plot’.
5. Now, right-click the newly created ‘Plot’ item in the tree and choose ‘Add’ -> ‘Pen’.
6. Select the newly created ‘Pen’ in the tree and in General Tab on the right-side insert ‘Data Source’ or click the ‘…’ button next to the ‘Data Source’. The Data Browser will open.
7. In the Data Browser expand ‘Data Connectivity’ and ‘BACnet with SC’.
8. Then expand BACnet address space to find your desired Trend Log object (or Trend Log Multiple object) providing trend data.
9. Tag that support history read has name “.history” for TrendLog.
10. Confirm the selection by clicking 'OK' in the Data Browser. This will add a Data Source path to the selected Trend Log object.
11. There is a “Connection” string under the Data Source that also have its ‘…’ button which opens allows us to specify connection details when you use “Configure…”.
12. There switch the radio buttons to ‘Use HDA connection’.
13. The content of the dialog window will slightly change and you can select a filter which depends on a purpose of the signal. If you select ‘(raw data)’ then you should get the same samples as in BACnet TrendLog object.
14. Now you can close the dialog window for TrendWorX64 Viewer’s configuration.
15. Switch GraphWorX64 to Runtime mode. You will see a line representing data stored in the Trend Log (maybe you will need to change vertical scale of graph. To do so, proceed with a left mouse click to the area of vertical axis ranges. A dialog window will appear where you can change it).
Displaying Trends from Trend Log Multiple Objects
These steps are the same as for 'Displaying Trends from Trend Log Objects' except:
You connect each pen (created in step 5) with the same Trend Log Multiple object (selected in steps 6 to 11) – one pen = one trend on the plot
There are tags with name “.history<n>” where the <n> is an index of a signal from TrendLogMultiple object.
In the “Connection” dialog (step 11 and 12), select the Use HDA connection as well.
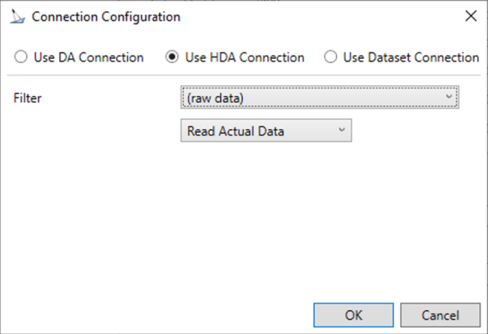
Displaying Trend Log Data in IoTWorX
To display BACnet Trend Log data in IoTWorX, do the following steps:
In Workbench, expand your project, then expand the Internet of Things node and right-click on the Subscriber Connections node.
Choose the desiredIoT Hub / Event hub or MQTT connection, or create a new one.
Enable 'Collect the logged data retrieved with this subscription' option inGeneral Settings.
Configure a logger for the subscriber. Make sure you enable the option “The logger is used by all subscriber connections to retrieve the collected data”.
Configure the history pointsin the publish list under the Published Historical Points tab.
Published Historical Points Tab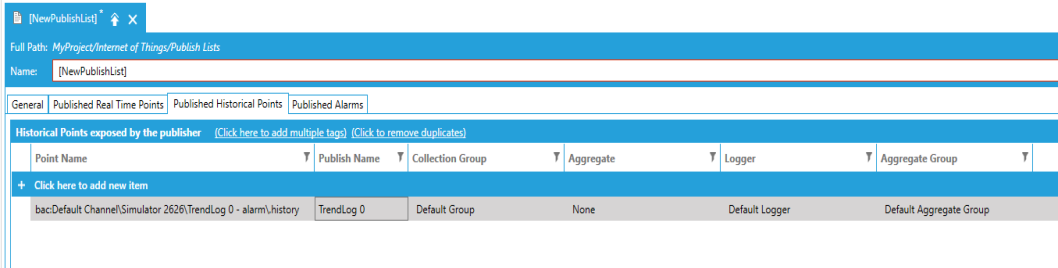
By default, raw data are read butif needed, you can specify a different aggregate for each history point.Then you will also need to configure the aggregate group.
History points are not available in the publisher. You need to publish them into the cloud and consume by the subscriber. You will find the history data under the device in the History Data folder.
You will find other useful settings in Advanced Settings under the General Settings of the publish list. Max. History Read Threads specifies the maximum read requests that can run at the same time. You need a request per point. History ReadTimeout specifies the timeout of the history read operation.