Why an Equipment Hierarchy with Tiers?
When you configure your equipment in AssetWorX, you create an equipment hierarchy that specifies which types of equipment belong at each tier of the asset tree. Doing this controls the structure of the asset tree by preventing you from accidentally assigning certain types of equipment to inappropriate tiers, and it also controls whether an asset level can have multiple tiers of equipment at each level. The equipment hierarchy applies universally throughout the configuration database's asset tree.
When you first install AssetWorX, you will find that there are three different equipment hierarchies provided for you to choose from, each with their own predefined tiers. You can alternatively choose to define a hierarchy of your own choosing. Your options include the following:
-
The Batch Production equipment hierarchy consists of tiers that structure the equipment typically used in batch processing.
-
The Building Automation equipment hierarchy consists of tiers for buildings and campuses.
-
The Discrete Manufacturing equipment hierarchy consists of tiers for the equipment that is frequently found in discrete manufacturing.
-
The User Defined option lets you choose of the preexisting equipment hierarchies as a starting point, and lets you define the tiers that you need for your installation. You can add any number of levels, and can even define and add iconic images that uniquely identify each tier.
You can use these levels as they are, rename them, delete them, move them, and add more levels. Do what you need to do so that they suit your enterprise's purposes. The objective you want to keep in mind when doing so is that each tier defines a specific type of equipment that occupies that tier.
The remainder of this topic describes the following:
Understanding the Rules of the Equipment Hierarchy
Before you define the tiers of the equipment hierarchy, put together a plan for structuring your company's equipment in a tree-like structure. Then define the tiers of the equipment hierarchy in AssetWorX. You can add iconic images that identify each level.
So that you can do this, it is important that you understand how the hierarchy works.
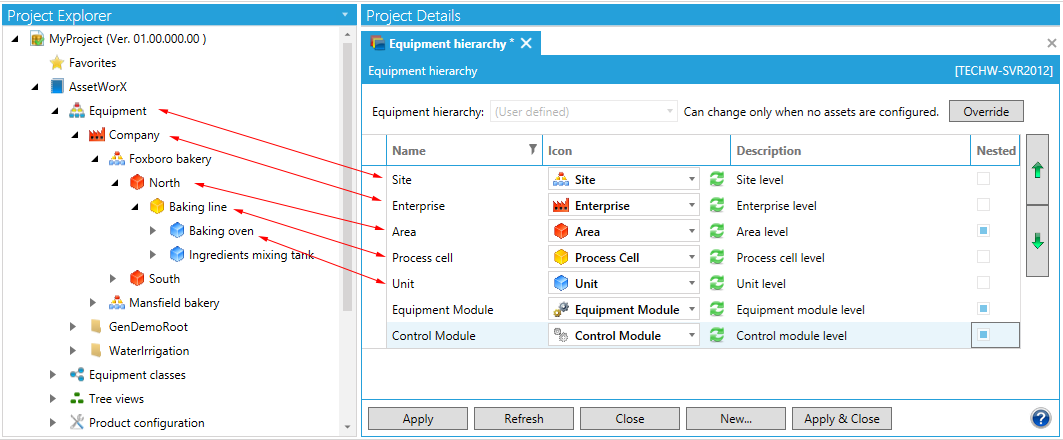
Asset Tree (left) and the Equipment Hierarchy that Controls It (right)
Here are a few rules you need to keep in mind when deciding what you want the tiers of the equipment hierarchy to be:
-
Each tier identifies a type of logical or physical equipment. Furthermore, each tier is intended to be a summarized version of the tier below it so that, as you work your way down the hierarchy you find that each tier is made up of the equipment at the next lower tier. For example, if the enterprise is made up of sites, each site is made up of areas, each area has process cells, each process cell has units, and so on. The tiers in this example are Site, Area, Process Cell, Unit, and so on.
-
Equipment that you add to the asset tree cannot skip tiers. For example, if you are using the tiers listed in the prior bullet item, the Site's child tier always contains equipment definitions for areas, and an area's child tiers are always equipment definitions for process cells. An area cannot have a child tier full of equipment definitions for units.
-
A tier can repeat itself for more than one level if you identify the tier as one that can benested. This means, for example, that facilities can contain other facilities.
-
The tiers display in the sequence, from broadest to most details, from top to bottom. Once equipment is defined to a tier in the asset tree, you cannot raise or lower that tier in the equipment hierarchy.
Defining the Tiers of the Equipment Hierarchy
Use the Equipment Hierarchy tab to identify asset levels in your asset tree, by following these steps:
-
In the Workbench, expand your project, then the AssetWorX provider node, and then the Product configuration node.
-
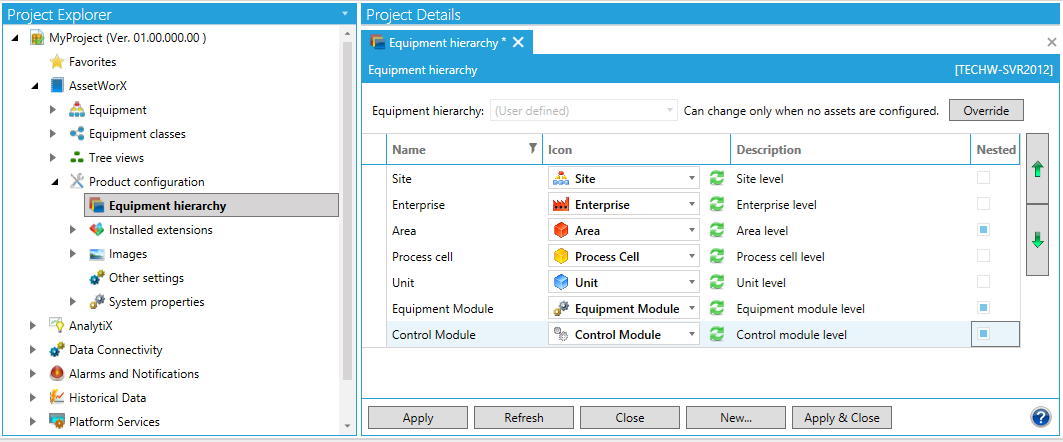
Double-click on Equipment Hierarchy(or select the node then click on the Edit button in the Edit section of the Home ribbon in the Workbench). This opens the Equipment Hierarchy properties, as shown below:
Equipment Hierarchy Defines the Tiers of the Asset Tree
-
If there are assets in the asset tree already, an Override button appears on the tab. You cannot change the equipment hierarchy unless you click the Override button.
-
From the Equipment Hierarchy drop-down list, select the hierarchy you want to use for this configuration. If you are creating the hierarchy for the first time, choose the hierarchy that is closest to the one you want to use, then follow the steps below to modify it.
-
To add a new tier to the hierarchy, click on the gray row that says Click here to add new item. The row becomes enabled so that you can define a new tier. Enter the following:
-
Enter a Name for the new tier.
-
Choose the Icon to represent the tier in the equipment hierarchy. You can use any .jpg or .png as a placeholder if you like. For help creating and configuring a new icon, refer to the Configuring icons for the equipment hierarchy section, below in this topic.
-
Enter a Description.
-
If more than one level of equipment can be created in the asset tree for this tier, put a check mark in the Nested column. If only one level of this tier can be created in the asset tree, leave the check box empty.
-
-
Click Apply to save the new tier.
-
Now, with the tier still selected, click the down arrow at the right of the table to move the tier to the position where it belongs in the hierarchy. Click the up and down arrows to position the new tier in the hierarchy. Note that the new tier cannot be inserted above any tier that has equipment in it in the asset tree.
-
Repeat these steps to define additional tiers.
-
To remove a level, select the level and press the Delete key on your keyboard.
-
Click Apply to save the change, or click Apply & Close to also close the tab.
If you need additional help using this tab, refer to the Equipment Hierarchy Node topic.
Configuring Icons for the Equipment Hierarchy
Tiers in the equipment hierarchy and equipment in the asset tree are represented by small, iconic images that have been configured in the AssetWorX. If you are adding a new tier to the equipment hierarchy, you must choose an icon in AssetWorX that will represent the tier in the hierarchy. You can use any image as a placeholder until you have finalized the images you will be using.
Uses
Icons in the equipment hierarchy are used by default for each tier in the asset tree. You can, however, use icons for each individual type of equipment which you select at the time you add equipment to the asset tree. For example, you can use the icon of an office building for the Building tier of the hierarchy, but when you add a warehouse, select the warehouse icon instead. If you are using Energy AnalytiX, you can create a separate set of icons that identify meters and utility sources.
You can create icons that represent:
-
Tiers in the equipment hierarchy. For steps to associate icons with tiers, refer to the Defining tiers for the asset tree topic, above. Icons that are defined for tiers are used by default for any equipment node that you add to the asset tree without the use of an equipment class.
-
Individual equipment classes. For steps to associate an icon with an equipment class, refer to the Creating an Equipment Class topic. The icons you use for equipment classes are used by default in the asset tree for any equipment node created using the equipment class.
-
Individual types of equipment in the asset tree. For steps to associate an icon with any equipment node in the asset tree, refer to the Adding Equipment to the Asset Tree topic. Equipment that you add to the asset tree is given a default icon that you can override for that equipment node.
Strategies
Plan out the icons you intend to use. How you use them and set them up will be determined by your enterprise, the complexity of your asset tree, and the needs at your organization. Keep in mind that the icons in the asset tree will be used not only by the personnel who configures providers in the Workbench, but also by runtime user who are viewing charts and reports. For this reason, you might want to set strategies in place for colors and shapes that you use in the asset tree, to make equipment in the asset tree easy to identify.
AssetWorX comes to you with some default images in place. You can use these images or create your own. If you want to use your own, then you must configure them in AssetWorX by following the steps provided below. The images must be saved to a file in a .JPG or .PNG format.
Steps
To Configure an Icon for Use in a Tier of the Equipment Hierarchy:
-
In the Workbench, expand your project, then the AssetWorX provider node, and then the Product configuration node.
-
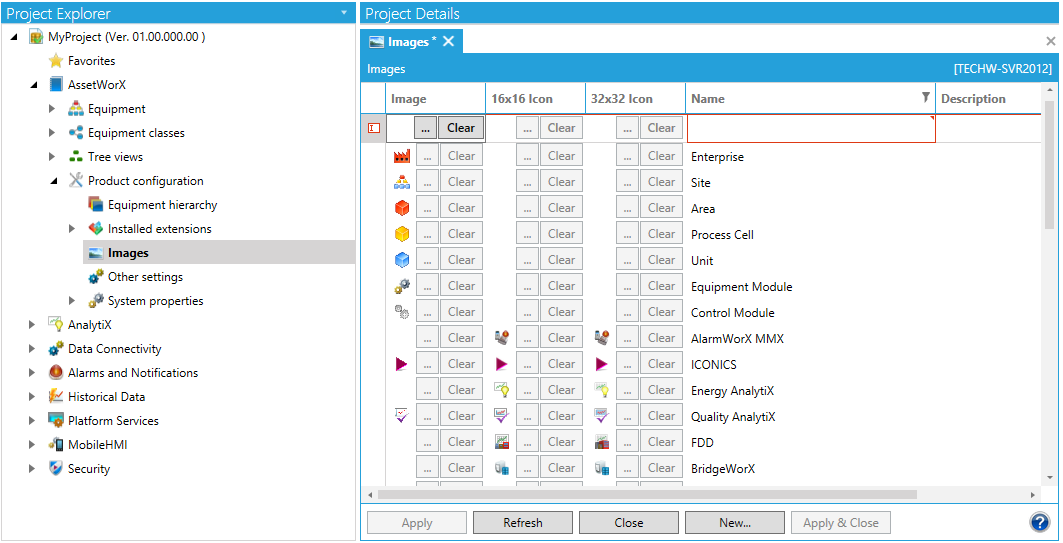
Double-click on Images (or select the node then click on the Edit button in the Edit section of the Home ribbon in the Workbench). This opens the Images properties, as shown below.
Configure Icon Images for Use in the Equipment Hierarchy
-
Click on the gray row that says Click here to add new item. The row becomes enabled.
-
Click the ellipsis button [...] in the Image column to choose the image as it will appear in the asset tree. This opens an Open dialog where you must navigate to the .jpg or .png file created for this purpose. Select the file and click the Open button; the dialog box closes and file image appears in the Image column.
-
Optionally, in the 16x16 Icon column you can choose a 16-pixel by 16-pixel version of the icon. If you leave this column empty, the icon in the Image column is used by default.
-
Optionally, in the 32x32 Icon column you can choose a 32-pixel by 32-pixel version of the icon that appears on the Equipment tab when you are modifying equipment values. If you leave this column empty, the icon in the Image column displays on the Equipment tab.
-
Enter a Name and Description for the new tier.
-
Move it to the correct location in the hierarchy by clicking the up and down arrow buttons at the right.
-
Click Apply to save the change, or click Apply & Close to also close the tab.
See Also: