Equipment Hierarchy Node
In the Workbench Project Explorer, expand your project, then the AssetWorX node, then the Product configuration node and then click on Equipment Hierarchy. This displays the Equipment Hierarchy tab, shown below, where you define the tiers of the equipment hierarchy, which will govern the structure of the asset tree. Each option on the tab is described below. For more information about the equipment hierarchy, refer to the Why an Equipment Hierarchy with Tiers? topic.
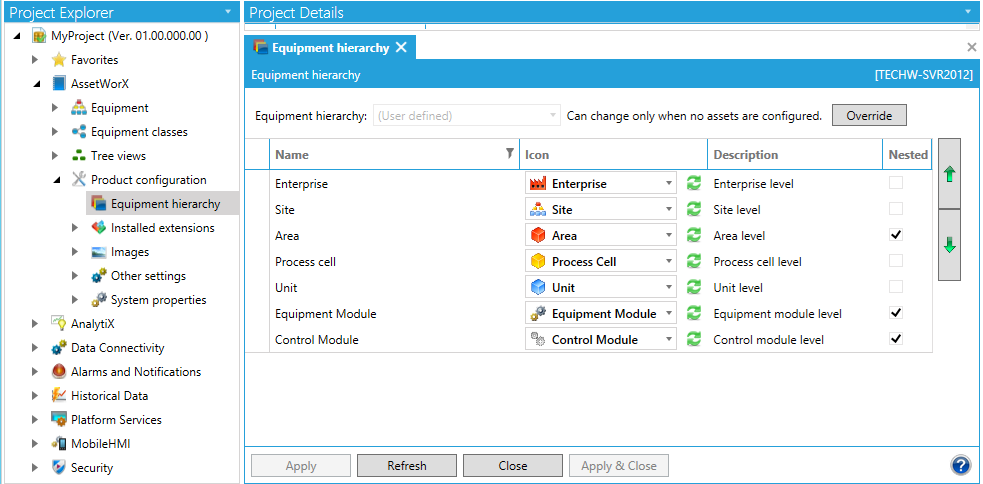
Equipment Hierarchy in AssetWorX
Option on the tab are:
-
Equipment Hierarchy: The name of the equipment hierarchy that is currently in use for the AssetWorX configuration. Choices are User Defined (for which you can define a hierarchy of your choosing) and three predefined hierarchies (which you can modify): Batch Production, Building Automation, or Discrete Manufacturing. You can choose a different one after clicking the Override button.
-
Override button: When you first open the tab, the Override button appears if equipment has already been added to the AssetWorX configuration's asset tree. It is recommended that once equipment has been used in the asset tree, you do not change the hierarchy. However, you are not prohibited from doing so. You can still make changes to the hierarchy by clicking the Override button. This enables the fields on the tab so that you can make changes. This is one limitation though: you cannot move a tier if equipment is defined for that tier in the asset tree.
-
Name: The name of the tier.
-
Icon: A picture of the icon that represents the tier in the equipment hierarchy. Any equipment added to this tier in the asset tree is accompanied by this icon so that its tier is easier discernible. You can select a different icon from the drop-down list; icons must be predefined using the process described in the Configuring icons for the equipment hierarchy topic.
-
Description: A description of the tier's use. This description is helpful if the type of equipment at this level is not obvious to people who might be using it.
-
Nested: A check mark indicates that this tier can have multiple levels of equipment in the asset tree. Equipment in this tier can have parent and child equipment in the same tier. Changing the state of this check box requires you to click three times on the cell: once to select the row, a second time to select the cell, and a third time to change the state.
-
Click here to add new item: Click this row to add a new tier to the table. Once you have added it, you can use the Up and Down button to put it in the correct sequence.
-
Up and Down arrow buttons: At the right of the table are two arrow buttons that you can use to sequence the selected tier in the hierarchy. Tiers must be arranged from broadest to most distinct in order from top to bottom. For example, from top to bottom you might have Enterprise, then Region, then Campus, then Building, then Area, all the way down to the most detailed level of Machine or Robot.
Other tips to help you use this tab:
-
To add another row, either click on an existing row or click Apply to save all changes. This enables the Click Here to Add New Item field.
-
To delete a row, select the row so that the entire row is selected (not just one field), and press the Delete key.
-
If at any time you believe the values to be out of sync with stored values in the database, you can click the Refresh button to retrieve the most-current values.
-
At any time, you can click the Reset button to undo changes that you haven't saved yet.
See also: