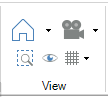
View Section of the 3D Home Ribbon
Use the View section of the 3D Home ribbon to see a 3D scene from different perspectives, to set grid-related options, and to create saved views of the 3D scene for use in configuration and runtime.
View Section of the 3D Home Ribbon
Changing the Perspective
The four left-most buttons in the View section of the Home ribbon let you jump to a specific perspective of the objects in the view. Each button also has a keyboard equivalent that you can use. (You can also use the Explorer and the mouse, as described in Navigating in a 3D Viewport.)
Click the Projection Modes button  (or press the V
 ![]() hot key ) to drop down a list of options for changing the perspective of the 3D viewport. The options are described below:
hot key ) to drop down a list of options for changing the perspective of the 3D viewport. The options are described below:
-
Click the Perspective button
 (or press the VP
  hot key ) to show a 3D perspective of the object. The perspective view most closely resembles human vision, where objects appear to recede into the distance creating a sense of depth and space. In the perspective view, you can use the mouse to rotate, pan, and orbit the scene to see objects from any point of view. Clicking the Perspectivebutton is an easy way to restore a useful perspective of the scene.
Three additional icons in the drop-down list show two-dimensional (2D) perspectives of the scene. They lack depth but they give you a perspective that lets you align and move objects in the scene. These 2D views are straight-on views of the scene from above, from the front, and from the side. For example, you might view a building from above so you can place condensers, solar panels, and vents accurately on its roof; but you might view a switchboard from its front to accurately position switches on the panel.
-
Click the Top button
 (or press the VT hot key ) to see the scene from above (looking directly at grid plane XZ). Use this option to work in a two-dimensional perspective that makes it easy to arrange objects from above, for example, along a floor plan or on a map.
 -
Click the Front button
 (or press the VF hot key ) to see the scene from the front (looking directly at grid plane XY). Use this option to work in a two-dimensional perspective that makes it is easy to arrange objects, for example, on the front of a building or on a virtual wall or bulletin board.
 -
Click the Side button
 (or press the VS hot key ) to see the scene from the side (looking directly at grid plane YZ). Use this option to work in a two-dimensional perspective so you can easily arrange objects, for example, on the side of a machine or position virtual boxes on a conveyor.
Other buttons in the View section of the Home ribbon are:
-
The Camera button’s menu options
 allow you to work with views of the 3D scene.
 -
The magnifying glass
 ( hot key = VC) zooms in on and centers on the selected object or objects.
 -
The eye
 ( hot key = LP) sets the look-at point. This option lets you quickly and easily move to a different point in the 3D viewport and is especially helpful if the 3D display is large and difficult to navigate. Click the icon to open the Set Look-at Point dialog boxSet Look-At Point Dialog Box
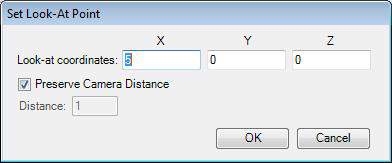 where you can set the X, Y, and Z coordinates and camera distance; clicking OK takes you directly to that location in the 3D viewport.
 -
The Grid button
 ( hot key = GR) gives you several options when you click it for creating a grid that you can use for drawing and aligning components of a graphic object.
See also: