Range Selector 3D Animation in Discrete Mode
Creating a Range Selector in Analog animation mode works much the same way as the State Selector Animation in 3D. However, the Range Selector dynamic in Discrete animation mode (which is its default mode) works quite differently.
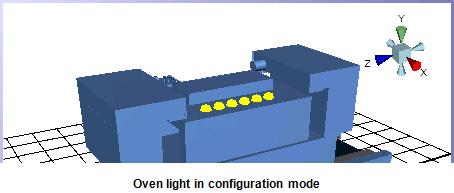
One way to think of a Range Selector dynamic is: use it when you want to start a small “movie” by flipping a switch. In this movie, you have a series of frames that you want to show. For example, you can create one object for each frame, and show the objects in a series. You might want a series of running lights that blink in rapid succession as a way to indicate that an oven is on.
When the oven comes on, ![]() the running lights in the display begin to blink rapidly in succession. When the oven shuts down, the lights stop. The oven’s state determines whether the animation (in this case, running lights) occurs. With a Range Selector, none of the lights is tied to a state (as they would be with a State Selector); instead, the lights simply create an illusion that cues the runtime user that the oven is on.
the running lights in the display begin to blink rapidly in succession. When the oven shuts down, the lights stop. The oven’s state determines whether the animation (in this case, running lights) occurs. With a Range Selector, none of the lights is tied to a state (as they would be with a State Selector); instead, the lights simply create an illusion that cues the runtime user that the oven is on.
|
|
Note: This topic describes State and Range selector use in 3D displays in GraphWorX64. For information that is specific to 2D displays, refer to Selectors and Animation. |
Example: Create the Range Selector dynamic by creating the oven lights blinking when on:
-
Add a process point, so you can see the values of localsim::var1 at runtime. If you don’t know how to do this, follow these steps:
-
In either the 2D space or the 3D viewport, click the Process Point button on the Dynamics toolbar. This creates a process point and opens the Data Browser dialog box.
-
Set the process point’s data source to localsim::var1—to do this, go to the Data Browser’s Simulation tab, and type var1 into the Name field and click OK.
-
For this example, set the process point’s DataEntry property to True.
-
-
Add 6 sphere primitives to the 3D viewport and align them. If you need help doing this, refer to Primitives in 3D.
-
Select the six spheres, then click the Range icon in the
 Selectors section
 of the Dynamics ribbon. This groups the six spheres into a dynamic model called DModeln in the Explorer and adds a Range Selector dynamic for the Dmodel group;
 -
To access the Range Selector dynamic, select the Dmodel in the Explorer, then go to the
Dynamics pane. -
On the Dynamics pane, go to the Range Selector dynamic's DataSource property and click the ellipsis button
 , which opens the Data Browser.
 -
Go to the Simulation tab and select localsim:var1 from the list on the left, and click OK to close the Data Browser.
-
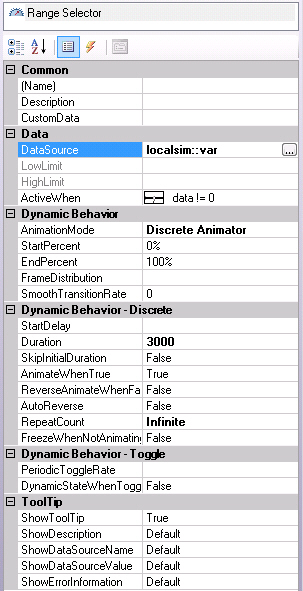
In the Duration property, type 3000. This gives the animation 3 seconds to complete. Make sure the RepeatCount property is set to Infinite. Note that the ActiveWhen property’s default is data != 0, and the AnimationMode property’s default value is DiscreteAnimator; don’t change these default values.
-
Click the Runtime button to go into runtime mode.
-
Type 1 in the process point field then press Enter. This starts the animation because the Range Selector dynamic’s ActiveWhen property triggers the animation when the data source value is something other than 0. To stop the animation, type 0 in the process point field and press Enter.
-
Click the Configure button to return to configuration mode and experiment with the properties that are available for the Range Selector dynamic.
The dynamic’s 3D properties:
-
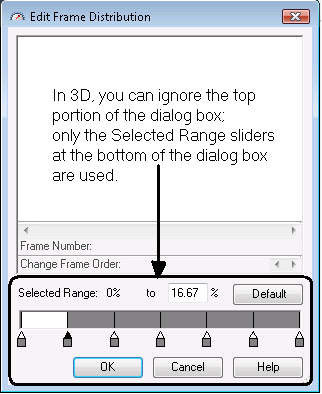
In 3D, the FrameDistribution property works somewhat differently than it does in 2D. Click the FrameDistribution property’s ellipsis button to open the
Edit Frame Distribution dialog box. In 3D you can use the Selected Range sliders at the bottom of the dialog, just as you do when working in 2D. But in 3D, you don’t use this dialog box to change the sequence of objects in the frames.
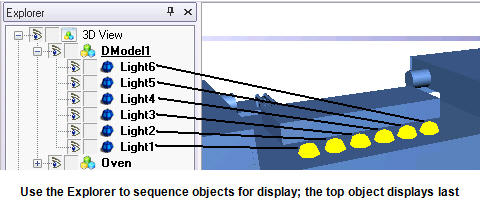
Instead, in 3D you sequence a Range Selector's objects by using the Explorer. Go to the Range ![]() Selector's dynamic group in the Explorer and move the objects into the correct sequence; the last object to display goes at the top of the list; the first object to display goes at the bottom of the list.
Selector's dynamic group in the Explorer and move the objects into the correct sequence; the last object to display goes at the top of the list; the first object to display goes at the bottom of the list.
-
Use SmoothTransitionRate to add a fading element to the dynamic. For this property, you can specify how many milliseconds you want it to take for objects to fade away. 0 milliseconds (the default) uses no fading at all, or a
SmoothTransitionRate of 3000 milliseconds (or 3 seconds); note how each light takes 3 seconds to fade out. -
The properties in the Dynamic Behavior - Discrete section work like they do for all other dynamics.
-
Use the PeriodicToggleRate property to start and stop the animation. By default, once the animation begins it will run as long as the Range Selector dynamic’s ActiveWhen property tells it to. However, you can use the PeriodicToggleRate property to toggle the animation off and on by specifying a number of milliseconds or by choosing a data source that will turn it off and on. For example, if you enter 5000 milliseconds, the animation will run for 5 seconds, then stop for 5 seconds, then run for 5 seconds, and so on. Or you can specify a data source that will stop and start the animation.
See also: