Viewing Published Files
After you have published your GraphWorX display files to the Web server, you can view the resulting HTML file(s) over the Internet from a client Web browser. Each GraphWorX display can be viewed as a Web page.
Starting GenBroker
Before connecting a client machine to the Web server on which the GraphWorX64 display files are published, GenBroker Server on the Web server has to be running. By default GenBroker Server runs as an Automatic Windows service and should always be available. If the GenBroker Server is not started, then the client will not get proper licensing and security information.
Downloading Published Display Files
Once the GenBroker Server is running on the Web server, you can view the HTML file that you have published to the Web server from any client PC's Web browser.
To View the Published HTML file:
-
Open your Web browser.
-
Enter the URL address of the file into the Address field of the Web browser, then press Enter. A complete address is, for example, "http://
The GraphWorX64 display file is referenced in the HTML code so the display can be viewed as a Web page. The client's Web browser simply downloads the HTML file in which the .gdfx, .gdfxz, .gdfxp, .gdfxpz, .gdfxs, or .gdfxsz file is referenced. All the client needs is a Web browser; it is not necessary to have GENESIS64 installed on client.
The Web page is downloaded from the Web server across the Internet/intranet and appears in the client's Web browser window. The display is in real time, just as if you were viewing the display in GraphWorX64 on the server machine; any live values (e.g. OPC tags) change dynamically in the display during runtime. Note that if the display file is compressed (.gdfxz, .gdfxpz, or .gdfxsz), the file must decompress before displaying.
The client PC downloads the HTML file from the Web server. The Web server delivers all the necessary components to the client PC's Web browser, which then runs the GraphWorX64 display directly within the browser. This way you can view the GraphWorX64 display in real time as a Web page.
Source Code of Published Files
The source code of the published HTML file contains references to the required components that are needed to run GraphWorX64 on the client that is downloading the file. The GraphWorX64 display itself is not really “converted” into HTML. Instead the display file is referenced in the HTML code. The Web Publishing Wizard takes care of all the necessary HTML code references automatically.
Publishing to FTP
It is very important to note that the publisher assumes that you setup the root of the ftp site to be the same as the http site. In other words, by default, an FTP site named GENESIS64 mapped to “C:\Program Files\ICONICS” would match the “GENESIS64” Virtual Directory created by the installation. With such a matching setup, you can publish via ftp, and subsequently access the published files via http.
When configuring the Web server using Windows XP with Service Pack 2 or Windows Server 2003, if publishing using HTTP does not work, the easiest solution is to switch to FTP publishing. If FTP is not an option, make sure the following settings are present on the server:
-
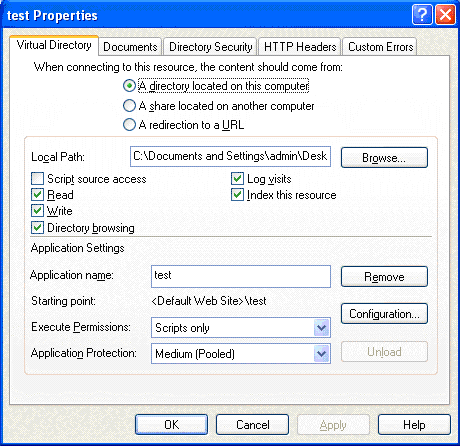
In the virtual folder to which you are publishing, go to the Virtual Directory tab of the Properties dialog box. Check the Write check box and the Directory Browsing check box.
Enabling the "Write" and "Directory Browsing" Options for the Virtual Folder
-
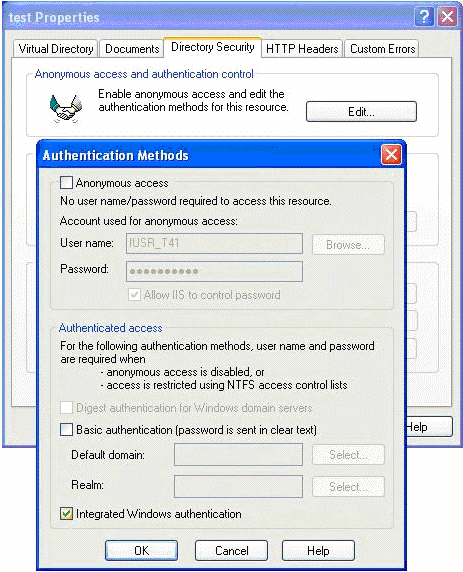
In the DirectorySecurity tab of the Properties dialog box, click the Edit button under Anonymous access and authentication control. This opens the Authentication Methods dialog box. Check the Integrated Windows Authentication check box.
Enabling Integrated Windows Authentication
-
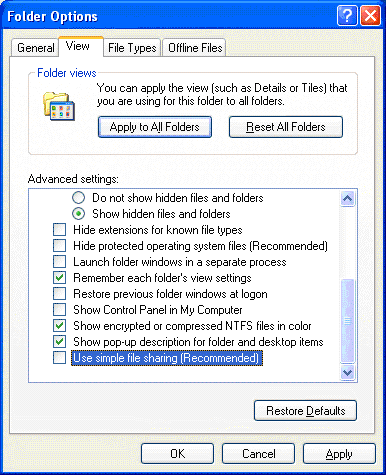
For the local folder that your virtual folder points to, go the View tab in the Folder Options dialog box. Under Advanced Settings, make sure that the Use Simple File Sharing check box is disabled.
Folder Options
-
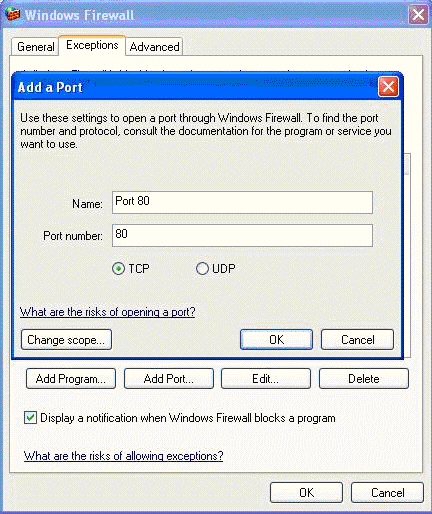
Make sure any system firewall (including Windows
Specifying the Port for the Windows Firewall
-
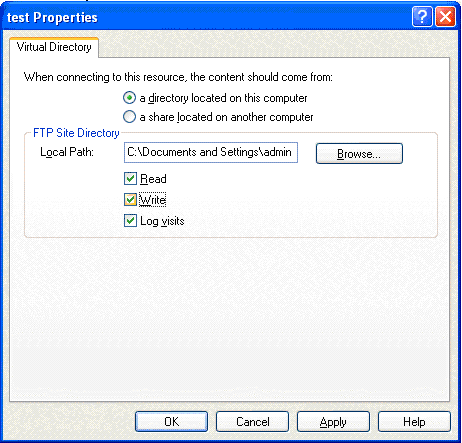
When publishing using FTP, go to the Virtual Directory tab of the Properties dialog box for the virtual folder and check the Write check box
Enabling Write Capability for the Virtual Folder
Publishing Write Errors
You can publish displays to IIS 6.0 or 7.0 using either FTP or HTTP. The FTP service is supported out of the box with IIS 6.0 and is enabled by one of the core modules for IIS 7.0. However, for HTTP file transfers to operate correctly the WebDAV service must be running on the IIS server. WebDAV is an additional option for IIS 6.0 and was shipped as an add-on module after IIS 7.0 had shipped. WebDAV can be downloaded from the Microsoft Web site, if required.
Therefore, for Windows Server 2003 and Windows Server 2008, make sure that WebDAV is installed and running as a service.
To check that WebDAV is operating, do the following:
-
Open the IIS Service Manager from the Administrative Tools folder of the Start menu.
-
Click the WebDAV service.
-
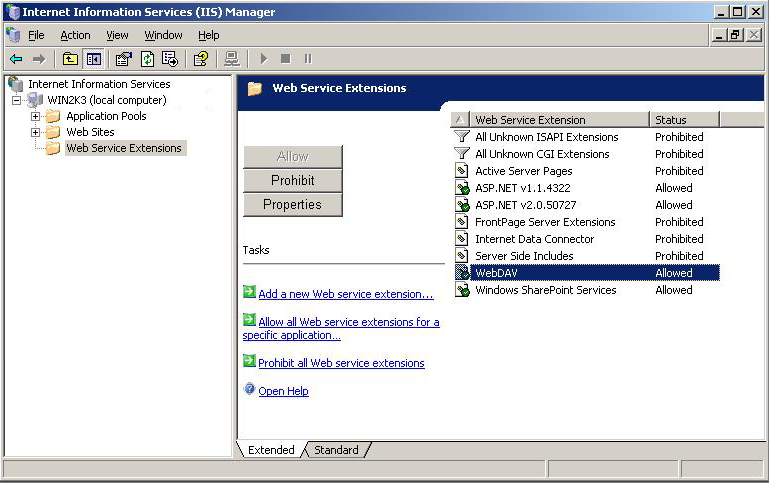
Click the Allow button to enable the service, as shown in the figure below for IIS 6.0 on a Windows Server 2003 system.
Enable the WebDAV Service to Publish Display Files by HTTP
If you still have problems with HTTP publishing, use the FTP protocol instead.
See also:
Publishing Displays Using the FTP Channel