Setting up Archiving
You can enable Data Historian to automatically move older data from the system to a specified location using archiving. Once your archived files are created, you can back them up to a CD, DVD, tape, or other permanent storage media for long-term preservation.
Archived data stays available. Data Historian continues to query and display it in trends, tables, and SQL queries, although reading from a large number of archived files takes longer than reading from the active log file.
You can also configure the Data Historian to generate metadata for the archive files. The metadata file contains detailed information about the archive file, including a list of the tags whose data is stored in it. You can then view the information in Workbench in the Archiving Management under Data Historian > Product Configuration. Here you can also attach the archived data files back to the Data Historian system.
To set up the archiving, your project must contain a Data Historian database.
To set up archiving in Data Historian:
-
Open Workbench and in the Project Explorer pane, expand your project > Historical Data > Data Historian > Loggers.
-
Double-click the logger that is used to log your data.
-
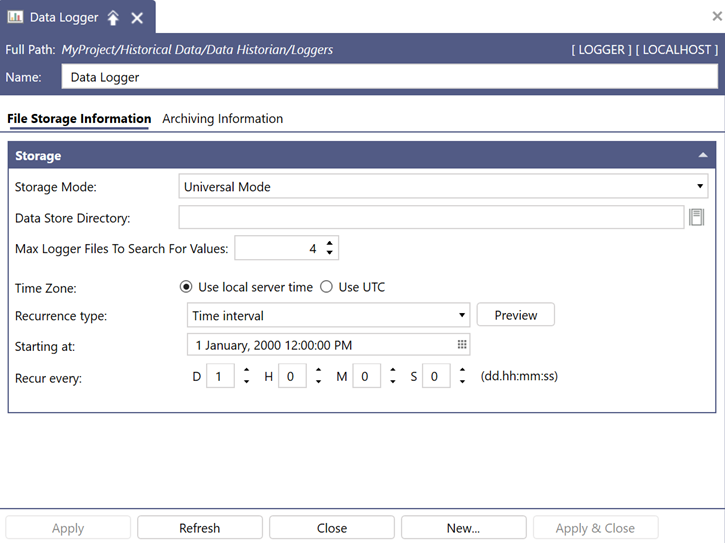
On the File Storage Information tab, set up the properties regarding the creation of new files containing logged data.
-
In Data Store Directory, enter the path to the folder where the .hhd files with logged values will be saved. Click
 to browse for the location. If you leave this field blank, the files are saved to the default location: C:\ProgramData\ICONICS\11\Data\DataHistorian\Data\<NameOfLogger>
-
In Max Logger Files To Search For Values, set the maximum number of log files to search for the last value(s) of a tag.
This setting is used by points requesting real-time Data Historian values and functions that search past data. Clients displaying logged data, such as the Trend Viewer, are not affected by this limitation.
-
Use the remaining controls when you are setting up a new storage file.
Setting
Description
Time Zone
Specifies the time zone (the local server time or UTC) that the logger uses to determine when to create a new data log file.
Recurrence type
Determines whether a new data log file is created after a constant time interval, or at specific dates and times.
Starting at
Specifies the date and time when the logger creates the first data log file. Click
 to select the date and time. The default value is January 1, 2000, 12:00:00 AM.
Recur every
Depends on the Recurrence type setting.
- When you select Time interval, it displays the options to specify the regular time interval after which a new data log file is created (for example, two days and six hours).
- When Specific dates and times is selected, it displays the options to set up the frequency of creating new data log files (for example, every week or every three days). The exact time is then specified in the next settings. For example, if you select Week as the time unit, you need to specify the day or days of the week.
Pick specific times
Displayed when you select Specific dates and times in Recurrence type. When selected, you can set the exact hour(s), minute(s), and second(s) when the new file is created.
Click Preview to display the times at which the logger creates a new data log file according to your specifications.
-
-
Switch to the Archiving Information tab.
-
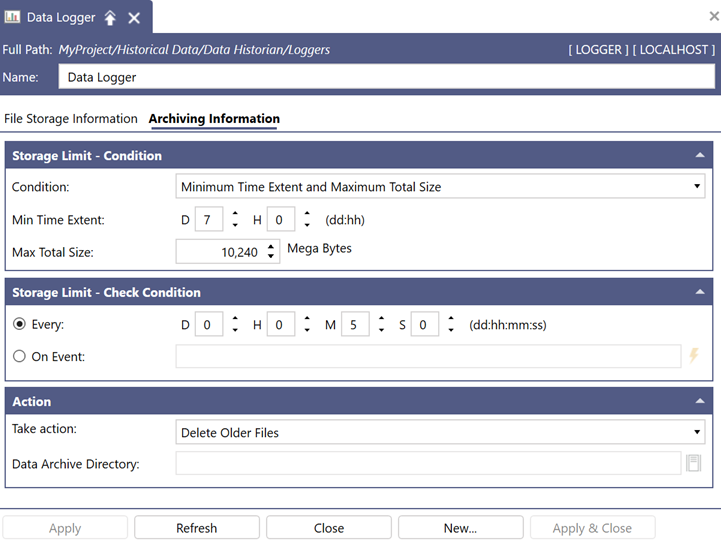
In the Storage Limit - Condition section, set up the requirements that need to be fulfilled before a file is archived.
Setting
Description
Condition
Specifies under what condition the logger archives a data log file. If you set the condition to None, the files with logged data are not archived and stay in the Data Store Directory. When you select the combined condition of Minimum Time Extent and Max Total Size, a file is archived when either condition is met, with Max Total Size taking precedence over Minimum Time Extent.
Min. Time Extent
The logger archives a data log file after the specified time passes.
Max Total Size
The logger archives a data log file when the file reaches the specified size.
Example: Suppose that your system creates new storage files every week and you always want to have five days' worth of data available. You select the Minimum Time Extent condition and set the Min Time Extent to five days. The first file is created and filled with data. After one week, the second file is created and begins receiving data. The first file is no longer written to, but it cannot be archived yet, because you would not have five days' worth of data available. Once the second file contains five days' worth of data, the first file can be archived.
-
In the Storage Limit - Check Condition section, specify when the system evaluates the archiving condition (assesses whether a file is large or old enough to require action).
-
Select Every to set a regular time interval in days, hours, minutes, and seconds.
-
Select On Event to associate the condition check with an event-based trigger. You can manually enter the address of the trigger or click
 next to the text field to search for it in the Data Browser.
When using this type of condition check, make sure that the FrameWorX Triggers point manager is running.
-
-
In the Action section, select the action to perform on the files that meet the conditions, and then click Apply.
-
Archive Older Files: Moves files that are no longer active to a separate location. In Data Archive Directory, click
to browse for the location or manually enter the path.Set Data Archive Directory to a location on a different physical drive than the Data Store Directory. Archiving to another folder on the same drive separates the older files from the current ones, but frees no space on the logging drive.
-
Delete Older Files: Permanently deletes the files, making the data inaccessible.
-
How Archiving Works
Data Historian logs live data into .hhd files on your active logging drive. You configure the storage limit conditions (Min. Time Extent and Max Total Size) that determine when a data file can be archived or deleted once it exceeds the configured limit.
If you choose archiving, Data Historian moves the .hhd files into the archive folder you specify.
Archived files stay connected and readable. Data Historian can still query and display data from archived files in trends, tables, and SQL queries. Pulling data from many archived files can introduce some extra query delay compared to reading from the live logging file, since Data Historian has to reach out to the archive location rather than reading straight from the active log.
The archive folder must not be on the same physical drive you are actively logging to. If you point the archive directory at a folder on the same hard disk as your live logging path, you gain no disk space, because the bytes never leave the physical drive. Archive to a separate physical drive or to a network location to free space on the logging drive.