Creating an OPC UA Connection
Before you can use Open Platform Communications Unified Architecture (OPC UA) for data connectivity in GENESIS, you need to set up a connection between the FrameWorX server and a properly configured OPC UA server.
To establish a connection between GENESIS and an OPC UA server, you need the following prerequisites:
-
An OPC UA server with an open network port or on the same machine as GENESIS is installed and running. We recommend using a certificate for secure communication.
Instead of installing a separate OPC UA server, you can connect to the FrameWorX Server via an OPC UA interface. Learn more -
The OPC UA application (component) is included in your GENESIS project.
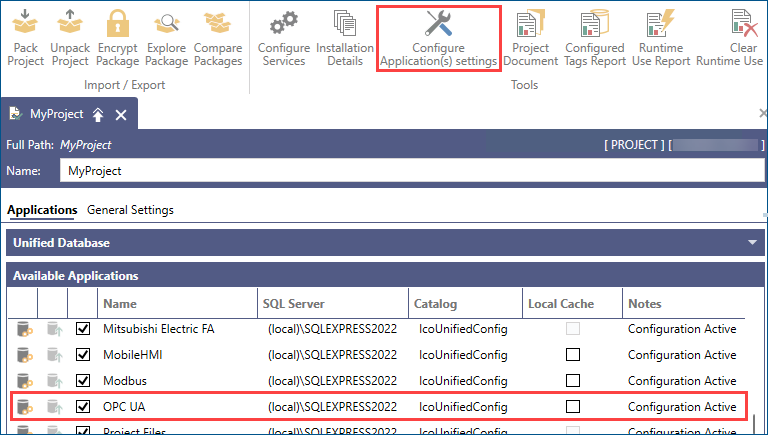
For more information on managing applications in Workbench, refer to Application(s) Settings Overview
- The GENESIS OPC UA Point Manager service is running.
To create an OPC UA connection in GENESIS:
-
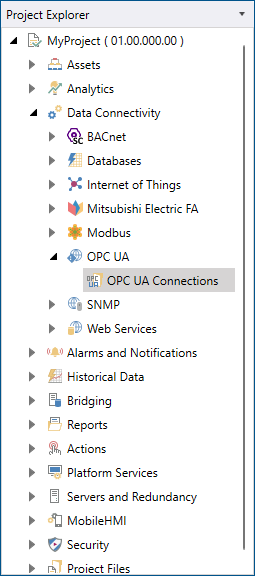
Open Workbench and in Project Explorer, expand your project > Data Connectivity > OPC UA.
-
Double click OPC UA Connections and in the Connections panel of the OPC UA Connections dialog, select Click here to add new item.
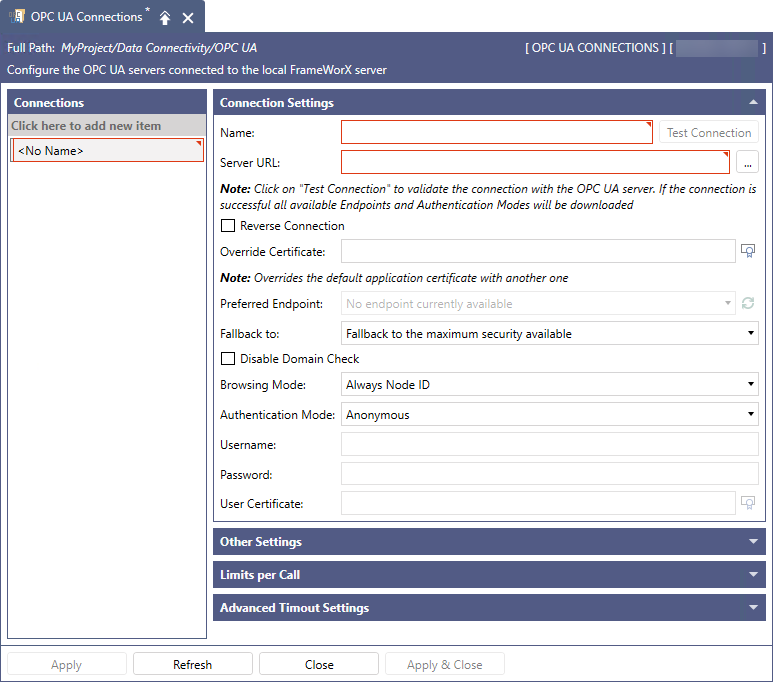
- In Connection Settings in Name, enter a unique name of the OPC connection.
-
In Server URL, enter the URL of the OPC server. It consists of the following elements:
- Protocol, which is opc.tcp.
- Domain name in the following format: myopcserver.mycompanydomain.com. If the OPC UA Server runs on the same machine, use localhost.
-
Port number that was set up in the OPC UA server configuration properties. In the example image, the Port No value is 52250.
The port 52250 is specific to DeviceXPlorer OPC Server.
Example: opc.tcp://localhost:52250/
It represents a local instance of DeviceXPlorer OPC Server, listening on port 52250.
-
In Preferred Endpoint, click
 to download all available endpoints, and then
select the desired endpoint from the drop-down list.We recommend using the Sign and Encrypt type, which ensures end-to-end security.
to download all available endpoints, and then
select the desired endpoint from the drop-down list.We recommend using the Sign and Encrypt type, which ensures end-to-end security. -
Complete the following fields in the Connection Settings section.
- Fallback To: Defines what happens in case the preferred endpoint is not found—whether the connection should use the most secured or the least secured (or unsecured) endpoint. For the production environment, select Fallback to the maximum security available.
- Disable Domain Check: When unselected, the domain name contained in the server certificate must match the domain name in the Server URL parameter. Selecting the check box disables this test; although it is less secure, it may be the only option in case the server certificate contains a domain, such as mycompany.com, while the Server URL contains the IP address of the server.
-
Browsing Mode: Specifies how the point names for the given server should be constructed, whether they should be based on the node IDs, or on the browse paths.
- Always Node ID: The point names will contain node IDs, which directly identify the objects in the server. It is the recommended option as it is fast and reliable. However, the node IDs are not guaranteed to be human-readable (this depends on the server implementation).
- Always Browse Path: The point names will be based on the browse path, which defines how to get to the given object. The browse paths are hierarchical and human-readable but they must be translated to node IDs before you can use them, which may be a lengthy operation for many servers.
- String Node ID, otherwise Browse Paths: A combination of the two options above. The node ID is used in case it is in a text format, otherwise the browse path is used.
- Authentication Mode: Defines how the OPC UA server authenticates a user. This is server-dependent; user support is optional. For DeviceXPlorer OPC Server, you can leave it as Anonymous.
- Anonymous: There is no user support, or no user should be logged in.
- Username and Password: Users are authenticated by their credentials.
Certificate: Users are authenticated by their certificate.
This is a different certificate than the one for communication encryption. This certificate identifies the actual user as a person.
-
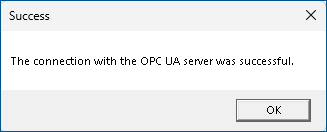
Click Apply, and then click Test Connection. Your first attempt to connect will fail, which is expected, as the connection between the FrameWorX Server and DeviceXPlorer OPC Server is not yet trusted. Learn more
When the warning dialog appears, click Yes twice. In the Error prompt, click OK.
In some cases, you may need to copy the certificates to the OPC Foundation folder. Learn more
When the Success message is displayed, click OK.
-
(Optional) Edit the default settings in the Other Settings, Limits per Call, and Advanced Timeout Settings sections as desired, and then click Apply & Close.
What's Next?