Configuring Azure Communications Plugin in Web API Service
Since acknowledging notifications via Azure Communications SMS integrates with the GENESIS Web API Service, you need to configure the Azure Communications plugin in the Web API configuration files.
To configure the Azure Communications plugin in GENESIS Web API Service:
-
In C:\Program Files\ICONICS\GENESIS64\Services\WebAPI, open appsettings.json.
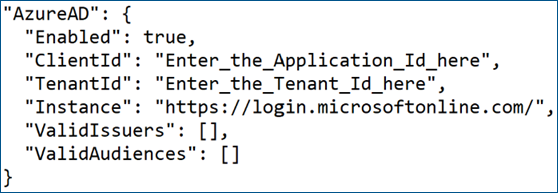
- Navigate to the Azure AD section of the .json file and set the Enabled field to true.
- Add the Application (client) ID and the Directory (tenant) ID of the Azure application created here.
-
In ValidAudiences, enter the Application (client) ID of the Azure App.
Example: "ValidAudiences": ["Application ID"]
-
In C:\Program Files\ICONICS\GENESIS64\Services\WebAPI\plugins\IcoACS, open IcoAcs.json, and ensure that the AppRoles section contains the role name mentioned in the script that you executed here. Below is the part of the script that mentions the name.
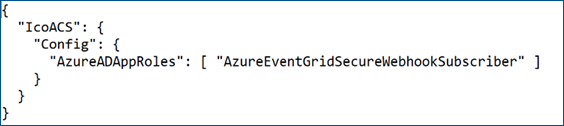 The appsettings eventGridRoleName is defaulted to the role AzureEventGridSecureWebhookSubscriber mentioned in the script as of this document's creation date. Since it matches the AzureADAppRoles value in the script above, you do not need to modify the name.
 -
Start or restart the GENESIS Web API Service. This is important since a handshake is required when the event subscription is being created, and the Web API Service needs the details configured above.
-
Subscribe to Azure Communication Service Events.
- Register the Event Grid resource provider.
-
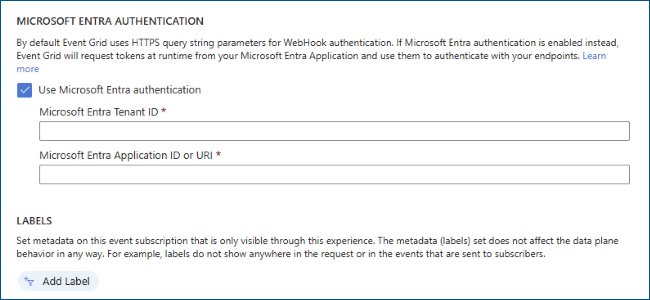
Subscribe to SMS Events via webhooks with the following customizations.
- Select the SMS Received and SMS Delivery Report Received events under Filter to Event Types as desired.
- In End point Type, select Webhook, and in Subscriber Endpoint, enter Yourdomainname/fwxapi/acs/sms (the domain was created while setting up the Web API Service).
-
On the Additional Features tab, select the Use Microsoft Entra authentication checkbox, and then enter the Directory (tenant) ID and Application (client) ID from the Azure application we created above and used in PowerShell.
- Click Create. Azure tries to deploy the subscription and if successful, it is displayed in the Azure portal.