Configuring a Limit Alarm
This topic explains how to configure an alarm based on the Limit alarm type. These alarms are triggered when the source signal value exceeds or falls below the specified thresholds. The alarm is evaluated each time the source signal changes value. In Alarm Server, you can specify up to four thresholds for limit alarms: LOLO, LO, HI, and HIHI conditions. This procedure focuses on configuring an alarm using the HI condition.
To create and configure a limit alarm:
- Open Workbench and in Project Explorer, expand your project > Alarms and Notifications > Alarm Server, and then right-click Alarms and select Add Alarm.
- In the Name field of the configuration dialog, enter a unique identifier for the alarm.
-
(Optional) On the General tab, enter a Display Name and Description.
Click next to Display Name to set up language aliases.
 - On the Inputs tab, click
 next to Type.
 -
In the next dialog, select Limit and click OK.
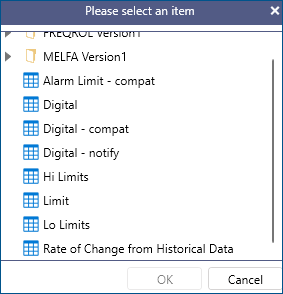 To set up an alarm with other limits, select the corresponding alarm type. For example, to configure Hi and HiHi limits, select Hi Limits. To configure all available limits, select Alarm Limit - compat.
 -
In the General Settings section, specify the Data Source. You can manually enter the address or the
 button to find the source in your project.
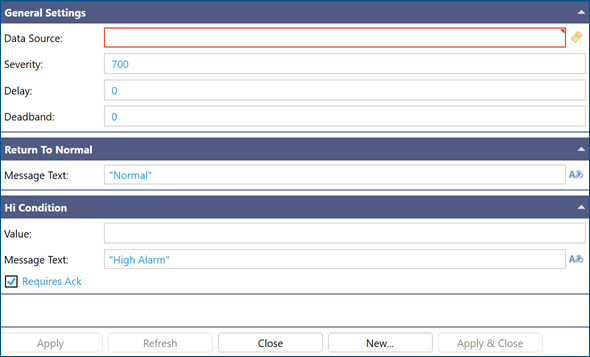
-
In the Hi Condition section in Value, specify the upper threshold. If the data source value exceeds this threshold, the alarm is triggered.
-
Configure the additional alarm settings as needed, and then click Apply to create the alarm and immediately start evaluating the source signal.
Field
Description
Severity
This is the alarm's priority. The valid severity range is 1 to 1000.
Delay
The time to hold off reporting a change of state. When the alarm switches states, the change is only reported if the alarm remains in the new state after the delay period.
Deadband
The range where the alarm can stay active even if the value dips below the limit. The alarm returns to its Normal state only if the source value falls below the threshold minus the deadband. This prevents the alarm from switching states frequently when the value fluctuates around the threshold.
Return to Normal > Message Text
This is the text displayed in the Message field of a reported alarm event when the alarm is in its Normal state.
Hi Condition > Message Text
This is he text displayed in the Message field of a reported alarm event when the alarm is in its HI state.
Requires Ack
When selected, the alarm requires user acknowledgment. When cleared, the alarm enters its HI state as already acknowledged.