Configuring the System Settings
You can configure the system settings for Alarm Historian, such as redundancy or data point tracing.
To configure Alarm Historian's system settings:
- Open Workbench and in Project Explorer, expand your project > Alarms and Notifications > Alarm Historian > Product Configuration, and then double-click System Settings.
-
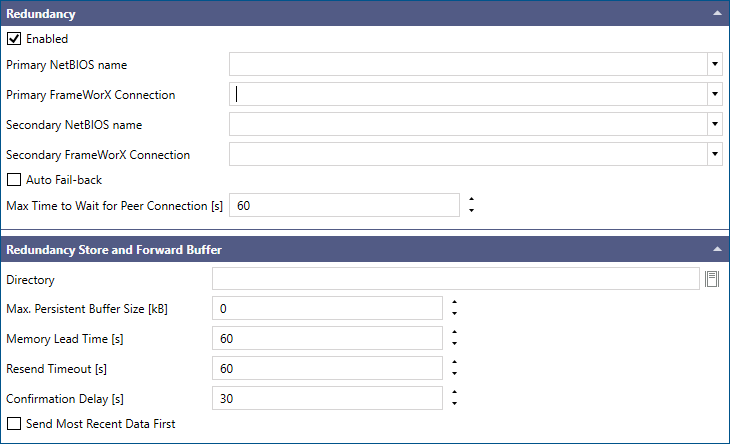
In the Redundancy section, select the Enabled checkbox to allow redundancy and activate the settings.
-
Configure the essential redundancy settings.
- In Primary NetBIOS name and Secondary NetBIOS name, enter the computer names of the primary and secondary machines. Both are mandatory for setting up redundancy.
- In Primary and Secondary FrameWorX Connection, enter the names of optional hosts that are used when the device cannot be reached by its computer name.
- Select Auto Fail-back to automatically switch from the back-up (secondary) machine to the primary machine when the primary machine becomes active again.
- In the Directory field in the Redundancy Store and Forward Buffer section, enter the path to the location for storing the event packages, or click
 to browse for the desired directory.
 - Edit the remaining redundancy settings as needed.
-
In the Point Tracing section, select the Enabled checkbox to allow point tracing and to activate the settings.
These settings enable traces for specific input and output data points. Each data point traces all the messages related to point subscriptions—subscribe, release, point properties, and data updates.

-
Specify the point tracing options. Click
 to browse for available input and output data points.
Setting
Description
Trace Level
Defines the level of generated trace messages. Setting higher trace levels filters other generic messages out of the trace log.
Input Point Names
Enables input data point updates coming from the FrameWorX infrastructure. Data point names are the same as in the FrameWorX server and must be separated by a semicolon.
Output Point Names
Enables output point tracing of all the traffic between the Alarm Server and its clients, including requests, responses, data updates, and event updates. Point names are the same as in the Data Browser, including the point manager prefix. Names must be separated by a semicolon.
- Edit the remaining system settings as needed, and then click Apply.