Information Broker MQTT Quick Start
Information Broker is a set of features for the IoTWorX Point Managers and BridgeWorX64, designed to connect GENESIS64 and ICONICS products to MQTT brokers, such as Mosquitto and ActiveMQ.
This document will walk you through setting up ICONICS communication to publish and subscribe to an MQTT broker.
Installing or Deploying the MQTT Broker
For a Windows device, if you do not already have an MQTT broker you can download the Mosquitto MQTT Broker from the Mosquitto website at: https://mosquitto.org/download/.
If you have an edge device with ICONICS IoT Edge software installed, you can deploy a Mosquitto module during the deployment phase. When configuring modules for the IoT edge device, simply check the Mosquitto box in the Deployment Modules section.
The following steps will assume that Mosquitto MQTT Broker has been installed to the default location (C:\Program Files\mosquitto) on the same system as GENESIS64. This is for testing or demonstration purposes. In a real production system, the broker is likely to be installed on a remote system or edge device.
Basic Setup
These steps are required for both subscribing and publishing to an MQTT broker.
-
Open Workbench.
-
Expand Internet of Things.
-
In the MQTT Brokers folder, create a new MQTT Broker.
-
Set the name to MyBroker.
-
For Protocol Type, choose Simple MQTT ("mqtt:").
-
For Server Address, enter the IP address where the broker is located. For a locally installed broker, enter localhost.
-
Apply the changes.
-
In the Subscriber Connections folder, create a new subscriber connection.
-
Set the name to MQTTSubscriber.
-
Uncheck Enable compatibility with ICONICS clients.
-
Set the Connection Type to MQTT.
-
Check Convert incoming raw messages into events.
-
In the MQTT Basic Settings section, for MQTT Broker choose MyBroker.
-
Set the Basic Topic to data/#.
-
Apply the changes.
-
Use the stoplight icons in the Home menu to ensure that the Subscriber and Publisher services are running.
Note: If you do not see the Publisher and Subscriber service stoplights in the Home menu, make sure you have the Internet of Things or a child item selected in the Project Explorer.
-
If Mosquitto is not running, start it with this command:
"C:\Program Files\mosquitto\mosquitto.exe" -v
Subscribing to MQTT
The steps below describe a few different ways to get information from an MQTT broker into GENESIS64 or BridgeWorX64.
Subscribing to MQTT Events in Alarm Viewer
ICONICS event clients, such as AlarmWorX64 Viewer can subscribe to MQTT messages.
-
If you haven't already done so, follow the steps in "Basic Setup".
-
Open GraphWorX64.
-
Add a new AlarmWorX64 Viewer.
-
Configure the alarm viewer.
-
Select the grid object in the tree.
-
On the Source tab, add a new real time subscription.
-
Remove the default Local Alarm Server event point.
-
Add a new event point.
-
In the tag browser, expand My Computer > Internet of Things then select MQTTSubscriber.
-
Select OK.
-
The resulting point name should be: iot:MQTTSubscriber/.
-
Close the configuration window.
-
Go into runtime.
-
Trigger a message from your MQTT broker. With Mosquitto, you can execute this command:
"C:\Program Files\mosquitto\mosquitto_pub.exe" -t data/a -m message
You should see your message appear in the alarm viewer.
Subscribing to MQTT Datasets
Subscribed MQTT information can also be made available as a dataset and viewed with clients such as the GridWorX Viewer.
-
If you haven't already done so, follow the steps in "Basic Setup".
-
Open Workbench.
-
Expand Internet of Things.
-
In the Custom Encoders/Decoders folder, create a new encoder/decoder.
-
Set the name to MQTTDecoder.
-
Set Plugin to CustomJson.
-
Set Message Type to The whole message is a dataset.
-
Apply the changes.
-
Edit Internet of Things > Subscriber Connections > MQTTSubscriber.
-
In the General Settings section, set Default Decoder to MQTTDecoder.
Note: If you do not see MQTTDecoder in the list, use the refresh button next to the Default Decoder field.
-
Apply the changes.
-
Create a new file under C:\temp named message.json.
-
Edit the file with Notepad or another text editor.
-
Type or paste this content into the text editor:
[
{
"first": "alice",
"last": "brown",
"age": 38
},
{
"first": "bob",
"last": "smith",
"age": 22
},
{
"first": "carol",
"last": "polak",
"age": 73
},
{
"first": "dave",
"last": "jones",
"age": 49
}
]
-
16. Save and close the file.
-
17. Run this command to publish the file we created:
"C:\Program Files\mosquitto\mosquitto_pub.exe" -t data/a -f c:\temp\message.json
-
Open GraphWorX64.
-
Add a new GridWorX Viewer.
-
Configure the grid viewer.
-
Select the grid object in the tree.
-
On the Source tab, add a data set tag subscription.
-
In the tag browser, expand My Computer > Internet of Things then select MQTTSubscriber.
-
Select OK.
-
The resulting point name should be: iot:MQTTSubscriber/.
Note: If you get an error saying the data fields could not be retrieved, run the command above to publish the JSON file again, then hit the refresh button in the grid viewer configuration. The file needs to be published at least once for the subscriber to know what fields to expect.
-
Close the configuration window.
-
Go into runtime.
-
Run this command again to republish the JSON file:
"C:\Program Files\mosquitto\mosquitto_pub.exe" -t data/a -f c:\temp\message.json
You should see the data appear in your grid viewer. (If it does not appear after a few moments, refresh the viewer.)
Using BridgeWorX64 to Parse Datasets
BridgeWorX64 transactions can be used to subscribe to MQTT events and parse specific information out of the dataset.
-
If you haven't already done so, follow the steps in "Basic Setup" and "Subscribing to MQTT Datasets".
-
Open Workbench.
-
Expand Bridging.
-
In the Templates folder, create a new template.
-
Set the name to MQTTTemplate.
-
Drag a JSON Content Reader activity into the diagram.
-
Name the activity, Read JSON.
-
Set the Activity Description to Reads the JSON from the alarm message field and converts it to a dataset that can be used by the next activity.
-
In the JSON Reader Settings section, select Edit Expression.
-
In the sidebar, select Trigger Attributes.
-
In the dropdown at the top of the sidebar, select Alarm Trigger.
-
Double-click on Message.
-
Select OK. Your resulting expression should look like this:
x={{triggerVariable:Message}}
-
Set JSON Parse Mode to Match Predefined Columns by Names.
-
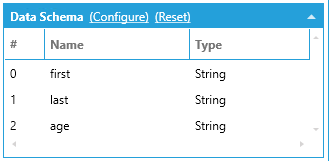
In the Data Schema section, select Configure.
-
Delete all but three of the items in this list.
-
Edit the remaining three items so they have these names in this order: first, last, age.
-
Select OK. Your configured schema should look like the following.
Data Schema
-
Drag a Real Time Output activity into the diagram.
-
Name the activity, Write Output.
-
Set the Activity Description to Writes select pieces of the dataset from the previous block to output tags.
-
Add two items to the Data Sources table, and configure them as follows:
|
Point Name |
Output Expression |
|
@sim64:String.Static("Static1").Value |
x=findoutputcell("Read JSON", "last='polak'", "first") |
|
@sim64:String.Static("Static2").Value |
x=findoutputcell("Read JSON", "last='polak'", "age") |
Note: The findoutputcell() function searches for a particular row in the given activity's dataset and returns a value in another column. In this case, it is looking for the row whose "last" column has a value of "polak". One expression returns the value in the "first" column and the other returns the value in the "age" column.
-
Connect the activities as shown below.
Transaction Diagram
![]()
-
Apply the changes.
-
Expand Transactions.
-
In the Sample Configuration, create a new transaction.
-
Set the name to MQTTTransaction.
-
Check The transaction is enabled.
-
Go to the Alarm Subscriptions tab.
-
Check Trigger transaction using alarm source.
-
Add a new item to the Alarm Subscription list.
-
Select the browse icon to bring up the tag browser.
-
Browse to My Computer > Internet of Things then select MQTTSubscriber.
-
Select OK.
-
Select the @ICONICS.AlarmSvr.1.Server tag and delete it.
-
Apply the changes.
-
In the Home menu, use the stoplight to make sure the Point Manager and Scheduler service is running.
Note: If you do not see the Point Manager and Scheduler service stoplight in the Home menu, make sure you have Bridging or a child item selected in the Project Explorer.
-
Open GraphWorX64.
-
Add two process points with these data sources:
@sim64:String.Static("Static1").Value
@sim64:String.Static("Static2").Value
-
Put the display into runtime.
-
Run this command to republish the JSON file:
"C:\Program Files\mosquitto\mosquitto_pub.exe" -t data/a -f c:\temp\message.json
-
Running the command should create an event, which triggers the BridgeWorX64 transaction. The transaction parses the JSON in the message field and writes out the first name and age into the two simulator points. The two points on the display should now show "carol" and "73".
Publishing to MQTT
The steps below describe a few different ways to send information from GENESIS64 or BridgeWorX64 to an MQTT broker.
Commanding
-
If you haven't already done so, follow the steps in "Basic Setup".
-
Open GraphWorX64.
-
Add a button.
-
Set the Command to Call Method.
-
In the Name field, select Browse/Edit.
-
Browse to My Computer > Internet of Things > MQTTSubscriber then select Publish.
-
Select OK.
-
Select the ellipsis button for Parameters.
-
Add three members and configure them as follows:
|
Value |
ValueType |
|
data/a |
String |
|
Hello World |
String |
|
0 |
Int32 |
|
false |
Boolean |
-
Select OK.
-
Go into runtime.
-
Run this command to see the messages being published to the MQTT broker:
"C:\Program Files\mosquitto\mosquitto_sub.exe" -t #
-
In GraphWorX64, hit the button you created. You should see a "Hello World" message appear in the subscriber window.
Scripting
-
If you haven't already done so, follow the steps in "Basic Setup".
-
Open GraphWorX64.
-
Add a button.
-
Set the Command to Run Script.
-
Select the events
 icon.
icon. -
Double-click in the RunScript field.
-
Select OK to the Script Options dialog.
-
The Script Editor should appear. Replace the contents of the Code View tab with the following code.
function Pick1_CommandExecuted(sender : System.Object, cmdArgs : Ico.Gwx.CommandExecutionEventArgs)
{
var pub = new Object[4];
pub[0] = "data/a";
pub[1] = "Hello from scripting";
pub[2] = 0;
pub[3] = false;
var callback : Ico.Fwx.ClientWrapper.MethodCallDoneDelegate = ThisDocument.CreateDelegate(Ico.Fwx.ClientWrapper.MethodCallDoneDelegate, this, "CallDone");
ThisWindow.FwxClientWrapper.MethodCallAsync("iot:MQTTSubscriber/", "Publish", pub, callback, null);
}
function CallDone(result : Ico.Fwx.ClientWrapper.MethodCallDoneResult)
{
message : String;
message = String.Format("Result: {0}", result.Status.ToString());
MessageBox.Show(message, "Publish Result", MessageBoxButton.OK);
}
-
Go into runtime.
-
Run this command to see the messages being published to the MQTT broker:
"C:\Program Files\mosquitto\mosquitto_sub.exe" -t #
-
In GraphWorX64, hit the button you created. You should see a "Hello from scripting" message appear in the subscriber window.
BridgeWorX64
-
If you haven't already done so, follow the steps in "Basic Setup".
-
Open Workbench.
-
Expand Bridging.
-
In the Templates folder, create a new template.
-
Set the name to MQTTPublisher.
-
Add an Information Broker Publisher activity to the diagram.
-
In the Information Broker Activity section, select the browse button next to Publish Point.
-
Browse to My Computer > Internet of Things > MQTTSubscriber then select Publish.
-
Select OK.
-
Set MQTT Topic to data/a.
-
Under JSON Payload Preview, select JSON Designer.
-
Select ScalarPropertyX.
-
Select Delete Node.
-
Select ScalarPropertyY.
-
Set Node Name to Hello.
-
Set Value Expression to x="World".
-
Select OK.
-
Make sure the start node points to your Information Broker Publisher activity, and your Information Broker Publisher activity points to the end node.
-
Apply your changes.
-
Expand Transactions.
-
In the Sample Configuration, create a new transaction.
-
Set the name to PublishToMQTT.
-
Check The transaction is enabled.
-
Go to the Triggers tab.
-
Add a new item to the list.
-
Select the browse icon to bring up the tag browser.
-
Browse to My Computer > Actions > Triggers > Date/Time Triggers then select Every Minute.
-
Select OK.
-
Apply the changes.
-
In the Home menu, use the stoplight to make sure the Point Manager and Scheduler service is running.
Note: If you do not see the Point Manager and Scheduler service stoplight in the Home menu, make sure you have Bridging or a child item selected in the Project Explorer.
-
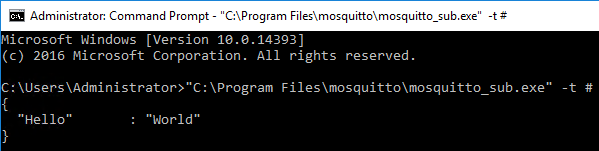
Run this command to see the messages being published to the MQTT broker:
"C:\Program Files\mosquitto\mosquitto_sub.exe" -t #
-
Wait for your computer's clock to tick over to a new minute. You should see a "Hello World" JSON appear in the subscriber window.
Hello World JSON
Note: When the test is complete, you may want to disable the PublishToMQTT transaction to avoid unnecessary MQTT publishing.
See Also: