Series advanced settings Window
Series advanced settings Window
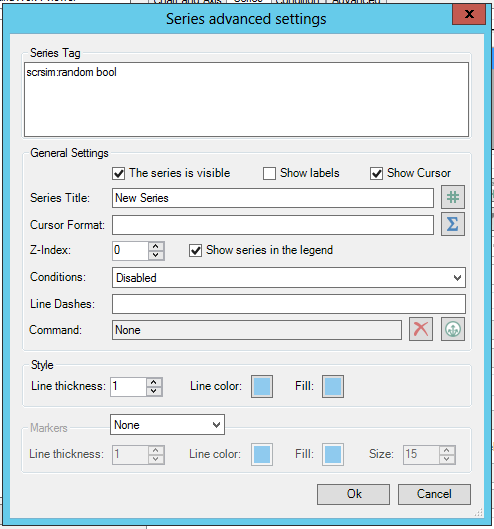
Series Tag
-
Series Tag -This section may be pre-filled if you opened this window from a prior configuration form. You have the option of editing the Series Tag further in the text entry field.
General Settings
-
The series is visible -True to make the series visible.
-
Show labels -True to show series labels.
-
Show Cursor -True to show the cursor with series data. Disabling this checkbox for a series will prevent that series from appearing in the cursor information. (This feature is currently available in desktop (WPF) only.)
-
Series Title -Enter a title for the series in the text entry field or click on the # button to open the Data Browser and navigate to your specified data source for the series title.
-
Cursor Format -Enter a format for the cursor or click on the
 button
to open an Expression Editor.
button
to open an Expression Editor. -
The Cursor Format property has been enhanced to allow expressions in order to provide more options on what can be shown in the cursor. The Cursor Format property can be found in the advanced settings for a series. The new cursor format expressions could be used starting in version 10.95.4, but in 10.96 there is now an expression editor available to help users build proper expressions.
-
Note: The old syntax will still be accepted for backwards compatibility. No changes should be required to existing displays.
-
Note: This functionality is currently only supported in desktop (WPF) displays and Universal Windows Platform (UWP) apps. Support for HTML5 apps is planned for future versions.
-
Z-Index -Enter a value in the text entry field for the Z-Index or use the up/down arrow buttons.
-
Show series in the legend -True to show the series in the legend.
-
Conditions -Use the pulldown menu to set a condition for the series.
-
Line Dashes -Only applicable to line charts. The length of dashes (in pixels) for line charts. Enter one number to have both the dashes and the blanks be the same length. Enter two numbers separated by a comma to separately specify the length of the lines and the blanks. For example, “10, 5” will result in a line drawn for 10 pixels and then no line drawn for five pixels. Leave blank for a solid line.
-
Command -The command executed when a marker or an element of the series is clicked. Click on the
 to open the Configure Command
window to set your command properties for the series. See the Commanding
topic for more info. You can also click on the
to open the Configure Command
window to set your command properties for the series. See the Commanding
topic for more info. You can also click on the  button to clear any selected Command from this setting.
Style
-
Line thickness -Enter a value for the line thickness or use the up/down arrow buttons.
-
Line color -Click on the nearby color box to open the Color window to select a color for the line.
-
Fill -Click on the nearby color box to open the Color window to select a color for the fill.
Markers
-
Markers -Use the pulldown menu to select from None, Ellipse, Square, or Triangle markers.
-
Line thickness -Enter a value for the marker line thickness or use the up/down arrow buttons.
-
Line color -Click on the nearby color box to open the Color window to select a color for the marker line.
-
Fill -Click on the nearby color box to open the Color window to select a color for the marker fill.
-
Size -Enter a value for the marker size or use the up/down arrow buttons.
Click the Ok button to return to the previous configuration settings.