Create a New Web Authentication Method
The sub-branches beneath a newly created Web Service (as mentioned in Create a New Web Service - REST) allow you to create a Web Authentication Method.
Web Authentication methods can be used with services that expose a non-standard authentication mechanism, or an authentication type that is not in the supported list. The only requirement is that the service’s authentication method returns a JSON Web Token (JWT) in one of the properties of the authentication result.
Web Authentication methods are only used during configuration in Workbench, and are not exposed in runtime.
To Add a New Web Authentication Method:
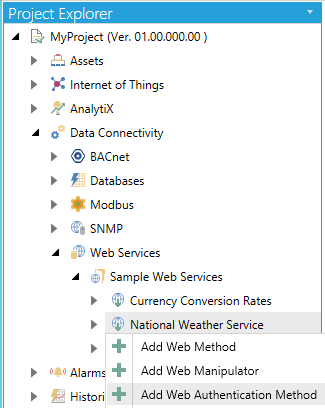
- Right-click on a sub-branch beneath a Web Service and select "Add Web Authentication Method" as shown below.
Adding a New Web Authentication Method
-OR-
Select a sub-branch beneath a Web Service, then click on the Add Web Authentication Method button, shown below, in the Edit section of the Home button in the Workbench.
Add Web Authentication Method Button
- This opens the Web Authentication Method properties in the right-pane of the Workbench as shown below. Enter a Namein the top text entry field.
New Web Authentication Method Properties
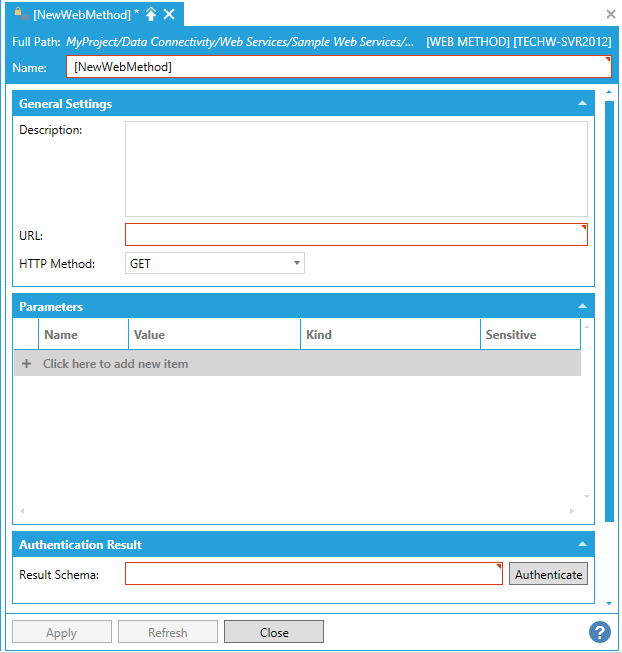
General Settings
-
Description - Enter a description for the Web Method in the text entry field.
-
URL - Enter a URL in the text entry field. This can be either a relative URL to the parent’s service URL, or an absolute URL.
-
HTTP Method - Use the pulldown menu to select from GET, POST, HEAD, PUT, DELETE, OPTIONS, PATCH, or MERGE.
Parameters
Click the "+ Click here to add new item" link to add a new parameter. You can then enter a Name, Value, and Kind (using the pulldown menu, select from Query String or POST Body, Cookie, URL Segment, HTTP Header, Query String, or Request Body) and select whether the parameter will be Sensitive (by clicking the checkbox within that column).
When a parameter is marked as Sensitive, it will be obscured in the Workbench UI so that its value cannot be read. It will also be removed in runtime from the point name. For security reasons, unchecking the Sensitive checkbox will clear the parameter value.
As described above, the supported parameter types are:
-
Query String or POST Body. This selection allows to dynamically change how the parameter is sent to the service, depending on the HTTP method used for the call. If the call is made using HTTP GET, then the parameter will be sent in the query string. If the call is made using HTTP POST, then the parameter will be sent in the request body and the content-type of the request will be set to application/x-www-form-urlencoded. If the intent is to send a parameter always in the query string, then using Query String instead of this option is recommended.
-
Cookie. The parameter will be sent as a cookie with the specified name and containing the specified value.
-
URL Segment. This kind of parameter allows to dynamically replace a part of the request URL with the parameter’s value. For this to work, the URL must contain a placeholder in curly braces with the name of the parameter. For example, assume that the method’s relative URL is configured as:
api/v1/{endpoint}/
Creating a parameter called endpoint of type URL Segment will allow to dynamically specify the endpoint used in the URL for the request. In runtime, the placeholder in the URL will be replaced with the value of the endpoint parameter.
-
HTTP Header. The parameter will be sent as a HTTP header with the specified name, containing the specified value.
-
Query String. The parameter will be added to the query string of the request with the specified name, containing the specified value.
-
Request Body. This parameter type only applies to HTTP POST, PUT or PATCH. The parameter will be sent in the request body as-is, and the request content type will be set to the parameter’s name. Only one Request Body parameter is allowed. This kind of parameter is typically used to POST JSON payloads to a service, using application/json as the parameter’s name.
Authentication Result
-
Result Schema - Click on the Authenticatebutton to autofill the text entry field based on the provided URL and HTTP Method.
-
Once you have completed making edits to the Web Manipulator, click Apply to save your settings and Close to exit.
JSON Web Token Authentication
Certain Web Services require an authentication object, as a method for representing claims securely between two parties. JWT (JSON Web Token) is a method that ensures authenticated communications for REST Web Services. Any communications utilizing this authentication method can now be permitted in ICONICS products when utilizing REST Web Services.
Before beginning, a user should ensure an authentication method is already created. If this is already configured, skip to step 5.
-
Launch the Workbench.
-
Navigate to the REST Service (Data Connectivity > Web Services) that has to be configured to use JWT (JSON Web Token) authentication. If the REST Service does not exist, right-click on any folder under Data Connectivity and select Add REST Service.
-
To configure an authentication method, right-click on the service and select Add Web Authentication Method.
-
A new form will populate. Fill out this form with the required settings to invoke the JWT authentication method exposed by the server you wish to interact with, and click Authenticate. If the authentication is successful and a JWT could be retrieved, the result will be shown in the Result Schema textbox. This Web Authentication Method will be used later.
-
Within the Workbench, edit the REST Service (Data Connectivity > Web Services) that was created at step 2. This will open the service form.
-
Within the General Settings section, there is a field for Authentication: Select JSON Web Token from the drop-down list. A new section called Connection Credentials will appear.
-
From the Authentication Method drop-down menu, select the Web Authentication Method that was configured at step 4.
-
The Token Property drop-down menu will automatically populate with the schema of the authentication’s method result. From within this drop-down menu, select the property that contains the JWT.
-
With the next three fields (Authorization Parameter Kind, Name and Value), configure how the JWT will be sent to server with each request. The placeholder @JwtSecurityToken can be used in the Authorization Parameter Value field and will be replaced with the actual JWT in runtime. Apply to save changes
-
All methods configured through this service will now use JSON Web Token Authentication.
See Also: