Create a New REST Web Manipulator
The sub-branches beneath a newly created Web Service (as mentioned in Create a New Web Service - REST) allow you to create a Web Manipulator.
A Web Manipulator allows users to call a REST service on demand, rather than being tethered to a single subscription during runtime. This also allows users to modify parameters before calling a service. Once configured, a Web Manipulator can be selected as a data source from the Data Browser. Note that a Web Manipulator will not show a live value in runtime until it is executed.
[Click HERE for more info on Web Manipulator for REST Web Services.]
To Add a New Web Manipulator
-
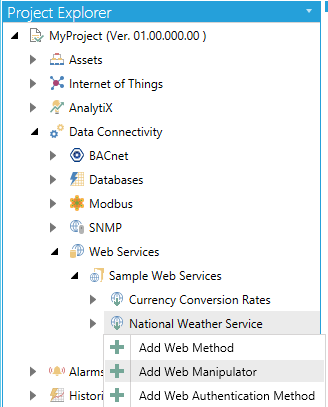
Right-click on a sub-branch beneath a Web Service and select "Add Web Manipulator" as shown below.
Adding a New Web Manipulator
-OR-
Select a sub-branch beneath a Web Service, then click on the Add Web Manipulator button, shown below, in the Edit section of the Home button in the Workbench.
Add Web Manipulator button

- This opens the Web Manipulator properties in the right-pane of the Workbench as shown below. Enter a Namein the top text entry field.
New Web Manipulator Properties
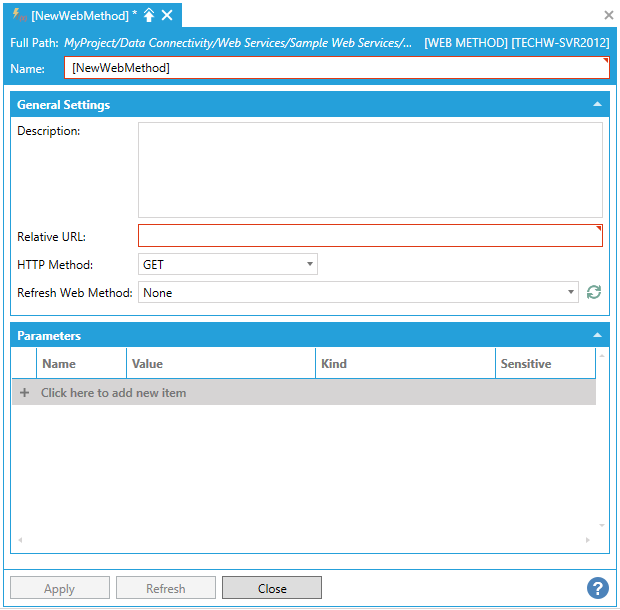
General Settings
-
Description - Enter a description for the Web Method in the text entry field.
-
Relative URL - Enter a relative URL in the text entry field. The URL is relative to the parent Service’s Base URL.
-
HTTP Method - Use the pulldown menu to select from GET, POST, HEAD, PUT, DELETE, OPTIONS, PATCH, or MERGE.
-
Refresh Web Method- Use the pulldown menu to select from None or from existing web methods associated with the provided URL and HTTP method. Click the refresh button to reset this list if necessary. This setting is particularly useful if there is a configured Web Method that pulls data from a source that is modified by the Web Manipulator. When the Web Manipulator is executed, the Web Services runtime will automatically request data from the source and update all clients.
Parameters
Click the "+ Click here to add new item" link to add a new parameter. You can then enter a Name, Value, and Kind (using the pulldown menu, select from Query String or POST Body, Cookie, URL Segment, HTTP Header, Query String, or Request Body) and select whether the parameter will be Sensitive (by clicking the checkbox within that column).
When a parameter is marked as Sensitive, it will be obscured in the Workbench UI so that its value cannot be read. It will also be removed in runtime from the point name. For security reasons, unchecking the Sensitive checkbox will clear the parameter value.
As described above, the supported parameter types are:
-
Query String or POST Body. This selection allows to dynamically change how the parameter is sent to the service, depending on the HTTP method used for the call. If the call is made using HTTP GET, then the parameter will be sent in the query string. If the call is made using HTTP POST, then the parameter will be sent in the request body and the content-type of the request will be set to application/x-www-form-urlencoded. If the intent is to send a parameter always in the query string, then using Query String instead of this option is recommended.
-
Cookie. The parameter will be sent as a cookie with the specified name and containing the specified value.
-
URL Segment. This kind of parameter allows to dynamically replace a part of the request URL with the parameter’s value. For this to work, the URL must contain a placeholder in curly braces with the name of the parameter. For example, assume that the method’s relative URL is configured as:
api/v1/{endpoint}/
Creating a parameter called endpoint of type URL Segment will allow to dynamically specify the endpoint used in the URL for the request. In runtime, the placeholder in the URL will be replaced with the value of the endpoint parameter.
-
HTTP Header. The parameter will be sent as a HTTP header with the specified name containing the specified value.
-
Query String. The parameter will be added to the query string of the request with the specified name containing the specified value.
-
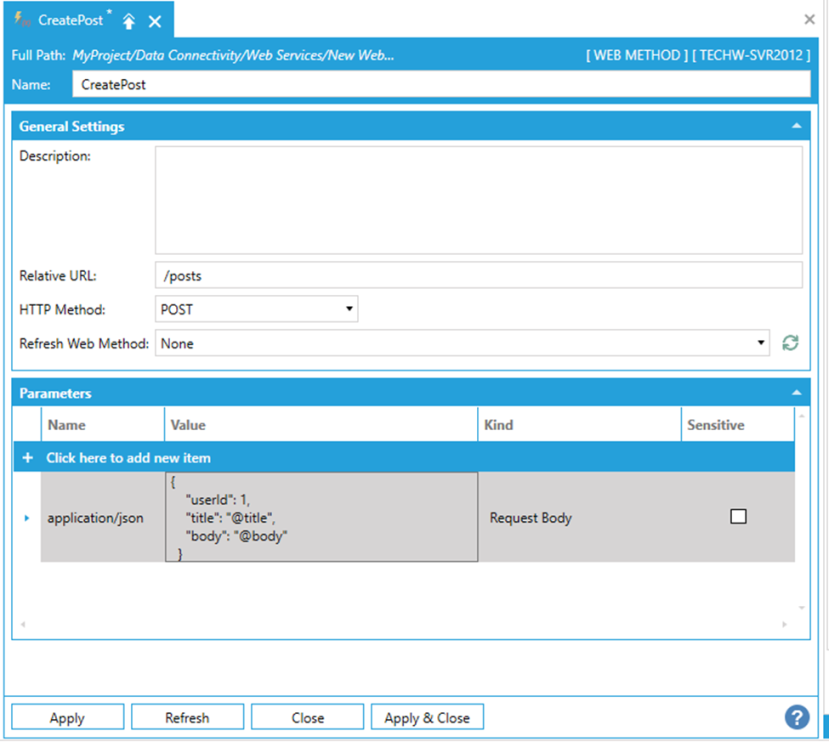
Request Body. This parameter type only applies to HTTP POST, PUT or PATCH. The parameter will be sent in the request body as-is, and the request content type will be set to the parameter’s name. Only one Request Body parameter is allowed. This kind of parameter is typically used to POST JSON payloads to a service using application/json as the parameter’s name.
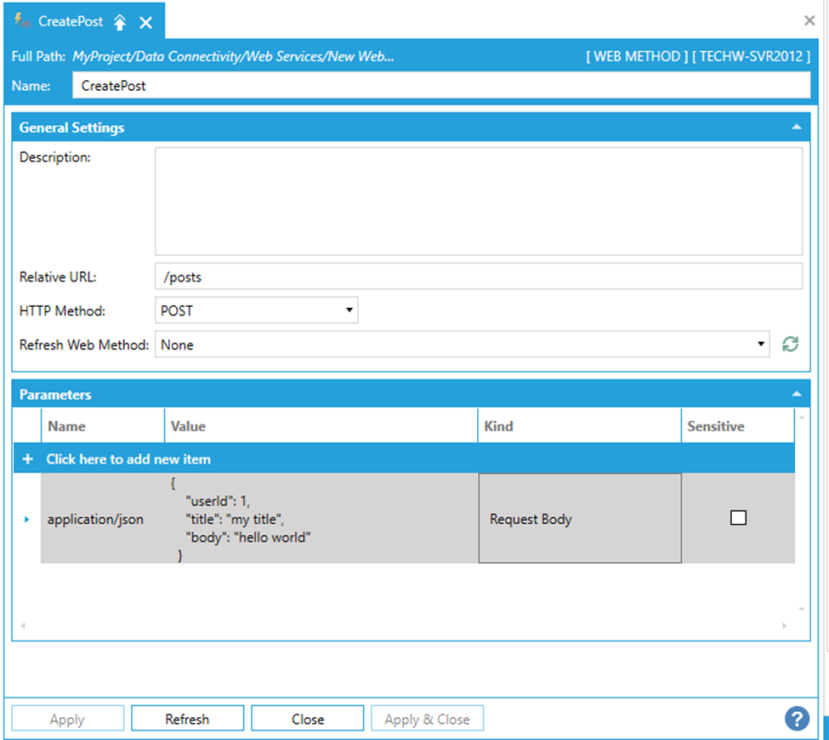
To simplify runtime usage, Request Body parameters also support virtual parameters. Consider the following example where an HTTP POST is made to create a new social media post on an API:
Web Manipulator to create a new post
Typically, a request body parameter will appear in the point name when browsed in runtime carrying the whole JSON:
Web Manipulator runtime point name with JSON
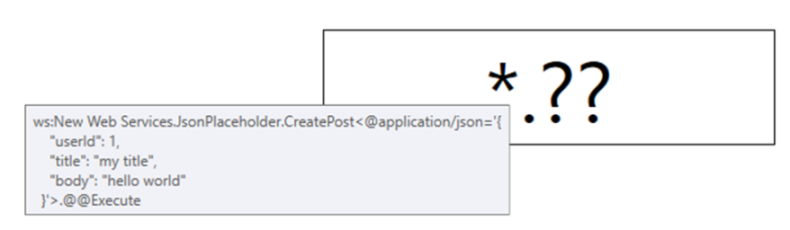
This leads to lengthy point names which are difficult to modify in runtime, especially when the JSON is complex.
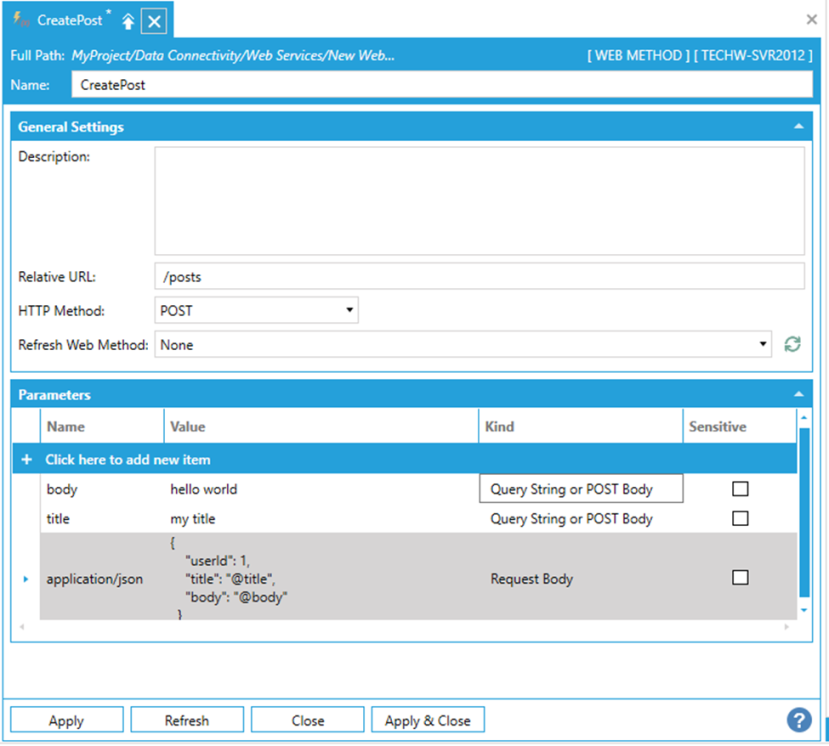
With virtual parameters, it is possible to parameterize the Request Body so that only selected parts are changeable in runtime. Following the example above, assume we want to parameterize just the title and the body of the post that we want to create. We can go ahead and replace the values with a name of a parameter, prefixed with the special @ character:
Substituting virtual parameters in the Request Body
Then, we can proceed to create individual parameters for title and body, with Kind set to Query String or POST Body:
Creating virtual parameters
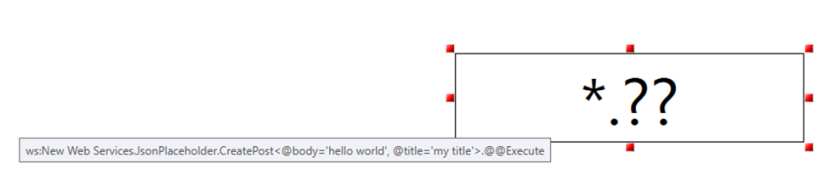
The final result is that in runtime, the Request Body parameter will not be a part of the point name anymore. We will see the title and body parameters instead:
Virtual parameters in the point name
-
Once you have completed making edits to the Web Manipulator, click Apply to save your settings and Close to exit.
See Also: