Rules
As Alarm/Event notifications arrive in AssetWorX, they must first pass through a Rules Engine.
The goals of the Rules Engine are:
-
To assign individual alarms and events to their corresponding assets
-
To expand alarms with information taken from the assets
-
To add command to the alarms
Each rule has three parts:
-
Condition
-
Action - (e.g., Assign to an asset; Modify an alarm or event with data; Add a command)
-
What to Do Next - (e.g., Next rule; Quit processing rules; Jump to sub-chain; Return from sub-chain).
Rules Chains and Processing
A Rule Chain is a set of rules. All processing starts in the default chain, selected through the General Settings and Subscriptions properties. Each rule in a chain is processed in the order that it appears in that chain. This flow can then be changed by individual rules. Chains other than the default chain are processed only if a particular rule changes the flow to that chain.
To Add a Rule Chain:
-
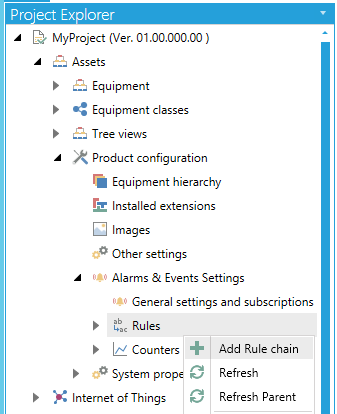
Open the Workbench and expand your project then the Assets node, then the Product configuration node, then the Alarms & Events Settings node, shown below. Right-click on the Rules node, then click on Add Rule Chain, as shown below.
Adding a Rule Chain in the Project Explorer in the Workbench
-OR-
Select the Rules node in the Project Explorer then click on the Add Rule chain button, shown below, in the Edit section of the Home ribbon in the Workbench.
Add Rule chain Button

-
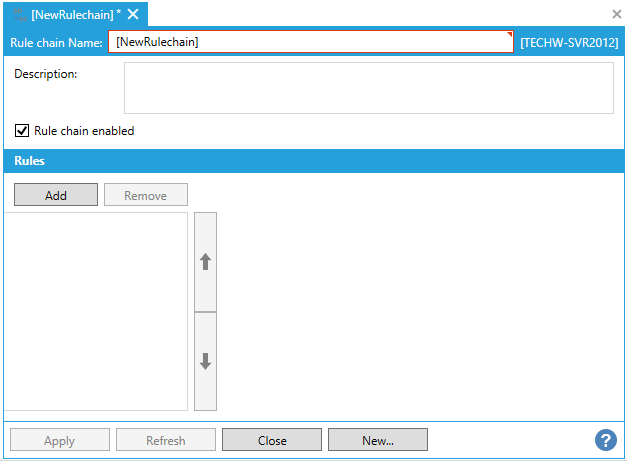
This opens the Rule chain properties, shown below, in the Project Details section of the Workbench. Enter a name in the Rule chain Name text entry field.
Rule Chain Properties
-
Description - Enter a description of the rule chain to distinguish it from others.
-
Rule chain enabled - Click this checkbox to enable the currently selected rule chain.
Rules
-
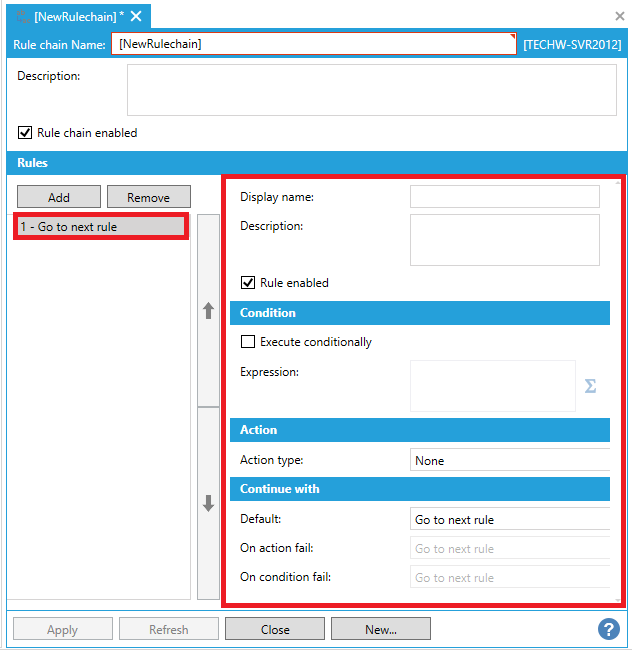
Add - Click this button to add a rule to the chain. When multiple rules are added, you will be able to select and change position of individual rules within the chain via the up/down arrows. Once a rule has been added, the right-side of the Rules section of the Rule Chain properties is populated with settings for the selected rule (see below).
-
Remove - Select an individual rule to remove from the list of rules within the chain.
Rule Chain Properties with Added Rule
-
Display name - Enter a name for the rule in the text entry field to be displayed at runtime.
-
Description - Enter a description in the text entry field to distinguish the selected rule from others.
-
Rule enabled - Click this checkbox to enable the selected rule.
Condition
Rules can be executed conditionally based on an expression, which has to evaluate to either True or Fales. Variables are accessible through the expression. In event fields (e.g., {{BaseEventType.Message}}), the syntax is similar to what is used in AlarmWorX64 Viewer or AlertWorX. Relative References (e.g., {{@@self.Description}}) can be used only after the event has been successfully assigned to an Equipment or Property.
-
Execute conditionally - Click this checkbox in order to execute the rule under a condition based on an expression set within the rule properties.
-
Expression - When the above checkbox is checked, you can enter an expression in the text entry field or click on the
 button
to open the Expression Editor and build your preferred expression.
button
to open the Expression Editor and build your preferred expression.
Action
-
Action type - Use the pulldown menu to select from one of the following actions. Note that the selection will display additional properties based on the action type.
-
-
None - Usable when the rule is only needed to jump to some sub-chain or change the execution flow in another way.
-
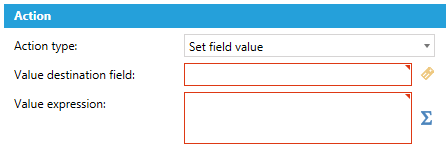
Set field value - Able to change the value of a field. Based on an expression. The expression is evaluated and the value assigned to one of the Alarm/Event fields. There are a few reserved fields that cannot be changed:
-
-
BaseEventType.EventClass
-
BaseEventType.EventType
-
BaseEventType.EventId
-
BaseEventType.SourceName
-
BaseConditionType.ChangeMask
-
BaseConditionType.NewState
-
-
Action type - Set field value
-
-
-
Value destination field - Enter the value destination field in the text entry field or click on the
 button to open the Data Browser and navigate to your selected
value destination field.
button to open the Data Browser and navigate to your selected
value destination field. -
Value expression - Enter the value expression in the text entry field or click on the
button to
open the Expressions Editor and build your preferred expression.
-
-
-
-
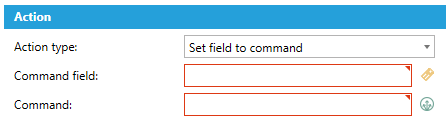
Set field to command - Able to assign a command to a field. It's possible to assign a single command as the field value. This is configurable through the Configure Command window. Event Fields and Relative References (e.g., <<@@self/.Description>>) can be used in the command. The syntax uses << and >>, as they are not resolved using the Expression Engine, but using string replacement.
-
Action type - Set field to command
-
-
-
Command field - Enter the command field in the text entry field or click on the
button to open the Data
Browser and navigate to your selected command field. -
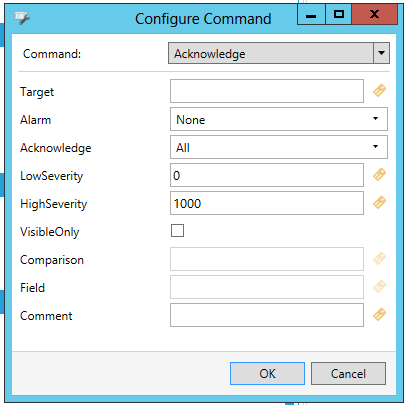
Command - Enter the command in the text entry field or click on the
 button to open the Configure
Command window, shown below, and select/configure your
preferred command.
button to open the Configure
Command window, shown below, and select/configure your
preferred command.
-
-
Configure Command Window
-
-
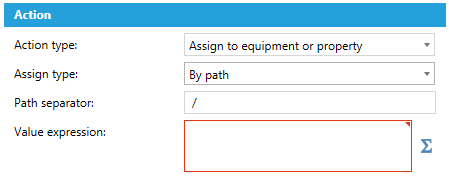
Assign to equipment or property - Needed to actually assign an incoming Alarm/Event notification to one of the existing assets. You can take the OriginalSource field, split its value by the forward slash character and use to the result to look up an Equipment or Property that matches this path.
-
Action type - Assign to equipment or property
-
-
-
Assign type - Use the pulldown menu to select either:
-
-
By path -This is usable if an event field contains the asset information in a string form. For example "Company#Foxboro bakery#South". The character used to split levels is configurable.
-
By property realtime data tag - This setting involves finding an Equipment Property by its real time data tag. If multiple properties match, this assignment will fail.
-
-
-
-
-
-
Path separator - If By path is selected, this field allows you to select the character to be used to split levels.
-
Value expression - Enter the value expression in the text entry field or click on the
to open
the Expression Editor and build your preferred expression.
-
-
Continue with
Depending on how a set rule is executed, one of three continuation paths is chosen. These include:
-
When all succeeded.
-
When the action failed (e.g., when the rule tried to assign the event to an asset, but the asset wasn't found in the configuration).
-
When the condition failed (if the rule wasn't executed conditionally).
'Continue with' Section of the Rule Chain Properties

-
Default - Use the pulldown menu to select the default for the selected rule from: Go to next rule; Return from sub-chain; Quit; or Execute sub-chain. See Option Definitions below.
-
On action fail - Use the pulldown menu to select what should occur on action fail for the selected rule: Go to next rule; Return from sub-chain; Quit; or Execute sub-chain. See Option Definitions below.
-
On condition fail - Use the pulldown menu to select what should occur on condition fail for the selected rule: Go to next rule; Return from sub-chain; Quit; or Execute sub-chain. See Option Definitions below.
Option Definitions:
-
Go to next rule - continues with the next rule in the current chain
-
Execute sub-chain - jumps to a different chain
-
Return from sub-chain - returns to the next rule in the calling chain, or quits executing if this is the top chain
-
Quit - quits processing immediately
-
Once you have completed your settings, click Apply to save them and Close to return to the Workbench. Your newly created Rule Chain will now appear in the Project Explorer beneath the Rules node.
Values Usable Inside the Rules
Regular Event Fields (e.g., BaseEventType.Message)
-
All of them are accessible for Read purposes.
-
There are a few protected ones that cannot be modified by the Rules Engine. See Set Field Value.
-
Commands can only be assigned to text (String) fields, which are not protected.
Special Event Fields
-
They are all Read-Only.
-
AcInternal.IsAssigned – A Boolean (true/false) field. True if the Alarm/Event notification was already successfully assigned to an asset.
-
AcInternal.SourceEventPointName – A text (String) field. The name of the realtime events tag, where this Alarm/Event notification originated from.
Relative References
-
E.g., @@self/.Description.
-
Only static information from the Equipment and Properties can be obtained. The value of dynamic properties or static properties with cache enabled cannot be used.
Syntax for Values Usable Inside the Rules
Places, which use the expression engine to evaluate the value, use double curly braces.
Example: {{BaseEventType.Message}} and {{@@self/.Description}}
Commands use the Relative References syntax.
Example: @@self/, which gets replaced by the path to the current Equipment
Or enclosed in << and >> to get the value.
Example: <<@@self/.Description>>
If a command field uses the Expression Engine syntax (starting with x=), the expression is not evaluated by the AssetWorX server side, and is sent to the client side, with just the Relative References (@@ and <<>>) resolved. The Alarm Viewer currently cannot evaluate the expression.
See Also: