Properties Tab for Equipment Classes
On the Properties tab for an equipment class (shown below), you can configure basic identifying information about an equipment node.
|
|
Tip:
For more information about equipment classes, refer to the Creating
Equipment Classes for Use as Templates topic. |
Equipment Class Form - Showing the Properties Tab
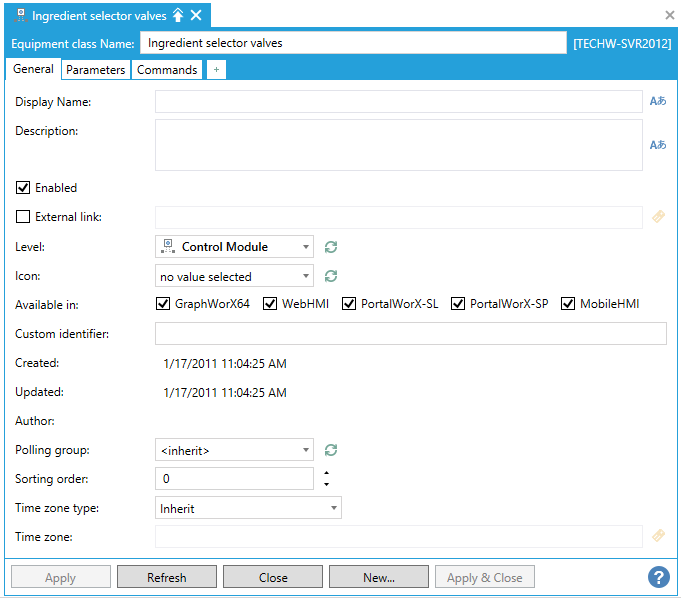
To open the Properties sub-tab, in the Workbench, in the Project Explorer, expand your project folder then the AssetWorX provider node, then the Equipment classes node. Navigate to the equipment class you are entering properties for and click on it. This displays the Equipment Class tab with the Properties tab on top. Use this tab to specify default values for equipment nodes that will be created using this class. Values include specifying the equipment icon, enabling or activating the equipment, entering a custom identifier, specifying an equipment class, or adjusting its level in the asset tree. Each prompt on this sub-tab is described below.
Options on the Properties sub-tab are described below:
-
Display Name - Enter a name in the text entry field to display in the asset navigator. Click on the
 button to
open the Data Browser, where you can within existing Language Aliases.
button to
open the Data Browser, where you can within existing Language Aliases. -
Description* - A description to be used for equipment created using this equipment class. This description is used as a tool tip when the cursor is held over the node. Note that if an alias is used in this field, the alias will appear in the tool tip for the equipment class.
-
Enabled - This checkbox allows you to enable or disable the selected equipment asset within your asset catalog.
-
External Link - Clicking this checkbox allows you to create an external link to an asset on another computer. The link must be an asset on another computer that is connected via your FrameWorX Network. Clicking the ellipsis button to the right of the text entry field opens the Data Browser, which allows you to navigate to your selected icon. Once you have selected your desired asset, it will appear in the text entry field. For more information, see Distributed Asset Catalog Runtime.
-
Level - The level in the asset tree to be assigned by default to equipment created using this equipment class. The level is determined by the level of the parent equipment. If the level of the parent equipment can be nested, you must choose which level the equipment belongs to: the level of the parent or the next level down. For more about levels, refer to the Why an Equipment Hierarchy with Tiers? topic.
-
Icon - The icon to display by default in the asset tree for equipment created using this equipment class. This icon can be overridden later on for individual equipment nodes. If <default> is the displayed selection, then the icon that is defined for the equipment's level in the equipment hierarchy will appear in the asset tree. For example, if the equipment class is used to create equipment at the enterprise level of the asset tree, the enterprise level's icon is used; but if the class is used to create equipment at the site level, then the site level's icon is used. For more information about these icons, refer to the Configuring icons for the asset tree topic.
-
Available in - These checkboxes give you the ability to decide in which ICONICS products the selected item (in which you are presently setting Properties) will appear. These currently include GraphWorX64, WebHMI, and MobileHMI.
-
Custom identifier* - The code or ID to be used by default for equipment created using this equipment class. This field is required for equipment nodes if you are using equipment data from an external or legacy system.You can use alphanumeric characters of any type, including special characters. The identifier is case sensitive; enter it exactly as it is defined for the equipment in the external or legacy system. If you are using an external or legacy system, and you don't enter the equipment's identifying code or ID from that system, no information will be available for the equipment.
-
Created - The date and time the equipment class was created.
-
Updated - The date and time the equipment class was updated last.
-
Author* - The default name or other appropriate information identifying the person or department responsible for maintaining the equipment that.
-
Polling group - Use the pulldown menu to select which Polling Group will include the presently selected asset.
-
Sorting order - This navigator can sort assets using this parameter.
-
Time zone type - Use the pulldown menu to select either Inherit (which will cause the selected asset to inherit the time zone for any parent-level asset or pre-set time zone) or As specified (which will allow you to set your preferred time zone in the Time Zone settings).
-
Time Zone - If you selected "As specified" in the Time zone type settings, you can enter a time zone in the text entry field or click on the
 button to open the Data Browser and set your preferred time zone.
 [More Info]
Time Zone Selection in the Data Browser
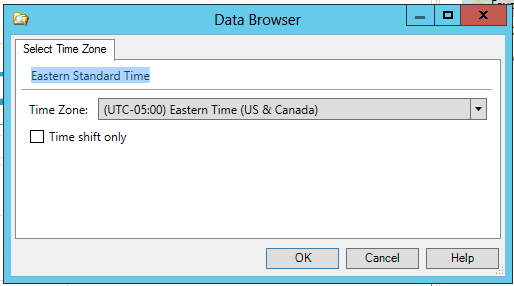
Select Time Zone
-
Time Zone - Use the pulldown menu to select your preferred time zone (including UTC0.
-
Time shift only - Click this checkbox if you wish to use a specific time shift rather than select a Time Zone based on location (or UTC). You can then enter or edit the time shift in the text entry field at the top of the window. If you have already selected a Time Zone, you will see a time shift appear in the text entry field, where you can either accept it as is or edit it.
Click OK to save your changes and return to the asset properties.
-
* This field can contain one or more aliases, which will be used as prompts when an equipment node is created using this equipment class. For more about aliases and their uses, refer to the Using Aliases in an Equipment Class topic.
See Also: