Adding Equipment Properties
For each level of Assets within the tree control of the AssetWorX provider in the Workbench, you can add Equipment Properties. These allow you to connect the associated asset to real-time (utilizing multiple data source options) or historical data sources
To Add an Equipment Property to an Existing Equipment Asset in AssetWorX
-
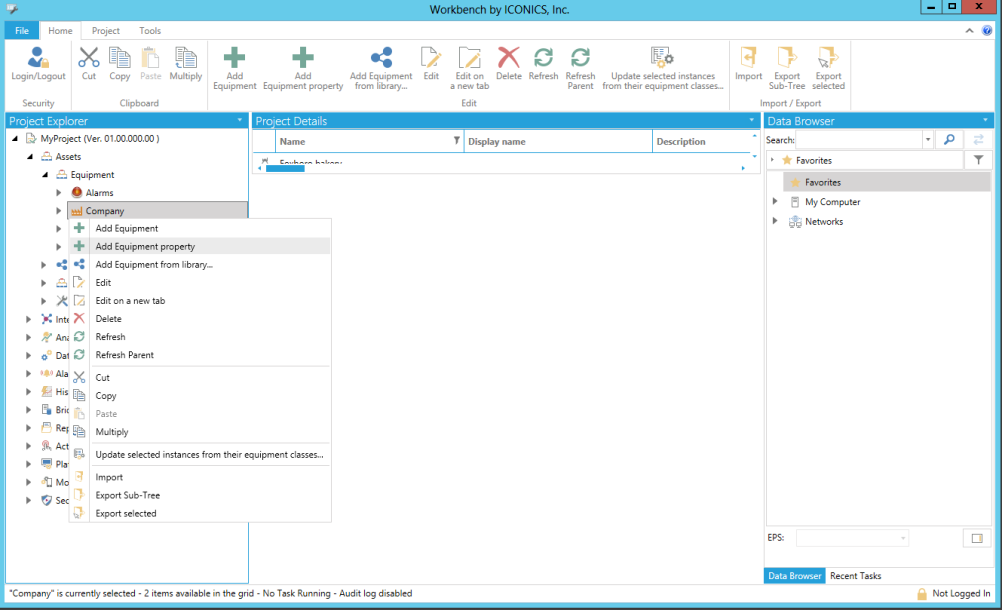
First, you need to work with an already created asset. You could assign an equipment property to the top-level 'Assets' node if you wish, but in our example, we are connecting to a sub-branch in the tree, an equipment asset we've named 'Test Asset'.
You can add the property by either right-clicking on the equipment in the asset tree and selecting 'Add Equipment property' OR you can click on the item and then, once the contextual ribbon changes to the items relevant to your item selection), click on the 'Add Equipment property' button in the Edit section of the Home ribbon at the top of the screen.
'Add Equipment property' in the Assets Node in the Workbench
-
This will open a new Equipment property properties window in the right-side window of the Workbench, as well as a placeholder in the top right items list. This items list shows any sub-items connected to an asset, as well as any of its connected properties. Enter an Equipment property name in the text entry field.
Equipment Property Settings in the Workbench
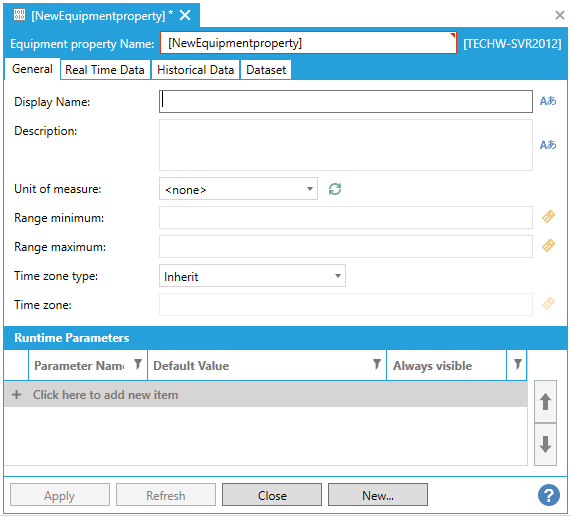
General Tab
General Tab
-
Display Name - Enter a name (in the text entry field) to be displayed for the selected equipment property at runtime or click on the
 button to open the Data Browser to navigate to a selected name.
 -
Description - Enter a description for the equipment property in the text entry field or click on the
button to open the Data Browser
to navigate to a selected description. -
Unit of measure - Use the pulldown menu to select a predefined unit of measure configured via the Units Node. Click on the
 button to refresh this list.
 -
Range minimum - Enter a range minimum in the text entry field or click on the
 button to open the Data
Browser and navigate to your selected range minimum.
button to open the Data
Browser and navigate to your selected range minimum. -
Range maximum - Enter a range maximum in the text entry field or click on the
button to open the Data
Browser and navigate to your selected range maximum. -
Time zone type - Use the pulldown menu to select from either Inherit or As specified.
-
Time zone - If the above Time zone type was selected as 'As specified', you can enter a time zone in the text entry field or click on the
button to open the Data Browser and navigate to your preferred time
zone.
Runtime Parameters
Runtime Parameters are very similar to parameters in the Unified Data Manager. All parameters used by the property need to be explicitly defined. This requirement is applicable to all text fields in the Equipment Properties, excluding Name, Parameter Name and Parameter Description. In addition, there is a mechanism that checks the parameter list against the parameters that are actually used and reports the differences along with a message/button to fix the issue (e.g., The property uses these undefined parameters. [Add parameters] or The property does not use these parameters [Remove parameters]).
-
Click on the + Click here to add new item link to add a Runtime Parameter.
-
Enter a Parameter Name in the text entry field beneath that column.
-
Next, set a Default Value in the text entry field of that column.
-
Then, decide whether the current Runtime Parameter should always be visible. If so, check the checkbox beneath the Always visible column.
Runtime Parameter - Point Name Syntax
-
Example: ac:Equip/Prop1(p1=abc, p2 = “def, ghi”)
-
Parameter names are case insensitive.
-
Order is not important.
-
White spaces and new lines are allowed.Forbidden characters; which are all characters except alphanumeric, underscore, dash and space in the middle; need to be double quoted or single quoted. If quotes of the same type need to be used inside the value, they need to be doubled (double quotes inside double quotes, and single quotes inside single quotes).
-
Any parameters can be omitted.
-
When browsing for the property, the point name will contain only parameters marked as “always visible”.
There will be a sub-property the point name of which will contain all parameters.
-
Relative References
Relative references are special placeholders that reference other equipment, properties or their attributes as a relative path from the current position. In runtime they are replaced by their full point names if used as direct, or by the values of those points if enclosed by chevrons << and >>. (See more details below.)
There are the following relative references:
-
@@self/- references the current equipment.
-
@@parent/- references the parent equipment
-
@@ancestor[n]/- depending on the numeric value of [n], references the current equipment or an ancestor equipment any number of levels down. @@ancestor[0]/ equals to @@self/.
-
@@property– references a current equipment property. This placeholder can only be used on properties.
To reference an equipment, property or attribute that is relative to the relative reference, simply combine them together:
-
@@self/Heating/Temperature– a property named ‘Temperature’ on the equipment ‘Heating’ that is a child of the current equipment
-
@@parent/.Name– the attribute ‘Name’ on the parent equipment
-
@@property.Name– the attribute ‘Name’ on the current property
Relative references can be used in these places:
-
Equipment configuration– all text fields except for the Name, Custom Identifier and Time Zone fields.
-
Equipment Properties configuration– all text fields except for the Name and Time Zone fields. They cannot be used in the Runtime Parameters section.
-
In some configuration forms of the Alarms & Events settings and in the fields of incoming external alarms – this is documented in the AssetWorX A&E section.
-
AssetWorX extension forms, like Hyper Historian, Hyper Alarm Server and Energy AnalytiX, may or may not support relative references. Where relative references are supported, a specialized browser will be available.
-
In many command fields (although not in all, due to technical reasons), including command text fields (except for the command’s Name field)
Data Browser for Relative References Support
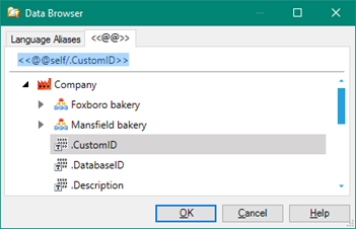
Examples:
-
X={{@@self/a}} + {{@@self/b}}: An Equipment Property, which Sums Together the Values of Two Sibling Properties (Named a and b)
-
<<@@parent/.DisplayName>>: An Equipment Description, which Uses the Value of its Own Parent’s Display Name
-
#Path=<<@@self&/.Path>>;: An Equipment Command, which Sets the Value of a Global Alias to the Path of the Current Equipment
Direct and Indirect Use of Relative References
-
Direct relative references (typically used in curly brackets {{@@ }} inside the expressions, but can be used anywhere) get replaced by the point name of the current equipment (not prefixed by the node name). They are usable whenever a point name is expected, for example in expressions.
-
When further enclosed by chevrons << @@ >>,AssetWorX will replace them with their static value. For example, ‘<<@@self/.Name>>’ could get replaced by ‘Equipment’.
-
It can be the value of a static equipment property or the value of attributes on both equipment and properties.
-
Taking the real-time value of the referenced equipment property is possible, but the property must be static or cached (the “Use database cache” feature in in Equipment Property->Real-time tab must be enabled. However, it is very strongly recommended to get the real-time value of a cached equipment property using a direct reference whenever possible.
![]() Note: When
taking the real-time value of a Cached Equipment Property, AssetWorX checks
for changes in the cached value of the property every 10 seconds,
so be aware that if you rewrite the property value, it will not change
until the next check, i.e. with up to 10 s. delay.
Note: When
taking the real-time value of a Cached Equipment Property, AssetWorX checks
for changes in the cached value of the property every 10 seconds,
so be aware that if you rewrite the property value, it will not change
until the next check, i.e. with up to 10 s. delay.
![]() Click
HERE for examples on how to achieve specific goals.Examples
of How to Achieve Specific Goals
Click
HERE for examples on how to achieve specific goals.Examples
of How to Achieve Specific Goals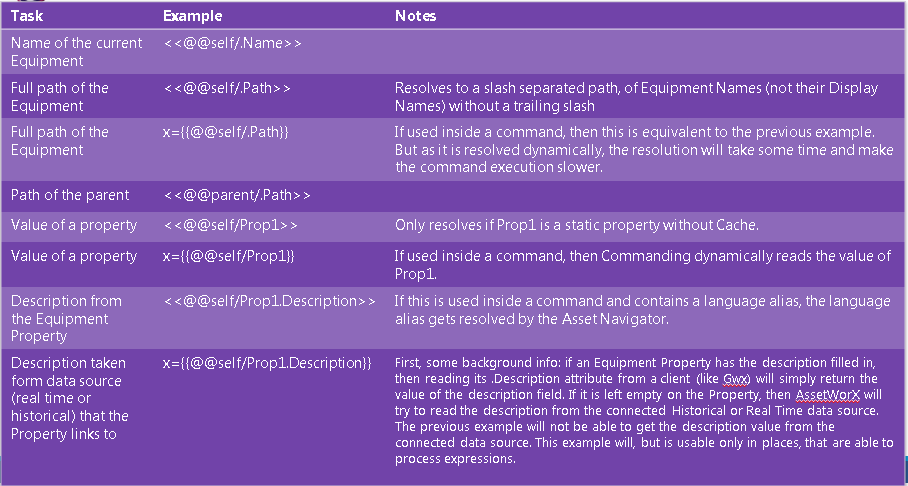
More Complicated Example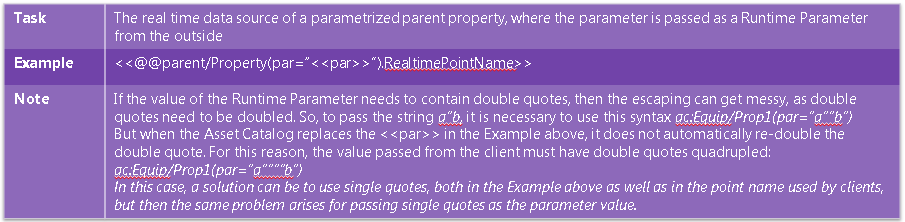
Dynamic Point Names
Prior to the inclusion of Dynamic Point Names, the data tag of an Equipment Property needed to be fully specified in the AssetWorX configuration.
Example:
hh\Configuration\DataTypes:Float64
Runtime Parameters and Relative References have added more flexibility.
Example:
hh:\Configuation\DataTypes<<P1>>
Dynamic Point Names add yet more flexibility. The Point Name is the result of a dynamically changing expression.
Example:
x="hh:\Configuration\DataTypes:" + tostring({{sim64:String.Static("dnph").Value}})
This is different from an "Expression" Property, where the client receives the value of the expression directly. It is applicable to Real Time data tags, Historical data tags, Data Set tags and Alarm sources. It can be combined with Runtime Parameters and Relative References and can also be combined with an Expression Property.
Real Time Data Tab
Source Type: None
Real Time Data - Source Type: None
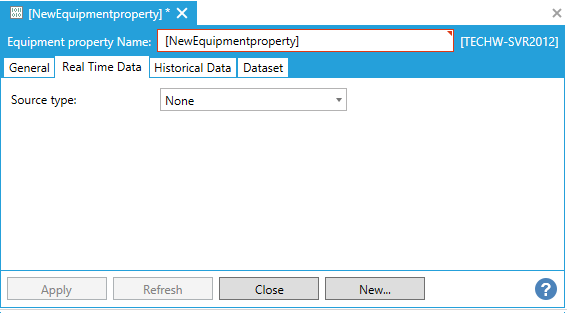
In this instance, you won't require a connection to any real time data. You can still decide to use any existing data cached in the database by clicking on the 'Use Database Cache' checkbox.
Source Type: Static Value
Real Time Data - Source Type: Static Value

In this instance, once you select 'Static Value' from the pulldown menu, you'll see options to select a 'Data Type' and, depending on that type, be able to enter a value (in the following text entry field). You can also decide to use any existing data cached in the database by selecting the 'Use Database Cache' checkbox.
Data Types include:
-
Native - will prevent you from entering anything in the Value text field.
-
String
-
8 bit signed integer
-
16 bit signed integer
-
32 bit signed integer
-
64 bit signed integer
-
8 bit unsigned integer
-
16 bit unsigned integer
-
32 bit unsigned integer
-
64 bit unsigned integer
-
32 bit floating point number (single precision)
-
64 bit floating point number (double precision)
-
Boolean value
Source Type: Dynamic Tag
Real Time Data - Source Type: Dynamic Tag
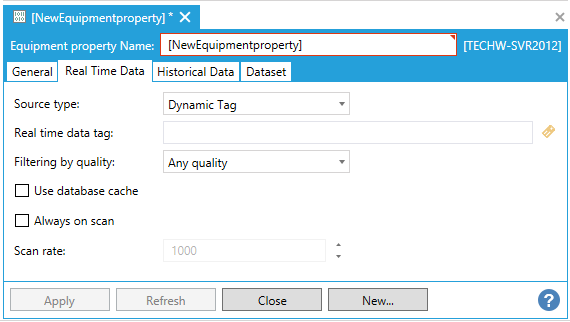
In this instance, once you select 'Dynamic
Tag' from the pulldown menu, you'll be able to enter a Real
time data tag. If you don't know the exact location, you can click
on the  button to bring up the Data Browser, where you
will be able to select from all connected data sources. In the example
above, we are using a simulated data value source. You can also decide
to use any existing data cached in the database by selecting the 'Use
Database Cache' checkbox.
button to bring up the Data Browser, where you
will be able to select from all connected data sources. In the example
above, we are using a simulated data value source. You can also decide
to use any existing data cached in the database by selecting the 'Use
Database Cache' checkbox.
Source Type: Polled Dynamic Tag
Real Time Data - Source Type: Polled Dynamic Tag
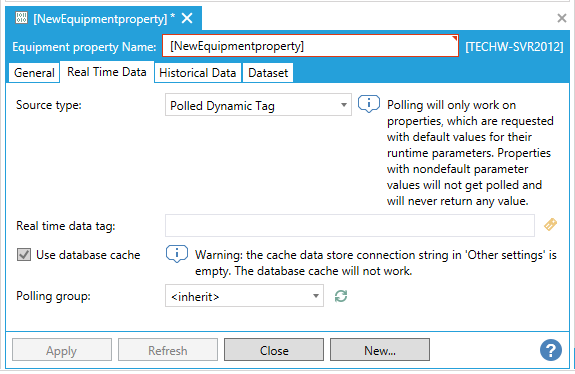
In this instance, once you select 'Polled
Dynamic Tag' from the pulldown menu, you'll be able to enter a Real
time data tag. In the example above, we are using a simulated data
value source.
In comparison to the regular 'Dynamic Tag' option explained above, the
Polled Dynamic Tag allows you to set times/recurrences for data retrieval,
using a Polling
Group. If you don't know the exact location, you can click
on the button to bring up the Data Browser, where you
will be able to select from all connected data sources.
The Polling Group pulldown allows you to either <inherit> the polling settings from the higher branches of the asset tree in which this particular equipment asset has been placed OR you can select a Polling Group that has been created through the Polling Groups feature of the AssetWorX provider's System properties.
You can also decide to use any existing data cached in the database by clicking on the Use Database Cache checkbox.
Source Type: Expression
Real Time Data - Source Type: Expression
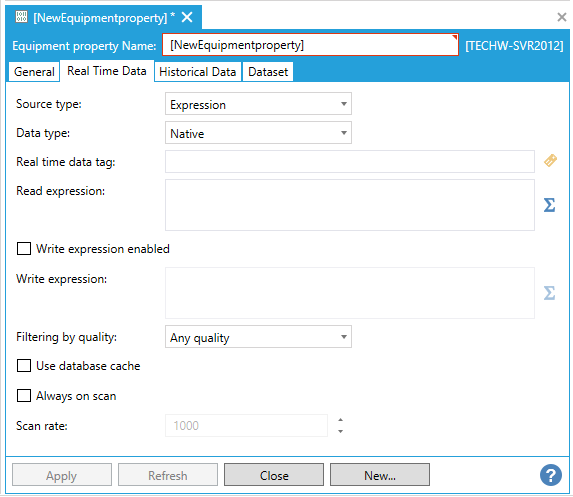
In this instance, once you select 'Expression' from the pulldown menu, you'll see options of Data Types.
Data Types include:
-
Native - will prevent you from entering anything in the Value text field.
-
String
-
8 bit signed integer
-
16 bit signed integer
-
32 bit signed integer
-
64 bit signed integer
-
8 bit unsigned integer
-
16 bit unsigned integer
-
32 bit unsigned integer
-
64 bit unsigned integer
-
32 bit floating point number (single precision)
-
64 bit floating point number (double precision)
-
Boolean value
-
Select a Data Type. You can also use data from the database cache.
-
Enter a Read expression directly into the text entry field, or use the
 button to open the Expression
Editor.
button to open the Expression
Editor. -
Once you have entered a Read Expression, you have the option of also creating a Write expression.
-
Select the Write expression enabled checkbox in order to allow the remaining text entry fields to become active.
-
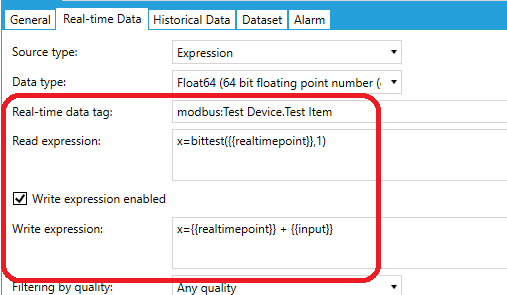
Enter a Real time data tag. If you don't know the exact location, you can click on the
button to bring up the
Data Browser, where you can choose from all connected data sources (see
a data tag example in the image below). -
Enter a Write Expression directly into the text entry field, or use the
button
to open the Expression
Editor.Example of Read and Write Expressions
Placeholder strings:
-
{{realtimepoint}}– References the data point specified by the “Real-time data tag” setting. It can be used in both “Read expressions” and “Write expressions”.
-
{{input}}– Contains the value written into the expression tag by the runtime client. It can only be used in “Write expressions”.
Other settings:
Filtering by quality - Use the pulldown menu to select from either Any quality or Only good.
Use database cache - Selectthis checkbox to use any existing data cached in the database. Make sure that the Cache Data Store connection string in Other settings is filled in, otherwise the database cache will not work.
Always on scan - Note that this option will only work on properties which are requested with default values for their runtime parameters.
Scan rate - If you have enabled Always on scan, you can enter a scan rate into the text entry field.
-
Historical Data Tab
Historical Data Tab in the Equipment Property Settings in AssetWorX
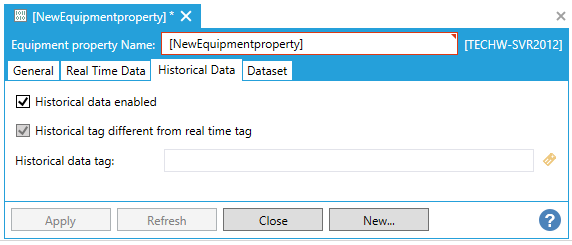
First, if you decide to utilize historical data with your equipment property, click on the checkbox for Historical data enabled.
If you have not already
changed settings in the Real Time Data tab, the Historical
tag different from real time tag checkbox will be inactive. If
you did make changes to the Real Time Data tab, select the checkbox if
you wish to use a different data tag. You'll then be able to enter a Historical data tag. If you don't
know the exact location, you can click on the button
to bring up the Data Browser, where you will be able to select from all
connected data sources.
AssetWorX Integration with Hyper Historian
AssetWorX can be integrated with ICONICS Hyper Historian rapid data historian solution. This allows for configuration of Hyper Historian tags directly from within AssetWorX inside the Workbench. For more info and steps on how to ensure Hyper Historian integration with Assets, click HERE. Once this integration has been configured, additional 'Source type' options are available within the Historical Data tab in Equipment Property Settings in Assets in the Workbench, including Hyper Historian Tag, Hyper Historian Calculated Tag, Hyper Historian Calculated Simple Events, and Hyper Historian Calculated Condition.
Source type: Hyper Historian Tag
Historical Data - Source Type: Hyper Historian Tag
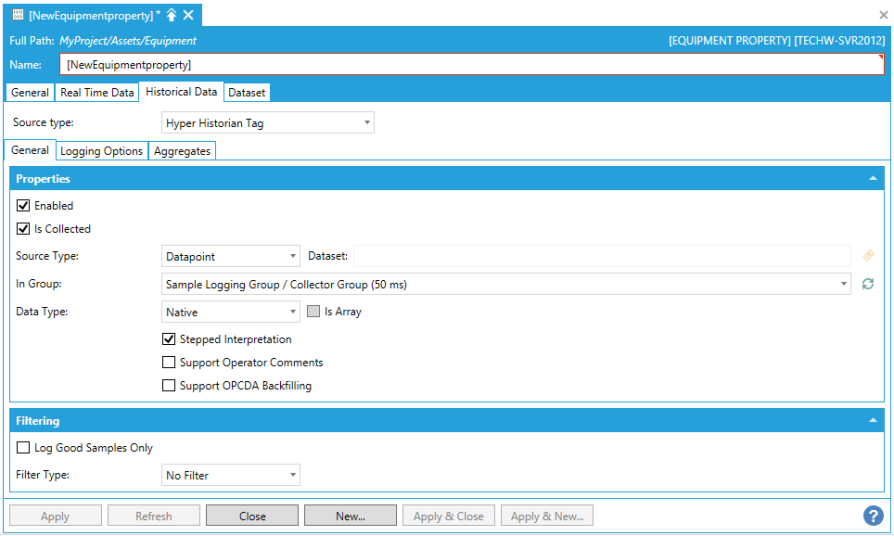
General Tab
Historical Data - Source Type: Hyper Historian Tag - General Tab

Properties
-
Enabled - Click this checkbox to enable this tag.
-
Is Collected - This checkbox is selected by default. This means that the Hyper Historian tag's data is collected by the collector from a signal. However, if the tag's data is not collected using a signal, but is collected and written directly to the logger using some other means, such as a TrendWorX64 Viewer or a .CSV file via MergeWorX, de-select the Is Collected checkbox. As a result, the tag's Signal Name field becomes disabled, as does the Filtering field and (on the Logging Options tab, described later in these steps) the Log to Disk options.
-
Source Type - Select a Source Type for the data signal associated with the tag using the provided pulldown menu. The signal can come from a Datapoint [e.g. from GenClient (recommended for processing OPC DA and UDM data) or a FrameWorX Client (recommended for processing OPC UA and GridWorX data)] or a Dataset (recommended for processing BACNet data) or Dataset Generic.
-
If you select Dataset, leave the Dataset field blank if the data set contains only one value or a default set of column names, or enter the user-defined name that appears at the end of each column name in the dataset (for example, if your data set includes columns named Value_test and StatusCode_test, enter "test" in the Dataset field). You can click on the ellipsis [...] button to open the Dataset Configurator or Dataset Generic Configurator.
-
-
In Group - Select the group in which the tag should appear within the configuration database. Click on the refresh button in order to load the current list of groups.
-
Data Type -Use the pulldown menu to select from Native, Boolean, Int8, UInt8, Int16, UInt16, Int32, UInt32, Int64, UInt64, Float32, Float64, String, Duration or DateTime.
-
The Is Arraycheckbox allows you to set if the data type is an array.
-
-
Stepped Interpretation - Check this box to enable this feature if it is desired. Stepped Interpretation is used primarily during playback, for interpreting the tag’s data values. This feature is applied only if you request a value for a certain point of time (in the Log to Disk option on the Tag Logging Options tab). The returned value will be the nearest older value available. In general, if the data comes from a discrete signal such as an on/off switch (or a Boolean data type), put a check mark in the Stepped Interpretation check box; but if data comes from a sine wave or analog signal, leave the box empty.
-
Support Operator Comments - Check this box to allow operators to comment on the signal in displays. Later, as the tag’s data values play or replay in the Trend Viewer, you may want to be able annotate the tag’s data values as you see them trending before you. For example, maybe you want to note an operator action that altered the data slightly, or highlight a piece of data for analysis later. Putting a check mark in the Support Operator Annotations check box lets you do that. Such annotations are saved with the tag’s data in its logger file, which makes the annotations available in a replay, accessible to the Hyper Historian SQL Server Interface, and archived with the tag’s data.
-
Support OPCDA Backfilling - Enables backfilling from devices via OPC DA. When enabled, all filters on collector are disabled.
Filtering
-
Log Good Samples Only - When checked, only good samples will be logged.
-
Filter Type - Select the value(s) of the signal to log to disk. Use the pulldown menu to select from No Filter, Deadband, or Swinging Door.
-
If you are using
 Deadband filtering,
set the threshold as either an Absolute
or Percent and
enter the value in the text entry field.
Deadband filtering,
set the threshold as either an Absolute
or Percent and
enter the value in the text entry field. -
If you are using Swinging Door filtering, set the threshold as either an Absolute or Percent and enter the value in the text entry field. Then, set both the Maximum Period and Minimum Period in the nearby text entry fields (in milliseconds).
[More Info]
The Swinging Door filter in Hyper Historian is implemented by the Logger on incoming values it receives from the Collector. It serves as the last-line of the filtering logic. The swinging door filters off values based on difference of consequent values from linear trend; if the difference is below defined threshold, new value is ignored.
Swinging door is a generalization of a deadband filter. Swinging door filters off values following certain linear trend. It starts with one value (the first one is always forwarded to storage). Two tangents are considered, originating above and below base value in defined filter range. Tangents are effectively defined by second value in filter (see example). As subsequent values come in, tangents are adjusted to form geometrical region encompassing all values in filter so far.
Geometrically, as long as tangents don’t intersect prior to base value (i.e. the region defined by tangents is not broadening – hence commonly used filter name), the filter is valid. When a new value causes the region to open up, the filter is flushed – the last value prior to the breaking one is dumped to storage and the filter is re initialized using that value and the breaking one.
There are certain guaranties about maximum deviation of values filtered off (the difference of ignored value from stored trend can’t be higher than distance between tangent base points considered above and below base point).
Filter configuration is similar to deadband’s:
-
It can be either disabled or enabled
-
If enabled, it is possible to configure its range as either of the following:
-
As an absolute value (non-negative)
-
As a percentage of value range (max - min) defined for the tag
-
Besides these parameters, there are two additional ones:
-
Minimum distance between values - If two subsequent values are closer (time-wise) than defined threshold, the new value is ignored
-
Maximum distance of values - If distance between last stored value (physically) and incoming value is higher (time-wise) than defined threshold, the filter is flushed as if new value would be breaking one
Swinging Door Filter Example

-
-
Logging Options Tab
Historical Data - Source Type: Hyper Historian Tag - Logging Options Tab
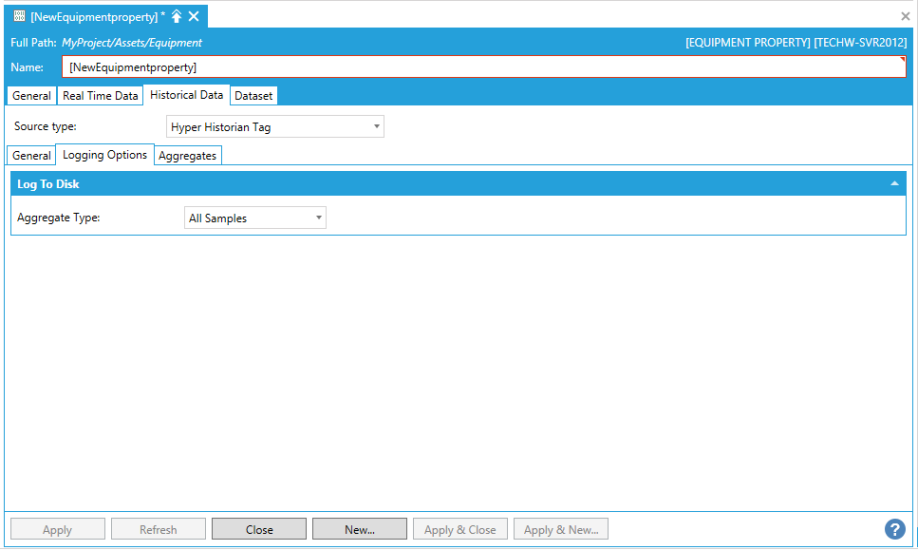
Log to Disk
-
Aggregate Type - Use the pulldown menu to select from All Samples, Max, Min, Avg, Std. Dev., Running Max, Running Min, Running Avg, Running Avg, Moving Avg, Moving Max, Moving Min, Totalizer or Most Recent On Time.
Aggregates Tab
Historical Data - Source Type: Hyper Historian Tag - Aggregates Tab
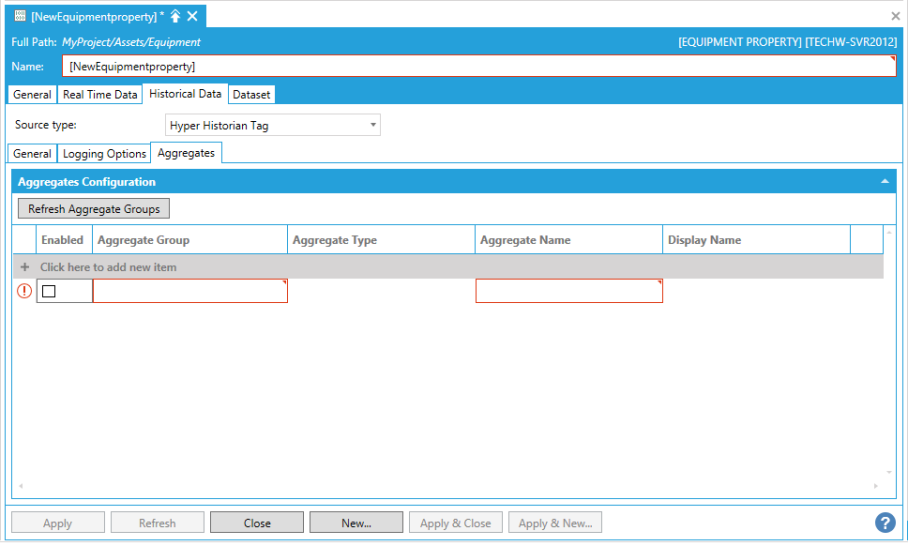
Aggregates Configuration
-
Refresh Aggregate Groups - Click this button to refresh the list of aggregate groups.
-
+ Click here to add new item - Click this link to add a new item to the list.
-
Enabled - Click this checkbox to enable the line item.
-
Aggregate Group -Use the pulldown menu to select from configured Aggregate Groups.
-
Aggregate Type - Use the pulldown menu to select from Interpolative, Average, Time Average (Interpolated Bounds), Sum, Minimum, Maximum, Minimum Actual Time, Maximum Actual Time, Range, Annotation Count, Count, Number of Transitions, Start, End, Delta, Duration Good, Duration Bad, Percent Good, Percent Bad, Worst Quality, Standard Deviation (N-1), Variance (N-1), Standard Deviation (N), Variance (N), Start (Bounds), End (Bounds), Delta (Bounds), Minimum (Bounds), Maximum (Bounds), Minimum Actual Time (Bounds), Maximum Actual Time (Bounds), Range (Bounds), Time Average, Total or Worst Quality (Bounds).
-
Aggregate Name - Enter an Aggregate Name. This entry may aHistorilso be auto-filled according to previous settings.
-
Display Name - Enter a Display Name. This entry may also be auto-filled according to previous settings.
Source Type: Hyper Historian Calculated Tag
Historical Data - Source Type: Hyper Historian Calculated Tag
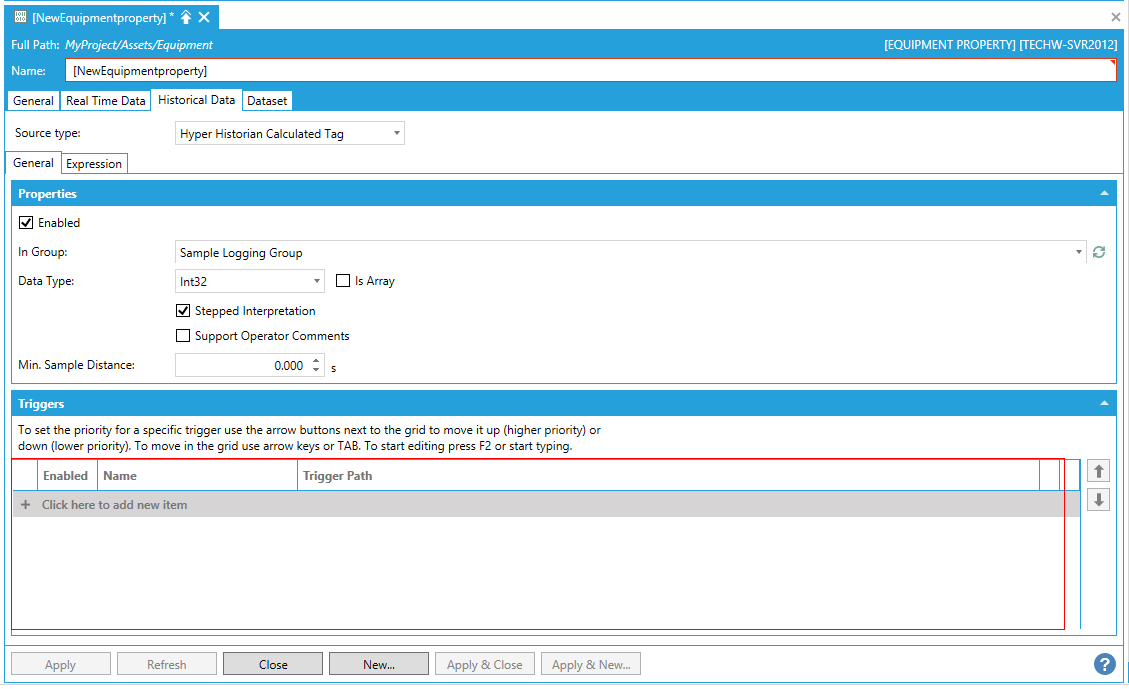
General Tab
Historical Data - Source Type: Hyper Historian Calculated Tag - General Tab

Properties
-
Enabled - Click this checkbox to enable this calculated tag.
-
In Group - You can specify if the tag is logged by a specific logging group. Use the pulldown menu to select the logging group. Click the refresh button to update the list.
-
Data Type - Use the pulldown menu to select from Native, Boolean, Int8, UInt8, Int16, UInt16, Int32, UInt32, Int64, UInt64, Float32, Float64, String, Duration, DateTime.
-
Is Array - Click this checkbox if the data type selection is an array.
-
Stepped Interpretation - Check this box to enable this feature if it is desired. The Stepped Interpretation checkbox is used primarily during playback, for interpreting the tag’s data values. This feature is applied only if you request a value for a certain point of time. The returned value will be the nearest older value available. In general, if the data comes from a discrete signal such as an on/off switch (or a Boolean data type), put a check mark in this box; but if data comes from a sine wave or analog signal, leave the box empty.
-
Support Operator Annotations - Check this box to allow operators to comment on the signal in displays. Later, as the tag’s data values play or replay in the Trend Viewer, you may want to be able annotate the tag’s data values as you see them trending before you. For example, maybe you want to note an operator action that altered the data slightly, or highlight a piece of data for analysis later. Putting a check mark in the Support Operator Annotations check box lets you do that. Such annotations are saved with the tag’s data in its logger file, which makes the annotations available in a replay, accessible to the Hyper Historian SQL Server Interface, and archived with the tag’s data.
-
-
Min. Sample Distance - In the text entry field, specify the time distance, in seconds and milliseconds, between calculated samples. This option is helpful for limiting samples from high-frequency sampling.
Triggers
-
In this section, add the triggers that determine when the calculations will occur. The triggers that you can add here are calculation triggers that must be predefined as described in the Creating a Calculation Trigger topic. Note that you can use the Up and Down buttons (on the right) to sequence triggers in the list. The sequence becomes important only when two triggers execute at the same time; the trigger that is higher in the list will execute first.
Expression Tab
Historical Data - Source Type: Hyper Historian Calculated Tag - Expression Tab
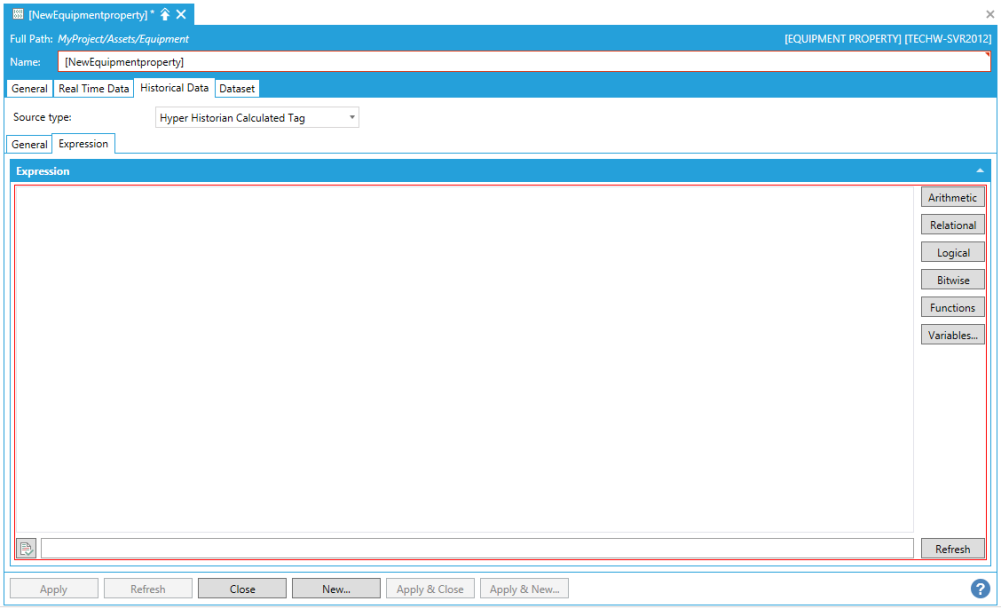
Expression
This tab allows you to create an expression for the calculation. This expression should include the following:
-
The tag or tags whose data is to be used as input to the calculation. This can include values from Hyper Historian tags and signals as well as values from other calculated tags. Clicking the Variables button will open a dialog box that lets you choose any tag that is in the Hyper Historian tree in Project Explorer.
-
The historical time frame from which data is to be taken. The time frame should be relative to the execution date and time determined by the triggers. Do not hard code dates into the expression unless you always want those exact dates to be used for the calculation.
-
Any additional selection criteria to be used.
-
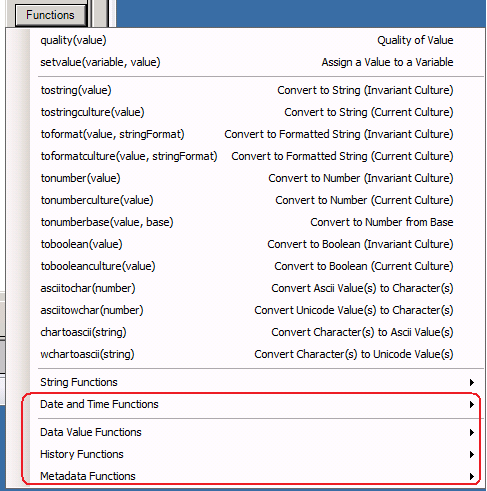
The calculation to be performed. Click the Arithmetic, Relational, Logical, Bitwise, and Functions buttons to incorporate syntactically correct elements into the calculation. Note that, from the Functions button, there are a number of
functions
that are specific to calculated tag logic; you can learn
more about them by going to the Performance
Calculation Functions topic. For tips on writing an
expression and for all other elements that are available
to you, refer to the Expression
Editor topic.
Click the Syntax button ![]() at the bottom of the window to check the logical syntax of the expression.
Make any necessary corrections.
at the bottom of the window to check the logical syntax of the expression.
Make any necessary corrections.
Source Type: Hyper Historian Calculated Simple Events
Historical Data - Source Type: Hyper Historian Calculated Simple Events
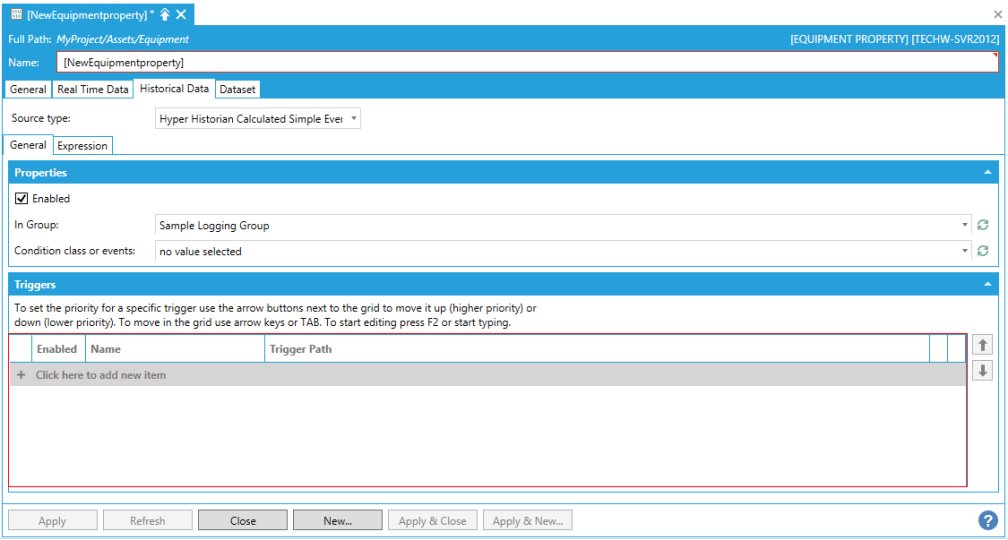
General Tab
Historical Data - Source Type: Hyper Historian Calculated Simple Events - General Tab
Properties
-
Enabled - Click this checkbox to enable the simple event.
-
In Group - Use the pulldown menu to select a group (configured via the Loggers & Groups).
-
Events type - Use the pulldown menu to select from Simple events or Conditions. "Simple events" will generate a simple event in each calculation period, where the result of the expression is not zero and not nologval(). "Conditions" will generate a condition change event whenever the result is different from the last result and is not nologval().
-
Condition class or events - Use the pulldown menu to select an item previously created under the Condition Classes root item. This will map the numerical result from the expression to actual events.
Triggers
-
In this section, add the triggers that determine when the calculations will occur. The triggers that you can add here are calculation triggers that must be predefined as described in the Creating a Calculation Trigger topic. Note that you can use the Up and Down buttons (on the right) to sequence triggers in the list. The sequence becomes important only when two triggers execute at the same time; the trigger that is higher in the list will execute first.
Expression Tab
Historical Data - Source Type: Hyper Historian Calculated Simple Event - Expression Tab
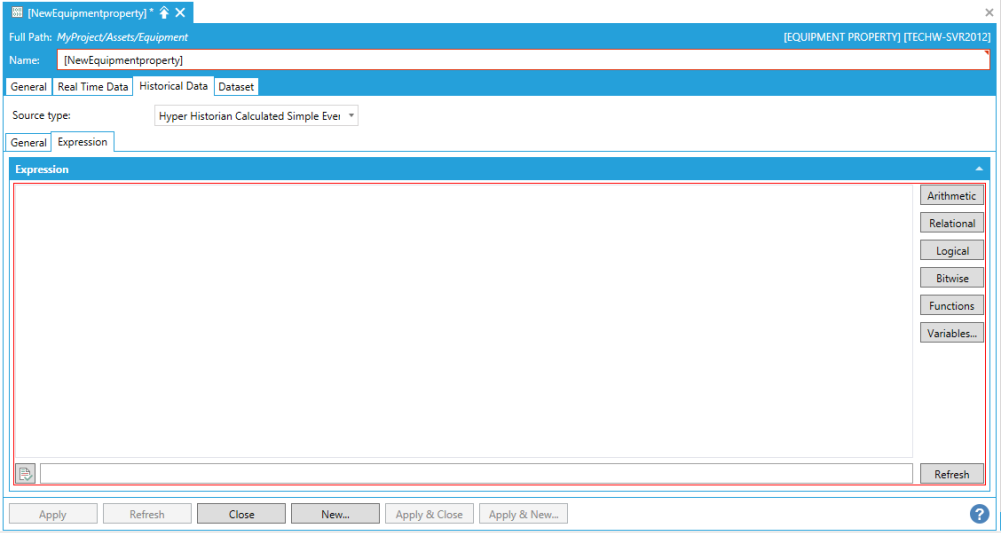
Expression
This tab allows you to create an expression for the calculation. This expression should include the following:
-
The tag or tags whose data is to be used as input to the calculation. This can include values from Hyper Historian tags and signals as well as values from other calculated tags. Clicking the Variables button will open a dialog box that lets you choose any tag that is in the Hyper Historian tree in Project Explorer.
-
The historical time frame from which data is to be taken. The time frame should be relative to the execution date and time determined by the triggers. Do not hard code dates into the expression unless you always want those exact dates to be used for the calculation.
-
Any additional selection criteria to be used.
-
The calculation to be performed. Click the Arithmetic, Relational, Logical, Bitwise, and Functions buttons to incorporate syntactically correct elements into the calculation. Note that, from the Functions button, there are a number of
functions
that are specific to calculated tag logic; you can learn
more about them by going to the Performance
Calculation Functions topic. For tips on writing an
expression and for all other elements that are available
to you, refer to the Expression
Editor topic.
Click the Syntax button ![]() at the bottom of the window to check the logical syntax of the expression.
Make any necessary corrections.
at the bottom of the window to check the logical syntax of the expression.
Make any necessary corrections.
Source Type: Hyper Historian Calculated Condition
Historical Data - Source Type: Hyper Historian Calculated Condition
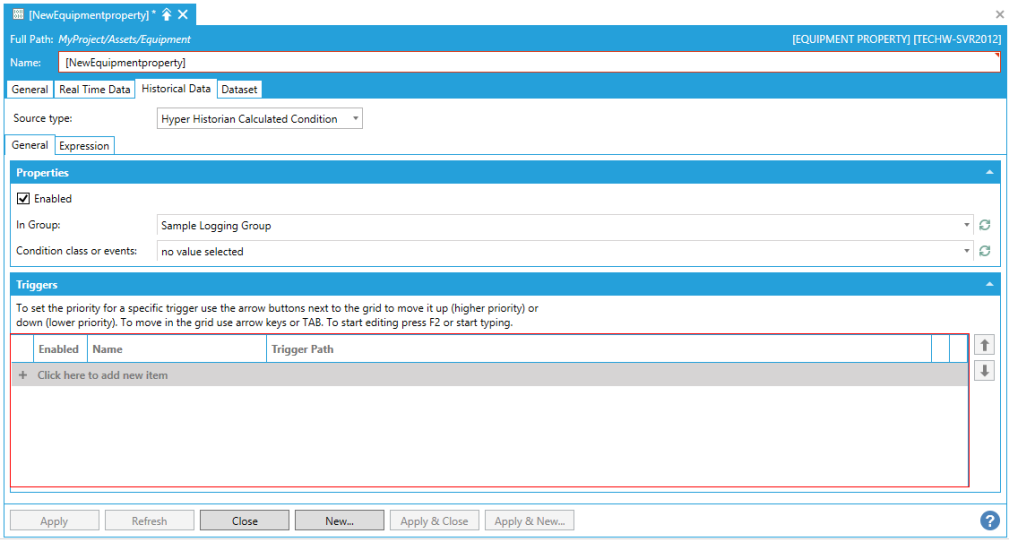
General Tab
Historical Data - Source Type: Hyper Historian Calculated Condition - General Tab
Properties
-
Enabled -Click this checkbox to enable the simple event.
-
In Group - Use the pulldown menu to select a group (configured via the Loggers & Groups).
-
Events type - Use the pulldown menu to select from Simple events or Conditions. "Simple events" will generate a simple event in each calculation period, where the result of the expression is not zero and not nologval(). "Conditions" will generate a condition change event whenever the result is different from the last result and is not nologval().
-
Condition class or events - Use the pulldown menu to select an item previously created under the Condition Classes root item. This will map the numerical result from the expression to actual events.
Triggers
-
In this section, add the triggers that determine when the calculations will occur. The triggers that you can add here are calculation triggers that must be predefined as described in the Creating a Calculation Trigger topic. Note that you can use the Up and Down buttons (on the right) to sequence triggers in the list. The sequence becomes important only when two triggers execute at the same time; the trigger that is higher in the list will execute first.
Expression Tab
Historical Data - Source Type: Hyper Historian Calculated Condition - Expression Tab

Expression
This tab allows you to create an expression for the calculation. This expression should include the following:
-
The tag or tags whose data is to be used as input to the calculation. This can include values from Hyper Historian tags and signals as well as values from other calculated tags. Clicking the Variables button will open a dialog box that lets you choose any tag that is in the Hyper Historian tree in Project Explorer.
-
The historical time frame from which data is to be taken. The time frame should be relative to the execution date and time determined by the triggers. Do not hard code dates into the expression unless you always want those exact dates to be used for the calculation.
-
Any additional selection criteria to be used.
-
The calculation to be performed. Click the Arithmetic, Relational, Logical, Bitwise, and Functions buttons to incorporate syntactically correct elements into the calculation. Note that, from the Functions button, there are a number of
functions
that are specific to calculated tag logic; you can learn
more about them by going to the Performance
Calculation Functions topic. For tips on writing an
expression and for all other elements that are available
to you, refer to the Expression
Editor topic.
Click the Syntax button ![]() at the bottom of the window to check the logical syntax of the expression.
Make any necessary corrections.
at the bottom of the window to check the logical syntax of the expression.
Make any necessary corrections.
Dataset Tab
Dataset Tab in the Equipment Property Settings in AssetWorX
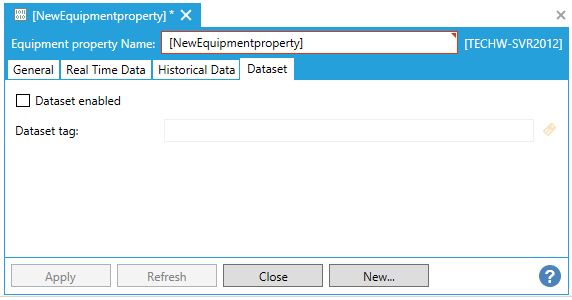
Along with Real Time and Historical data, AssetWorX properties can be used to transport Data Sets.
-
Dataset enabled - Click this checkbox to enable the dataset for the current equipment property.
-
Dataset tag - If the about Dataset enabled checkbox is checked, you can enter a dataset tag in the text entry field or click on the
button to open the
Data Browser and navigate to your preferred dataset tag.
See Also: