Scale Controls
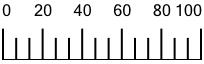
One of the most difficult facets of drawing a gauge or a scale is arranging the face of its dial: spacing the tick marks evenly, and adjusting the marks and numbers can be tricky. GraphWorX64 now provides a preset Scale Control that you can tailor to your own needs. By default, it looks like the scale illustrated below, a linear measure from 0 to 100.
Default Scale Control
![]()
The purpose of a scale control is to provide a shortcut to creating a symbol or object that has a dial, rule, or other type of scale. Such types of objects include gauges, thermometers, scales, clocks or watches, meters, speedometers, visual counters, and so on. You can add a scale control to gauges that you've created. Using the scale control's properties, you can tailor the scale's appearance. For help doing this, refer to Adding a Scale Control to a Symbol or Object, next in this topic.
Adding a Scale Control to a Symbol or Object
To add a scale control to a symbol or object, you must first design it with its used in mind, and then you can add the scale to the object.
-
Open the object or symbol you are adding the Scale Control to.
-
From the GraphWorX64 Controls ribbon, click the Scale Control icon
 then click the GraphWorX64 work surface. A default scale control is added to the work surface.
 -
Drag the handles around the edge of the scale control to enlarge or stretch the scale to a size or shape you want to work with. Settings, such as the size of tick marks and fonts, may hinge on the overall size of the scale you are creating, so it is important to start with a scale of the right size.
-
Go to the scale control's Properties tab, and set the properties to create the scale you need. Refer to Featured Scale Control Properties below for several ways to tailor the scale using the properties in the Numbering, Scale, Text, and Tick Marks property sections.
-
You can also apply effects and styles to the scale by using the options in the Styles and Colors Section of the 2D Home Ribbon in GraphWorX64.
-
Incorporate the scale control into the symbol or object you created it for, and save it as part of the object.
Featured Scale Control Properties
Key properties that are unique to the Scale Control or important to shaping its appearance are described below.
-
Show/Hide numbers. To remove numbers from the scale, set the ShowNumbering property to False. Note that if numbers are missing on the scale, it may be because of the ShowNumbering property, or it may be that the NumberFrequency or NumberingStretch property is to 0 (zero). To fix a problem of missing numbers, make sure all three of these properties are set correctly.
-
Range. To change the range of numbers (the default is 0 to 100), use the LowLimit and HighLimit properties. You can enter numbers for these limits, but you can also enter data sources for them, too. This gives you the power to set limits dynamically, and use aliasing in a way that lets you create a generic scale that can be used in multiple contexts.
-
Reverse numbering. To reverse the sequence in which the numbers appear, change the ReverseNumbering setting. Options are True and False(the default). By default, numbers increment from left to right, from top to bottom, and clockwise.
-
Frequency of numbers. To change the frequency of numbers that label the scale, increase the NumberFrequency. To label every major tick, enter 1. To label every other major tick, enter 2. To label every third tick, enter 3. And so on.
-
Decimal places. To add decimal positions to the numbers on the scale, use the DecimalPlaces property. By default, there are no decimals (0), but you can specify the number of decimal places you need. For example, entering 5 includes five decimal places in each number on the scale, such as 0.00000.
-
Number width. You can control the width of numbers by using the NumberingStretch property. Enter 1 for a normal number width, or 2 or 3 or higher for wider numbers. The illustration below shows the number 60 with a property of 1, 2, and 3, from left to right. The number you enter will depend on the scale you are creating. Note that entering 0 removes numbers.
Three Examples of Number Width
-
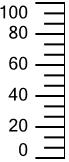
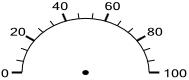
Orientation of the scale. Use the ScaleType property to make the scale horizontal, vertical or radial. The default is Horizontal. Changing the orientation may require you to drag the handles to re-size and reshape the scale. The three scale types look like this:
|
Horizontal:
|
Vertical:
|
Radial:
|
-
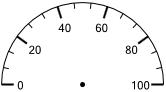
Tick mark and number placement. To change the orientation of the tick marks and numbers, use the ScaleCentering property. The four options are illustrated below on a radial scale. For a vertical scale, the outside orientation is to the scale's left while inside is to its right. For a horizontal scale, outside is above the scale while inside is below.
|
Inside:
|
MiddleInside:
|
MiddleOutside:
|
Outside:
|
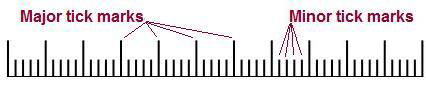
- Tick marks on the scale. Specify the number of major and minor tick marks in the scale by setting the MajorDivisions and MinorDivisions properties. The scale illustrated below has 20 major tick marks and 4 minor tick marks between major ones, so its property settings are 20 and 4 respectively.
Tick Mark Divisions
-
Tick mark appearance. Use properties in the Tick Marks section to set the length, thickness, and color of major and minor tick marks.
-
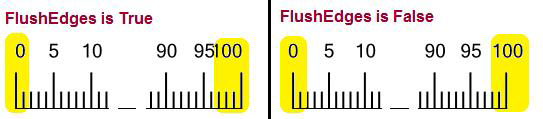
Number alignment. The alignment of the first and last numbers on the scale is determined by the FlushEdges property. When you set this property to True, the edge of the scale is flush with the edge of the control; in order to do this, the beginning and ending numbers (highlighted in the illustration below) are also flush with the ends of the scale. When you set this property to False, the beginning and ending numbers are centered over the beginning and ending tick marks and, therefore, the scale will not be flush with the control in which you place it. (This property is not available for the Radial type of scale.)
Settings for the FlushEdge Property
-
Appearance of the numbers. Use properties in the Text section to define the look of fonts used in the Scale Control. You can choose the FontFamily, FontSize, FontStyle (to use italics), FontWeight (to use bolding).
Note: To stretch the numbers, use the NumberingStretch property. Ignore the FontStretch property.
-
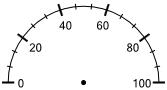
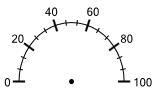
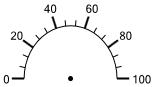
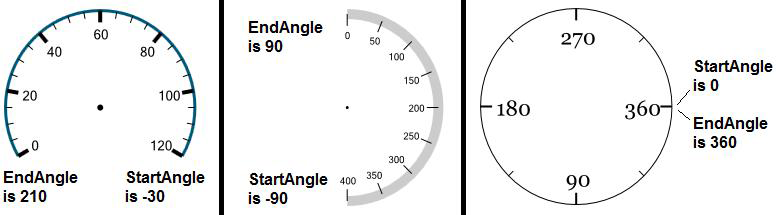
Radial scale's angle. If the scale type is Radial, you can use the StartAngle and EndAngle properties to specify the beginning and ending angles of the scale. By default, the StartAngle and EndAngle properties are 0 and 180 respectively. The StartAngle of 0 is stands at 3 o'clock and rotates counterclockwise to 12 'oclock (90 degrees), 9 o'clock (180 degrees), 6 o'clock (270 degrees), and back to 3 o'clock (360 degrees). (If you want numbers to increase in the opposite direction, change the True or False value of the ReverseNumbering property.) Three examples are provided below, and the one on the right illustrates the degrees of the angles used in the Scale Control. To flip the arc to a mirror of its current orientation, change the True or False value in the FlipArc property.
Three Examples of Angle Settings
-
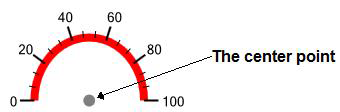
The back line. To change the appearance of the back line, use the BackLineThickness property to control the thickness of the line and the BackLine property to control its color and gradient. The sample below illustrates a thick, red back line.

-
Radial center point. If you're working with a radial scale, you can also use the CenterPointRadius and CenterPoint properties to control the center point. In the following illustration, the CenterPointRadius is 2, and the CenterPoint color is gray.
See also: