Camera Control
The Camera Control in the GraphWorX64 viewer allows users to include output from a networked camera within their display. Before configuring, please be sure IcoCameraService (Services > IcoCameraService) is running. It may be necessary to configure Camera Credentials in the Platform Services insert (Platform Services Configuration > Source > Realtime Subscription) for proper configuration. Within Camera Credentials, create a new record (FWX <-> Camera) and specify camera URL, user name, and password.
The Camera Control supports cameras that can stream in these formats:
-
MJPEG
-
JPG
-
RTSP (H.264)
-
RTSP (H.265)
-
Note: Recommendations for using the RTSP (H.265) format are an i7 equivalent or better processor and a GTX10 series equivalent or better GPU.
The following chart shows which formats are compatible with which application platform.
|
Application Platform |
RTSP (H.265) |
RTSP (H.264) |
MPEG |
JPG |
|
WPF |
l |
l |
l |
l |
|
HTML5 |
|
|
l |
l |
To Use This Item, Select the Camera Control Icon from the Controls Ribbon.
VideoWorX Ribbon

VideoWorX
-
Configure -Clicking this button opens the separate Configuration window, similar to double-clicking on the control itself in the canvas.
Controls
-
Volume -Show volume control next to the video.
-
PTZ -Show pan/tilt/zoom controls within the video control.
-
Control Box -Show the playback controls under the video.
Video
-
Flip Horizontally -Flip the camera image horizontally.
-
Flip Vertically -Flip the camera image vertically.
PTZ
-
Flip Pan -Inverts the Pan direction.
-
Flip Title -Inverts the Tilt direction.
Volume
-
Mute -If set to True, the control will be muted by default.
Once you select the Camera Control icon from the Controls Ribbon, your cursor will now become a cross hair. Use the cross hair to draw the perimeter of the Camera Control on the display. Your Camera Control will now be visible.
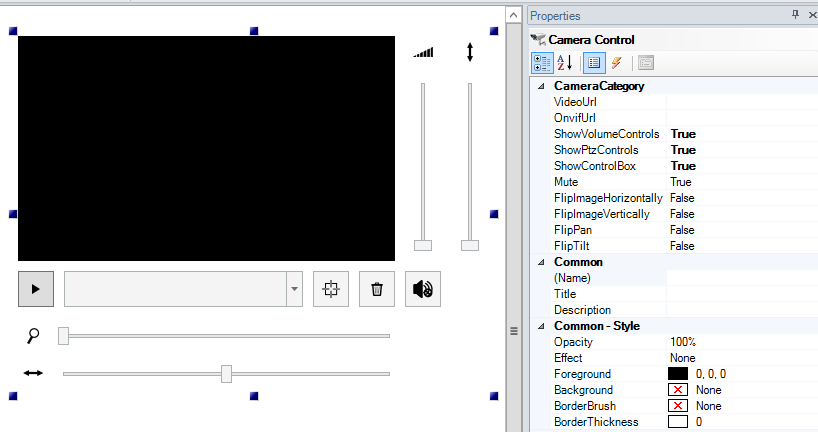
Camera Control Added
Camera Control Object Properties
The BridgeWorX64 Viewer properties can be configured either through the Configuration window, shown below, or via the Properties section of the Workbench on the right side of the GraphWorX64 window.
Configuration Through the Camera Control Configuration Window
GENERAL
Camera Control Configuration Window - GENERAL Tab
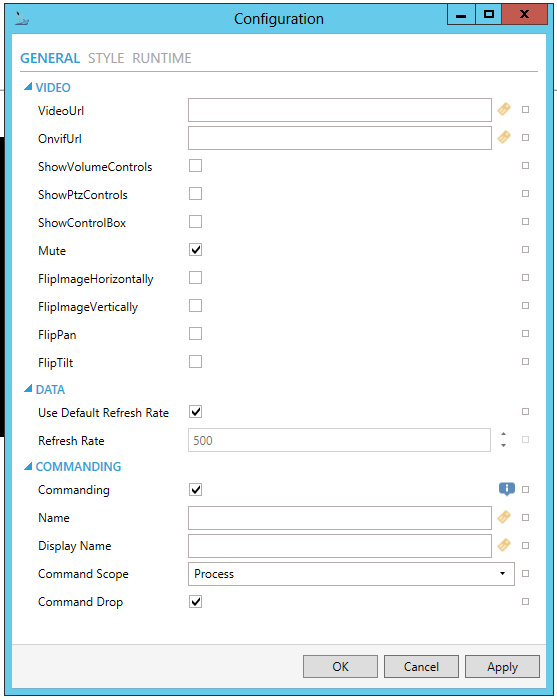
VIDEO
-
VideoURL -Video source URL. It must point to a RTSP or MJPG stream.
-
OnvifUrl -Onvif URL. It must point to a URL where the ONVIF on the camera is listening. Click HERE for more info on using ONVIF cameras with the Camera Control.
-
ShowVolumeControls -Show volume controls next to the video.
-
ShowPtzControls -Show PTZ controls next to the video.
-
ShowControlBox -Show the playback controls under the video.
-
Mute -If set to true, the control will be muted by default.
-
FlipImageHorizontally -Flips the camera image horizontally.
-
FlipImageVertically -Flips the camera image vertically.
-
FlipPan -Inverts the Pan direction.
-
FlipTilt -Inverts the tilt direction.
DATA
-
Use Default Refresh Rate -Use default refresh rate or refresh rate inherited from parent container.
-
Refresh Rate -Data refresh rate of data sources defined for properties, in milliseconds. Do not modify if you intend to use local variables for sharing data with other controls, e.g. selected asset or current time range.
COMMANDING
-
Commanding -Determines whether commands are enabled for this display. Use the CommandingName setting to specify a registration name.
-
Name -Name used for registering the control for commanding.
-
Display Name -User friendly control name.
-
Command Scope -Indicates whether commands sent and received by this display affect the current process only (Process) or all processes that are currently opened (Machine). For inter-process commanding, use the Machine option.
-
Command Drop -True to enable receiving commands by drag and drop.
STYLE
Camera Control Configuration Window - STYLE Tab
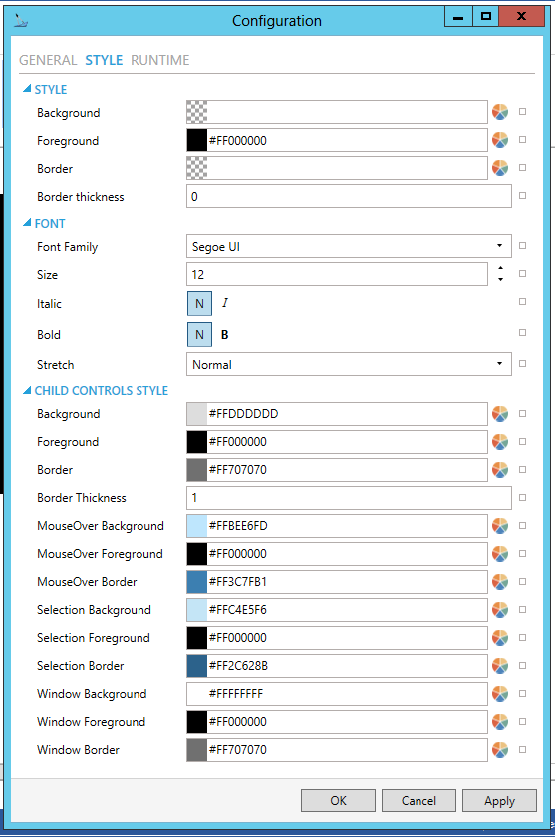
STYLE
-
Background - Background color, gradient or pattern of this object. You can enter a color code (if known) in the text entry field or click on the
 button to open the Brush Picker window and set the properties for
your background
button to open the Brush Picker window and set the properties for
your background -
Foreground - Foreground color, gradient or pattern of this object. You can enter a color code (if known) in the text entry field or click on the
button to open the Brush Picker window and set the properties for
your foreround. -
Border - Color, gradient, or pattern of the border surrounding this object. You can enter a color code (if known) in the text entry field or click on the
button to open the Brush Picker window and set the properties for
your border. -
Border thickness - Width of the border surrounding this object. Enter a thickness in the text entry field.
FONT
-
Font Family - Specifies the name of the font used to render text. Use the pulldown menu to select from installed fonts.
-
Size - Specifies the size of the font used to render text. Enter a font size in the text entry field or use the up/down buttons.
-
Italic - Specifies the style of the font used to render text (italic). Select "N" for Normal or "I" for Italic.
-
Bold - Specifies the thickness of the font used to render text (bold) Select "N" for Normal or "B" for Bold.
-
Stretch - Specifies whether a font appears with a typical width (Normal) narrower than usual (Condensed), or wider than usual (Expanded). Use the pulldown menu to make your selection.
CHILD CONTROLS STYLE
-
Background - Background brush of child controls. You can enter a color code (if known) in the text entry field or click on the
button to open the Brush Picker window and set the properties for
your background. -
Foreground - Foreground brush of child controls. You can enter a color code (if known) in the text entry field or click on the
button to open the Brush Picker window and set the properties for
your foreground.
-
Border - Border brush of child controls. You can enter a color code (if known) in the text entry field or click on the
button
to open the Brush Picker window and set the properties for your border.
-
Border Thickness - Border thickness of child controls. Enter a thickness in the text entry field.
-
MouseOver Background - Background brush of child controls under mouse cursor. You can enter a color code (if known) in the text entry field or click on the
button to open the Brush Picker window and
set the properties for your mouseover background.
-
MouseOver Foreground - Foreground brush of child controls under mouse cursor. You can enter a color code (if known) in the text entry field or click on the
button to open the Brush Picker window and set the properties for
your mouseover foreground.
-
MouseOver Border - Border brush of child controls under mouse cursor. You can enter a color code (if known) in the text entry field or click on the
button to open the Brush Picker window and set the properties for
your mouseover border.
-
Selection Background - Background brush of selected child controls. You can enter a color code (if known) in the text entry field or click on the
button to open the Brush
Picker window and set the properties for your selection background.
-
Selection Foreground - Foreground brush of selected child controls. You can enter a color code (if known) in the text entry field or click on the
button to open the Brush
Picker window and set the properties for your selection foreground.
-
Selection Border - Border brush of selected child controls. You can enter a color code (if known) in the text entry field or click on the
button to open the Brush Picker window and set the properties for
your selection border.
-
Window Background - Background brush of child control windows. You can enter a color code (if known) in the text entry field or click on the
button to open the Brush
Picker window and set the properties for your background of child
control windows.
-
Window Foreground - Foreground brush of child control windows. You can enter a color code (if known) in the text entry field or click on the
button to open the Brush
Picker window and set the properties for your foreground of child
control windows.
-
Window Border - Border brush of child control windows. You can enter a color code (if known) in the text entry field or click on the
button to open
the Brush Picker window and set the properties for your border of
child control windows.
RUNTIME
Camera Control Configuration Window - RUNTIME Tab
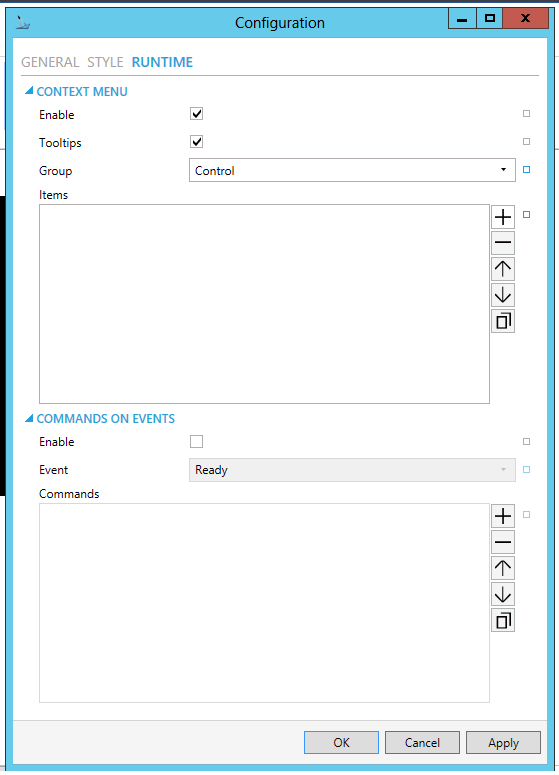
CONTEXT MENU
-
Enable - True to enable context menu on right click. Click the checkbox to enable context menu on right-click in the control. You can also click on the
 button to reset the current setting.
 -
Tooltips - Enables tooltips on hover in context menu items.
-
Group - Select context menu group for editing. Use the pulldown menu to select from any existing context menu group. You can also click on the
button to reset the current setting. -
Items - Allows users to add items to a collection based on the selected Context Menu Group. Click on the plus sign [+] to add an item to the list. Click on the minus sign [-] to remove a listed item. Click on the up arrow to move a selected item higher in the list. Click on the down arrow to move a selected item lower in the list. Click on the
 button to duplicate a selected entry in the list.
Control
-
Separator - Horizontal separator to separate groups of context menu items.
-
Custom Command - Custom command that can be configured to run any command with custom parameters.
-
Command - Use the pulldown menu to select the Command you wish to include as a Context Menu Item. Click HERE for more info on Commands in GraphWorX64.
Video
-
Custom Command - Custom command that can be configured to run any command with custom parameters.
-
Command - Use the pulldown menu to select the Command you wish to include as a Context Menu Item. Click HERE for more info on Commands in GraphWorX64.
-
Display Name - Set the name displayed in configuration collection. Enter a Display Name in the text entry field. Click on the
 button
to open the Data Browser to set any required Language Alias. You can
also click on the button
to reset the current setting.
button
to open the Data Browser to set any required Language Alias. You can
also click on the button
to reset the current setting. -
Description - Set the description displayed in tooltip in configuration collection. Enter a Description in the text entry field. Click on the
button to open the Data
Browser to set any required Language Alias. You can also click on
the button to reset the current setting.
[For Custom Command selection]
-
Command - The command associated with the control. Use the pulldown menu to select from available commands. See the Commanding topic for command definitions. You can also click on the
button to reset the current
setting.
COMMANDS ON EVENTS
Note: The Camera Control is one of many controls that now supports executing commands on events. These events vary per control, but for the Camera Control they include:
-
Ready
-
Started
To configure the command to be executed when this event occurs, go to Runtime tab. Find the Commands on Events section, check Enable Commands on Events, then configure the form below.
-
Enable - True to enable configuring actions and commands for control events.
-
Event - Select a control event and configure actions to fire when the event occurs. Use the pulldown menu to select from Busy, Ready, Row Selected, or Started.
-
Commands - List of commands to perform when selected control event occurs. Click on the plus sign [+] to add an item to the list. Click on the minus sign [-] to remove a listed item. Click on the up arrow to move a selected item higher in the list. Click on the down arrow to move a selected item lower in the list. Click on the
button to duplicate a selected entry in the list. For any Custom Command
selected in the list, you can then select a specific Command and then
complete the associated properties for that command. Click
HERE for more info on Commands in GraphWorX64.
Camera Control Object Properties
The right side of the screen will now display the Camera Control Properties. Camera Controls have a number of standard properties such as Measurements and Text, but also have a number of unique properties listed under Camera Category, as shown above.
CameraCategory
-
VideoURL - The Video Source URL. This must point to a RTSP (h264) or MJPG (Motion JPEG) stream.
-
OnvifUrl - This must point to a URL where the ONVIF server on the camera is listening.
-
ShowVolumeControls - In Runtime mode, 'True' means the volume controls will be shown next to the video feed.
-
ShowPtzControls - In Runtime mode, 'True' means the Pan/Tilt/Zoom controls will be visible with the video feed.
-
ShowControlBox - In Runtime mode, 'True' means the playback controls will be shown under the video feed.
-
Mute - In Runtime mode, 'True' means the audio from the control will be muted by default.
-
FlipImageHorizontally -Flip the image horizontally.
-
FlipImageVertically - Flip the image vertically.
-
FlipPan - Flip the PTZ (pan/tilt/zoom) pan direction.
-
FlipTilt -Flip the PTZ (pan/tilt/zoom) tilt direction.
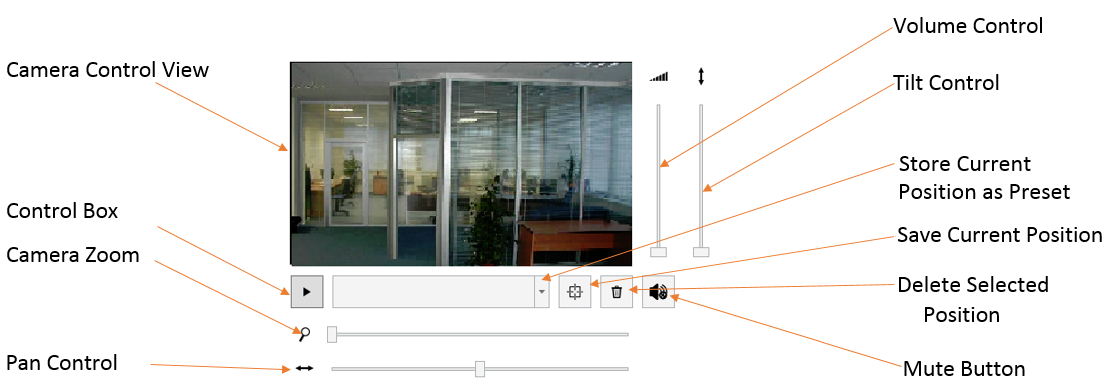
Preset Mode
Camera Control allows for a user to specify positions with
configurations that can be recalled in the Camera Control at any time.
Selecting the  button will store your current position
as a preset location. After naming the preset position, the exact camera
configuration can be replicated at any time by selecting the preset location
name from the preset position scroll-down menu.
button will store your current position
as a preset location. After naming the preset position, the exact camera
configuration can be replicated at any time by selecting the preset location
name from the preset position scroll-down menu.
Camera Control Preset Mode
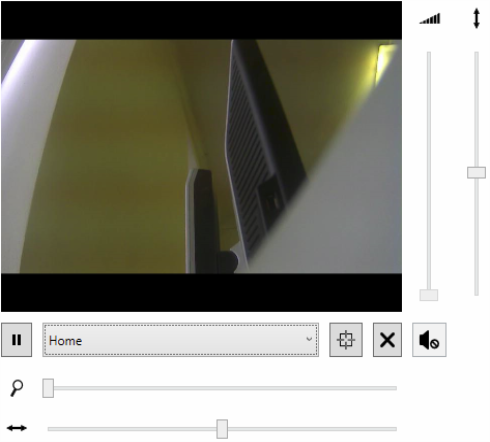
Creating Presets:
Note: Before creating a preset, ensure that you have a camera that supports creating presets (ideally an Axis, Bosch or Planet one).
-
Insert a Camera Control into your GraphWorX64 display.
-
Enter your VideoURl.
-
Enter "OnvifURL".
Your URL looks like this: http://<IP_of_the_camera>/onvif/device_service
Note: This may vary depending on the camera's manufacturer and the camera's configuration. -
Set your ShowControls property to True.
-
Go to Runtime.
-
Aim the camera and hit the cross button next to the combo box.
-
Name your preset, and confirm it by clicking on the check mark.
Your preset appears amongst the other presets in the combo menu.
Execute Commands on Events
The Camera Control is one of many controls that now supports executing commands on events. These events vary per control, but, for the Camera Control, they include:
• Ready
• Started
To configure the command to be executed when this event occurs, go to Runtime tab. Find the Commands on Events section, check Enable Commands on Events, then configure the form below.
Using Camera Control with HoloLens (UWP app only)
HoloLens supports any USB integrated webcam or device with DirectShow support. The DeviceName parameter must include the URL encoded FriendlyName. If the parameter is not specified, HoloLens chooses the first enumerated video device connected to the PC.
Users can input a URL like http://<ip_of_the_camera>/jpg/video.jpg to continuously query the image for updates. This allows JPG and page refreshing cameras that only support streaming to function with the program as well.
Note: HoloLens support is limited to HoloLens 1 (first generation) only.
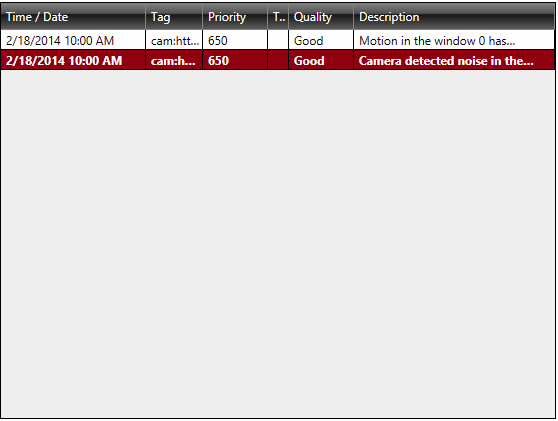
Motion/Sound Detection Alarms
Camera Control also supports the ability to motion and audio alarms using the camera control in GraphWorX. If the connected camera supports ONVIF and motion detection, the Camera Control can be tied in with AlarmWorX to report alarm detections through any AlarmWorX viewer.
To configure the camera for motion or audio detection, use the following alarm configurations in the AlarmWorX Configuration:
-
cam:http://cameraURL/ONVIF/device_service\detectors
-
cam:http://cameraURL/ONVIF/device_service\detectors\motion - specific to motion detection
-
cam:http://cameraURL/ONVIF/device_service\detectors\audio - specific to audio detection
Camera Control Alarm Detection
Play or Pause Video Feedback with Commanding
Previously, users who wanted a way to play or pause the camera control's playback would need to use global aliases for the video URL and set the alias to null to "pause" it. This had a side effect of causing errors in the camera control.
Now, the SetFreezeMode command has been enhanced to play or pause the camera control's video. Set the camera control as the command target. The freeze action pauses the video, the unfreeze action plays, and the toggle action toggles between the two.
Creating Motion/Sound Detection Alarms
Note: Before creating an alarm, ensure that you have a camera that supports motion and noise events.
-
Insert a Camera Control into your GraphWorX64 display.
-
Enter your VideoURl.
-
Enter "OnvifURL".
Your URL looks like this: http://<IP_of_the_camera>/onvif/device_service
Note: This may vary depending on the camera's manufacturer and the camera's configuration. -
Set your ShowControls property to True.
-
Go to Runtimemode.
-
Aim the camera and hit the cross button next to the combo box.
-
Name your preset, and confirm it by clicking on the check mark.
Your preset appears amongst the other presets in the combo menu. -
Return to Configuration mode.
-
Insert an AlarmWorX64 Viewer into the display.
-
Double-click the AlarmWorX64 Viewer to bring up the Configure your Control popup menu.
-
From here, click the Grid button. This automatically opens the Source tab.
AlarmWorX64 Viewer Grid - Source Tab

-
Click on the Green Cross to open the subscription drop-down menu.
-
Select the "Real Time Subscription" tab.
-
Manually input either, cam:http://<Ip_of_the_camera>/onvif/device_service\Detectors\MotionDetection,cam:http://<Ip_of_the_camera>/onvif/device_service\Detectors\AudioDetection or cam:http://<Ip_of_the_camera>/onvif/device_service\Detectors for both of the fields labeled "New Subscription".
-
Enter Runtime mode.
See Also: