Import
The Import button within the File menu, allows the user to import GPS (global positioning system) information stored in a .GPX file. Use such imported information to establish waypoints, routes, and tracks on the map.
Before you import data from a .GPX file, set the zoom level to an appropriate level that geographically accommodates the routes or tracks being imported. For example, if you are importing airplane routes, set the map to a zoom level that shows the routes in the view; if you are showing city routes, set the zoom level to a street level that displays the routes you are importing. Save your display before you import because you may want to experiment with the import function and review the results before saving them.
File - Identifies the .GPX file from which data is to be imported onto the map.
Conversion Settings - Determines how you want imported information to be represented on the map.
-
Convert Waypoints to - Specify whether each Waypoint will display as a Pushpin or as some other image. A generic Pushpin loads waypoints as red Pushpins; you can alter the appearance of the Pushpins after the data has loaded. (Waypoints are the geographic positions that define a planned route.) Alternatively, you can copy an image into your clipboard, and then select the A Copy of the Clipboard option to use it for waypoints on the map.
-
Convert Routes to - If you are importing GPX routes, choose an option. (A route is a GPX guide of a planned path to be traveled. The path is defined by a series of waypoints; the route connects the waypoints.)
Polyline (the default option) creates routes using lines, while Polygon creates a closed-loop geometric shape that is shaded. Select Polygon if you want a closed-loop route to be shaded in a color of your choosing. Note: This option may close a route that is not actually a loop, so use the Polygon option sparingly.
-
Convert Tracks to - If you are importing GPS tracks, choose an option. (A track is a GPX record of a course that has been traveled.)
Polyline (the default option) creates tracks using lines, while Polygon creates a closed-loop geometric shape that is shaded. Select Polygon if you want a closed-loop track to be shaded in a color of your choosing. Note: This option may close a track that is not actually a loop, so use the Polygon option sparingly.
Polygons and Polylines - Determines the appearance of the routes and tracks on the map.
-
Use this color for all polygons and Use random color for each polygon - These options determine the color of the polygon fill. If you are converting data to polygons, specify whether you want to use one color for all polygons or a random color for each polygon. Click the color box to choose a color.
-
Stroke and Stroke Thickness - Choose the color and line thickness of the lines that will be drawn for routes and tracks.
Other - Show the Description in the tooltip is selected by default so that path descriptions display as tooltips in the display. If you don't want descriptions to display as tooltips, deselect this checkbox.
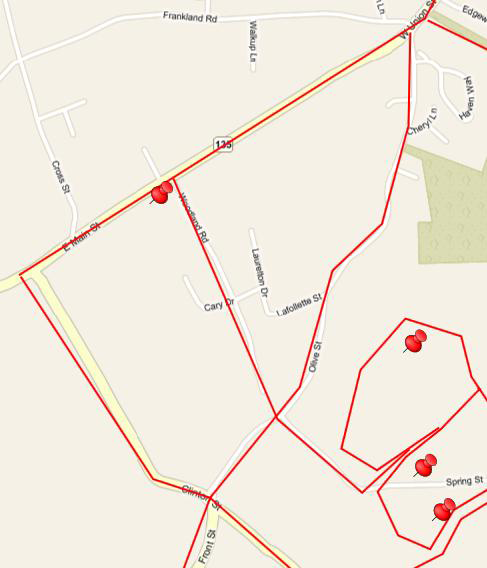
Routes imported as Polylines. Note how, when the routes are imported as polylines, map features display because the routes are drawn as lines.
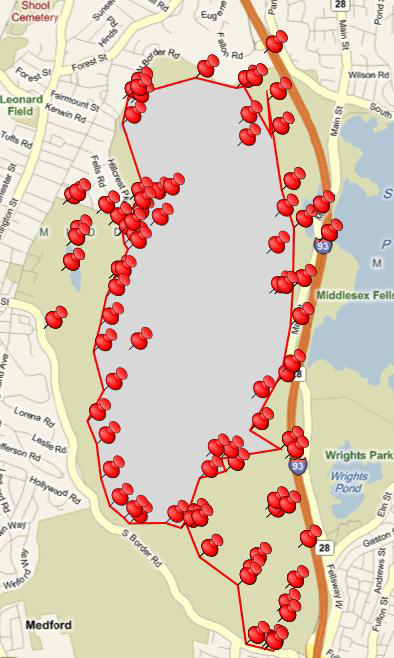
Routes imported as Polygons. If a route is a closed loop, you might want to import it as a Polygon. Note that the polygon is grayed; as a result, no map features are displayed inside the loop.
See Also:
EarthWorX Configuration Ribbon
Map Type Section on the EarthWorX Configuration Ribbon
Map System Section of the Earth WorX Ribbon
Map Information Section on the EarthWorX Ribbon