Defining Alarm Inputs
After adding a new alarm type and entering the information in the General tab, the Inputs tab is where you define a set of values needed to create specific alarm behaviors or conditions for alarm sources that use the alarm type. Input values specify source data point(s), limits, and other settings. The input values you define become the alarm parameters for the alarm tag. See Alarm Types Overview for additional information.
 Input values in the left pane appear empty if you create a new alarm type. You can add input values in two ways:
-
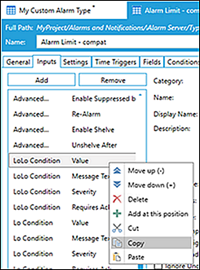
Right-click on an existing alarm type, such as Digital, Hi Limit, Lo Limit, or Limit, select the Inputs tab , and select an input values in the left pane,
 right-click to copy alarm category and paste the input value into the left pane of the new custom alarm type.
 - Add and define all the input values needed for the new alarm type (see the procedure.)
To define input values for an alarm type:
- Click the Inputs tab.
- Click the Add button in the left pane to create a new input value or select an existing input value.
- Type the Category name or click the tag
 button to select a
  predefined/localized category.
 - Type the new input value identifier in the Name text box. This is unique input value identification used inside alarm type configuration.
- Either type the Display Name to define the category or click the tag
 button to select a predefined category. For example, if you select Value, this input parameter appears as the display name for the alarm source.
 - (Optional) Type the alarm type input function in the Description text box. Information entered becomes a tooltip for the alarm source input.
- Select the
 appropriate Input Type from the drop-down menu. The input type you select enables additional inputs.
 - Complete following inputs enabled based on the Input Type selection (step 7):
- Constant Typeallows you to select the data type from the drop-down menu. For example, string, boolean, integer, or floating point value.
- Browser Type indicates how alarm values and the alarm source get displayed in the data browser.
- None implies default value is a simple text box to type whatever information is necessary.
- File Browser allows you to select a file.
- Language Aliases allows text entry or a function using a language alias browser.
- Default Value allows you to type the value or select the tag
 button to define the default value. The value appears blue in the alarm source.
 - Review Expression applies to the Adjustable input type, allowing you to make sure values are between some maximum and minimum values.
- Select the following data change trigger checkboxes that apply:
- As Main Input. Applies to AssetWorX™ integration with Hyper Alarm Server where the value only uses the related property input data point (real time or historical) and does not directly appear as part of the AssetWorX property configuration.
- Use as Trigger. The system checks for data value changes and then runs the expression associated with the specified condition states (on the Conditions tab.)
- Ignore Bad Quality. Ignores bad quality alarm parameter values and continues processing.
- Ignore Uncertain Quality. Ignores any uncertain alarm parameter values and continues processing.
What's Next?
