PowerShell Quick Start
PowerShell commands can be used to configure the backend of your project. Workbench has a PowerShell module for each provider. Every module allows you to perform the following actions in the configuration databases:
-
Create entities
-
Read entities
-
Update entities
-
Delete entities
Getting Started
Open the Windows Start menu and type “Windows PowerShell ISE”. This tool allows you to write PowerShell commands directly in the command line or create scripts and save them as .ps1 files.
Our first command will be:
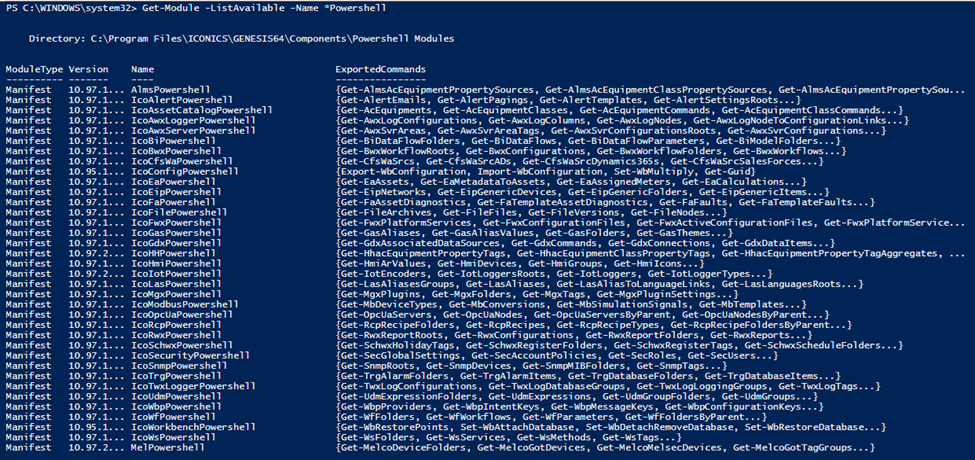
Get-Module - ListAvailable - Name *Powershell
A list of modules that support PowerShell commands will be shown.
Available Workbench PowerShell modules

To get a closer look at the commands each module supports, type:
Get-Command -Module IcoHHPowershell
In the example above, a series of Hyper Historian configuration commands will be listed.
Available commands in IcoHHPowerShell module

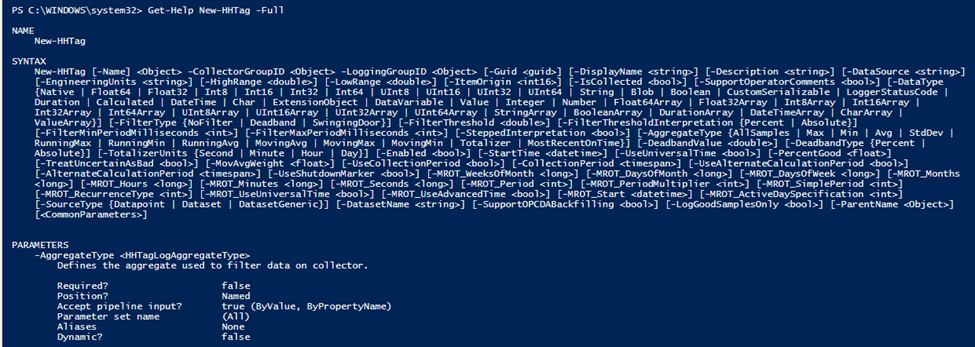
For each PowerShell command, it is possible to show help information. The following command will show the full parameter definition of the New-HHTag command:
Get-Help New-HHTag –full
Full Help for New-HHTag command

The New-HHTag command will create a new Hyper Historian tag, and this Get-Help command will list all of the possible parameters New-HHTag, along with a short description and which ones are mandatory.
We can create a new historical tag for Hyper Historian using an existing collector and logging group with the following three commands:
$CollectorGrp_key = (Get-HHCollectorGroup 'Collector Group (1 second)').Key
$LoggingGrp_key = (Get-HHLoggingGroup 'Sample Logging Group').Key
New-HHTag -Name Sine -CollectorGroupID $CollectorGrp_key -LoggingGroupID $LoggingGrp_key -DataSource '@sim64:Float.Sine(10,-5.0,5.0,62).Value'
For the New-HHTag command, the CollectorGroupID and LoggingGroupID parameters are mandatory. They both take an EnitityUniqueKey. We used the Get-HHCollectorGroup and Get-HHLoggingGroup commands to get the key for our desired collector and logging groups. We stored those keys into two variables, $CollectorGrp_key and $LoggingGrp_key, then passed those keys into the New-HHTag command.
Security
Workbench’s PowerShell interface supports ICONICS Security. If the logged-in user is not allowed to delete or modify the configuration, they will get a message that this command is not allowed. (If a user does not have permission to take an action in standard Workbench, they will be not be able to perform the action using PowerShell commands either.)
Workbench PowerShell Security

Remote Server Configuration
As in the usual Workbench environment, it is possible to configure a remote Server using PowerShell. The following command will show the current Workbench host:
Get-WbHost
This command will change to a different Workbench host:
Set-WbHost COMPUTERNAME
After running Set-WbHost, every subsequent configuration command will now apply to the remote Workbench’s configuration.
Pipeline and Key Support
Workbench PowerShell supports key variables, so you can store configuration information in a key variable and use it for other commands.
This example will get a global alias named BuildingIdent, which has the ID 2 in the sample configuration database, and store it to a key variable for future use:
$alias_key = New-WbKey -TypeName GasAlias -Id 2
Now, because we have stored the global alias as a key, these two commands should have the same result:
Get-GasAlias $alias_key
Get-GasAlias BuildingIdent
It is possible to pipeline the result of one command and use it in a second command. This example loads the configuration of the global alias named Building and selects its ThemeID property:
Get-GasAlias Building | Select-Object -Property ThemeID
Script Examples
Workbench PowerShell supports Scripts, which can be saved as .ps1 files. These Scripts can be used to automate your configuration process. The following are some script examples.
Create ten new Global Aliases:
for($i=1; $i -le 10; $i++)
{
$alias_name = 'Alias_' + $i
New-GasAlias $alias_name
}
Create a new user in the security configuration and set its permission:
# importing the cryptography module
Import-Module ”C:\Program Files\ICONICS\GENESIS64\Components\IcoSecurityCryptography.dll”
# getting the date
$utcDate = [System.DateTime]::UtcNow
# creating a password
$password = [Ico.Security.Cryptography.PasswordHashing]::SaltAndHash("a")
# getting the default policy
$default_policy_key = New-WbKey -TypeName SecAccountPolicy -Id 1
# getting the configuration key
$global_setting_key = New-WbKey -TypeName SecGlobalSetting -Id 1
# disabling the security
Set-SecGlobalSetting $global_setting_key -SecurityEnabled 0
# creating a new user
New-SecUser Paolo -AccountPolicyID $default_policy_key -CreateDate $utcDate
# setting the permissions
New-SecUserAcl -ParentName Paolo -AllowDeny 1 -Type ApplicationAction -Path '*' -Mask 1
New-SecUserAcl -ParentName Paolo -AllowDeny 1 -Type DataPoint -Path '*' -Mask 3
New-SecUserAcl -ParentName Paolo -AllowDeny 1 -Type Alarm -Path '*' -Mask 1
New-SecUserAcl -ParentName Paolo -AllowDeny 1 -Type File -Path '*' -Mask 7
New-SecUserAcl -ParentName Paolo -AllowDeny 1 -Type Station -Path '*' -Mask 1
New-SecUserAcl -ParentName Paolo -AllowDeny 1 -Type Custom -Path '*' -Mask 1
New-SecUserAcl -ParentName Paolo -AllowDeny 1 -Type Method -Path '*' -Mask 1
New-SecUserAcl -ParentName Paolo -AllowDeny 1 -Type Asset -Path '*' -Mask 3
New-SecUserAcl -ParentName Paolo -AllowDeny 1 -Type MobileLayout -Path '*' -Mask 3
# setting its password
New-SecPassword -ParentName Paolo -PasswordHash $password -CreateDate $utcDate
# re-enabling the security
Set-SecGlobalSetting $global_setting_key -SecurityEnabled 1
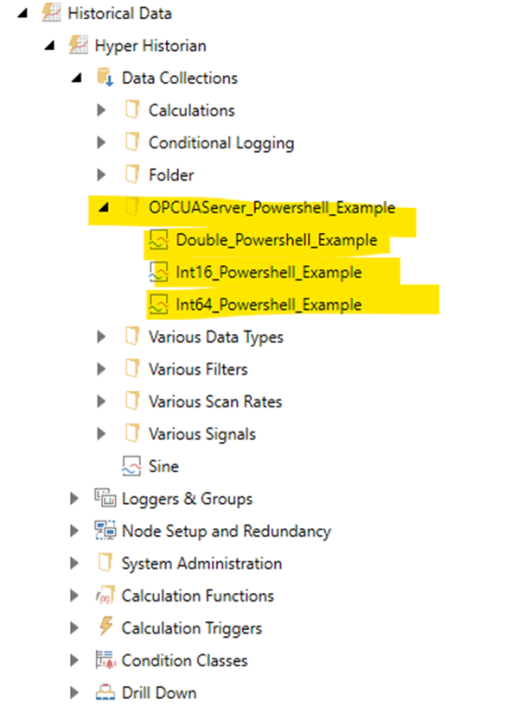
Create a network alias for an OPC UA Server and three historical Hyper Historian tags for data logging:
#Creating FrameWorX UA Network Alias
New-FwxOuterServer -Name OPCUATEST -PrimaryEndPointUri "opc.tcp://OPCSERVER:48010 - [None:None:Binary]"
#creating a HH Tags folder
New-HHFolder OPCUAServer_Powershell_Example
# creating the logging group
$logging_group = New-HHLoggingGroup LoggingGroup -ParentName 'Data Logger'
# getting the collector pair
$collector_pair = Get-HHCollectorPair 'Local Collector'
# creating the collector group
$collector_group = New-HHCollectorGroup CollectorGroup -ParentName LoggingGroup -CollectorPairID $collector_pair.Key
# creating an empty key
$logging_group_key = New-WbEmptyKey
#creating three HH Tags
New-HHTag Int16_Powershell_Example -ParentName OPCUAServer_Powershell_Example -CollectorGroupID $collector_group.Key -LoggingGroupID $logging_group_key -DataSource 'ua:OPCUATEST\\[http://www.unifiedautomation.com/DemoServer/]Demo/Dynamic/Scalar/Int16'
New-HHTag Int64_Powershell_Example -ParentName OPCUAServer_Powershell_Example -CollectorGroupID $collector_group.Key -LoggingGroupID $logging_group_key -DataSource 'ua:OPCUATEST\\[http://www.unifiedautomation.com/DemoServer/]Demo/Dynamic/Scalar/Int64'
New-HHTag Double_Powershell_Example -ParentName OPCUAServer_Powershell_Example -CollectorGroupID $collector_group.Key -LoggingGroupID $logging_group_key -DataSource 'ua:OPCUATEST\\[http://www.unifiedautomation.com/DemoServer/]Demo/Dynamic/Scalar/Double'
HH Tags created with the script

See Also: