BACnet Settings
To Edit BACnet Settings:
-
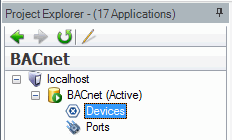
In the GENESIS64 Workbench, select the BACnet branch in the Project Explorer for BACnet. There are multiple ways to begin the Edit function:
-
Double-click the
 Devices branch of the Tree Explorer.
-OR- -
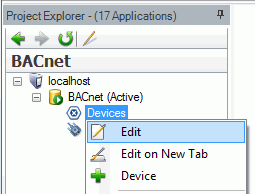
Right-click the
Devices branch of the Tree Explorer then click on Edit.
-OR- -
Select the
Devices branch of the Tree Explorer then click on the Edit button in the Home ribbon at the top of the Workbench64 screen.
-
-
This opens the BACnet Settings in the right pane of Workbench64. The following settings may be changed:
General Tab
Runtime Settings
-
-
Local Device ID: Specifies a Device ID for BACnet Runtime. When the ID is set to -1, then the ID is generated automatically during the startup from the IP address where BACnet Runtime is running.
-
Network: Specifies a network number where BACnet Runtime is running.
-
Default Polling Rate (s): Sets the frequency of communication between BACnet devices and the BACnet Connector. Range can be between 0 and 4194303. Default is 100.
-
Default Priority: Sets a number between 1 and 16 as to the criticality of a device, in comparison with others. Assigning a priority level marks the importance of messages and which will override others. Some numbers are pre-assigned (1, 2, 5, 6, 8), with life safety naturally having highest priority. Other numbers (3, 4, 7 and 9 through 16) are not assigned and therefore are available for users to set their own priorities. Default is 8.
-
|
Priority Level |
Application |
Priority Level |
Application |
|
|
1 |
Manual Life Safety |
9 |
Available |
|
|
2 |
Automatic Life Safety |
10 |
Available |
|
|
3 |
Available |
11 |
Available |
|
|
4 |
Available |
12 |
Available |
|
|
5 |
Critical Equipment Control |
13 |
Available |
|
|
6 |
Minimum On/Off |
14 |
Available |
|
|
7 |
Available |
15 |
Available |
|
|
8 |
Manual Operator |
16 |
Available |
-
-
Service Type: Select the service type: Automatic, ReadProperty, ReadPropertyMulitple, ConfirmedCOV, or UnconfirmedCOV. Default is Automatic.
-
Read Range Type: This can be Buffer Position + Time, Time + Sequence Number or Time. Default is Buffer Position+Time.
-
AE Summary Type: Select from Automatic, GetAlarmSummary, GetEnrolmentSummary or GetEventInformation. Default is Automatic.
-
Logging
-
-
Log Level: Can be set to None, Error, Info, Warning, Network or Debug.
-
Log File: The location and file where logging is to be done.
-
Browsing
-
-
Resolve Device Names: Will show names of devices in the runtime tree (instead of just IDs)
-
Resolve Object Names: Will show names of objects in the runtime tree (instead of just IDs)
-
Show Network: Will show the different Network IDs in the runtime tree
-
Show Object Type: Will show the types of objects in the tree (e.g. Analog Input, Trend Log, etc.)
-
Show IDs: will show the IDs of an object in parentheses next to the object name (in the runtime tree)
-
Use Default Property: (Inactive setting)
-
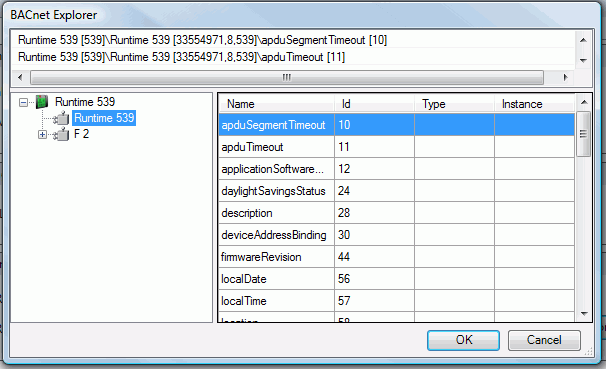
Explore... button: Opens the
BACnet Explorer window. -
Send Who-Has: Opens a dialog where you can find the object using the Who-Has message.
-
Device & Object Cache
-
-
Clear at Startup: when the option is enabled, the disk cache is cleared when the BACnet Runtime starts and the devices are scanned again from the network
-
Clear Now: clears the disk cache and scans the devices from the network immediately
-
Communication Tab
WhoIS Settings
-
-
WhoIS Low Range: The low range for which BACnet Runtime will send WhoIs messages (if some BACnet device on the network has an ID outside of that range, it won’t be discovered since a WhoIs message will not be sent)
-
WhoIS High Range: The high range for which BACnet Runtime will send WhoIs messages (if some BACnet device on the network has an ID outside of that range, it won’t be discovered since a WhoIs message will not be sent)
-
Cache Update (ms): specifies how often the BACnet address space is saved (updated) into the disk cache
-
WhoIs Period (s): specifies how often the Who-Is message is sent, used to find new devices on the network
-
Send Who-Is: sends the Who-Is message immediately
-
Save Object Cache: when the option is disabled, the disk cache is not used (it is not saved)
-
Communication settings
-
- APDU Timeout (ms): Sets the time the Application Protocol Data Unit driver will wait for response from a connected device before trying again or proceeding to the next request. Range can be between 300 to 30000 milliseconds. Default is 300.
- APDU Segment Timeout (ms): Sets the amount of time before retransmitting an Application Protocol Data Unit segment. Range can be between 300 to 30000 milliseconds. Default is 300.
- APDU Retries: Sets the maximum number of times that the Application Protocol Data Unit will be transmitted. Range can be between 0 and 5. Default is 0.
-
Expiry Time (s): this is the time taken before a value is removed from the cache
-
Consecutive Errors: when the number of Consecutive Errors to the device exceeds the maximum value, then polling of the device will be flagged as offline and it will not be polled again until the Offline Poll Interval is exceeded
-
Offline Device Polling (s): when the number of Consecutive Errors to the device exceeds the maximum value, then polling of the device will be flagged as offline and it will not be polled again until the Offline Poll Interval is exceeded
-
Subscribe Timeout (ms): specifies a period in which the subscribe and unsubscribe of the points is done
-
Segmentation Supported: specifies whether the segmentation is supported by the BACnet Runtime or not
Notification Classes - Subscribe Parameters
-
Notification Type: Set to receive either Confirmed Notifications or Unconfirmed Notifications.
-
Time Range: Use the entry fields and up/down buttons to set start and end times for the selected notifications.
-
Valid Days: Click the checkbox next to each applicable day of the week for your set notifications.
-
Transitions: Click the checkbox for the type of desired transition from the notification. Options are To Normal, To OffNormal and To Fault.
Network filtering
-
Network Filter Type: Use the pulldown menu to select from Network filter disabled, Specified networks are scanned, or Specified networks are NOT scanned. "Network filter disabled" will disable any previously entered network filter as well as the Add/Remove Selection/Remove All buttons.
If you have selected "Specified networks are scanned" or "Specified networks are NOT scanned, you will then be able to add a network filter. The Network Dialog box will open and you can enter your desired Network Number. Click OK and it will now appear in the box to the left.
-
Click Apply to proceed.
See also: