Using the ICONICS Web Licensing Utility for Cloud Licenses
The ICONICS Web Licensing Utility is the tool used to activate new licenses, add products to existing licenses, and kill licenses.
The cloud licensing capability for ICONICS licensing requires the machine with the ICONICS products installed to have an internet connection available in order to complete the licensing process. The Web Licensing Utility steps do not need to be performed on the machine to be licensed.
NOTE: Cloud licensing is only available for 64-bit products. 32-bit products, such as GENESIS32, ReportWorX, and BridgeWorX cannot use cloud licensing.
How Cloud Licensing Works
ICONICS Cloud Licensing is a means of licensing ICONICS products that is specifically designed for applications running on public cloud, private cloud, or virtualized environments. Rather than maintaining the license locally on the machine, licenses are hosted by ICONICS on a publicly-accessible data center.
NOTE: ICONICS’ cloud licensing server has address cloudlicensing.iconics.com. The license service connects to it over HTTPS (port 443). Older products (10.95.x) could use a different licensing server (activate.iconics.com).
During normal operations of the licensed machine, the first action it will take when starting up is to request the license information according to its License Pool ID. This request will require the machine to have access to the internet in order to request the information from the ICONICS cloud licensing server.
Once the license information has been successfully retrieved, the machine will continue to operate using the licensing information retrieved from the web. The machine will then periodically check with the ICONICS cloud licensing server in order to validate the license. If it cannot validate the license for an extended period of time, then the machine license will fail.
A cloud license pool cannot contain a combination of IoT and non-IoT licenses. A license pool with non-IoT licenses (such as GENESIS64 and Hyper Historian) can be assigned to a single server. That server uses the entire license pool and can act as a license server to other machines, like with software licenses.
Licensing IoTWorX Devices
New in version 10.96, a license pool with IoT licenses can be assigned to multiple IoTWorX gateways, where each gateway gets the license options as defined in the license pool. The number of gateways may be up to the total count of the license pool.
In versions of ICONICS prior to 10.96, a License Pool ID could only be assigned to a device as a whole and could not be shared among multiple IoTWorX gateways. This meant that each IoT gateway needed its own separate License Pool ID, which could be tedious and time consuming to configure for large systems with many IoT gateways.
Starting in 10.96, a group of IoT gateways with identical configurations can use one License Pool ID for the whole group. The group of IoT gateways will have a unique IoTGroupId. Each device will have a globally unique IoTDeviceId (combined IoT Hub URL and Device ID). One License Bucket (part of the license pool) will be assigned to each unique IoTDeviceId.
Example Setup 1 (non-IoT):
License Pool 123 contains licenses for GENESIS64 and Hyper Historian.
ServerA has GENESIS64 installed and acts as a license server to other machines. It is assigned License Pool 123, consuming the entire pool. ServerA uses the GENESIS64 license for the local server. ServerB has Hyper Historian installed and points to ServerA for a license.
Example Setup 2 (IoT):
License Pool 456 contains 20 IoT gateway licenses.
ServerB has 20 identical IoT gateways. It is assigned to License Pool 456. It consumes the 20 IoT gateway licenses and distributes them to the 20 gateway devices.
Issuing a New Cloud License
Follow these instructions to activate a license on a machine that currently has no license on it, or has a license on it that you want to overwrite.
If your machine already has a license on it and you are looking to add another license to it, see the next section entitled, “Adding to an Existing Cloud License”.
-
Select Cloud and log in with your email and password.
NOTE: If you do not have a login, you can register for one using the Create New Account link at the bottom. If you have forgotten your password, you can click on the Forgot Password link at the bottom.
Figure 1 – ICONICS Web Licensing Utility

-
Once you have logged into the website, select the New License link at the top.
-
Enter your Product Registration Number and Customer Key for the products. You may enter more than one set of numbers at a time.
NOTE: Your Product Registration Number(s) and Customer Key(s) are usually inside the DVD tin package that ICONICS sent when the product was purchased.
-
Select Next once you have entered all of your Product Registration Number(s).
-
Choose an existing end user or enter new end user information. Select Next when done.
NOTE: The existing end user dialog may take a few moments to appear. Please be patient.
-
In the next screen, you will see a list of the products that are available for you to license. Check all the products that you would like to license on this machine.
-
If you are licensing IoTWorX products and you would like to generate a single license pool to be used across multiple devices, check the box labeled, Check this box to create a license pool that can be used on a number of devices equal to the number of products selected. Otherwise, leave unchecked for a license pool to be used on a single device.
-
Select Next.
-
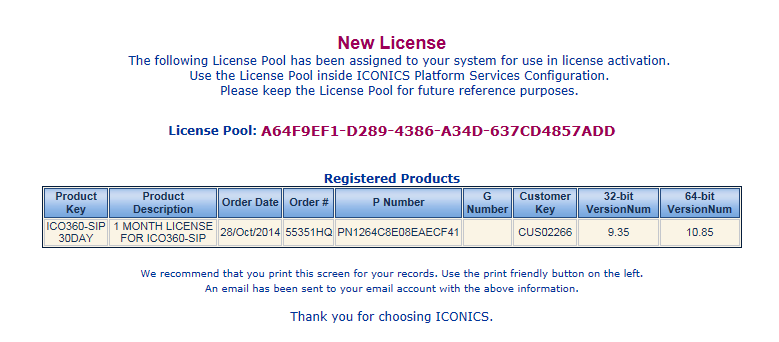
This page shows you a summary of what will be in your license. Check to make sure everything is correct, then select Generate Key. You should see a page similar to Figure 2.
Figure 2 – Generated License
Activating the License
-
Open the Platform Services Configuration application by opening Platform Services Configuration from Workbench or from the start menu under ICONICS Tools.
-
Select the License tab.
-
Select the radio button for Cloud License and enter the license pool code that was provided by the Web License Utility. You can leave the Password field blank.
-
Restart the ICONICS FrameWorX service.
Adding to an Existing Cloud License
-
Select Cloud and log in with your email and password.
-
Once you have logged into the website, select the Add to License at the top.
IMPORTANT NOTE: It is very important to pick Add to License and not New License. Picking New License will overwrite any existing license already activated on this machine. Make sure to pick Add to License if you are adding products to a machine that already has a license on it.
-
Enter your existing License Pool ID and the Product Registration Number(s), and Customer Key(s) for the new products.
NOTE: Your Product Registration Number(s) and Customer Key(s) are usually inside the DVD tin package that ICONICS sent when the product was purchased.
-
Select Next once you have entered all of your Product Registration Number(s).
-
Choose an existing end user or enter new end user information. Select Next when done.
NOTE: The existing end user dialog may take a few moments to appear. Please be patient.
-
In the next screen, you will see a list of the products that are available for you to license. Check all the products that you would like to license on this machine. Select Next.
-
This page shows you a summary of what will be in your license. Check to make sure everything is correct, then select Generate Key.
Activating the License
-
Open the Platform Services Configuration application by opening Platform Services Configuration from Workbench or from the start menu under ICONICS Tools.
-
Select the License tab.
-
Select the radio button for Cloud License and enter the license pool code that was provided by the Web License Utility. You can leave the Password field blank.
-
Restart the ICONICS FrameWorX service.
See Also: