How to Create a Workflow
Workflows allow users to use customizable logic to execute complex actions. They are an easy way to manipulate data in real time. Data is used to drive actions (e.g. generating a report, archiving an historical table, etc.) under certain conditions. Click Here for directions on how to create a Workflow Folder.
To Create a Workflow:
-
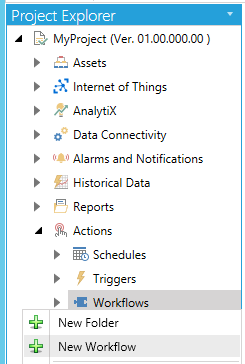
Open the Workbench and expand the Actions node in the Project Explorer. Right-click the Workflows node and then click on Add New Workflow, as shown below.
New Workflow from Project Explorer
-OR-
Select the Workflows node then click on the New Workflow button (shown below) in the Edit Section of the Home ribbon.
New Workflow Button

-
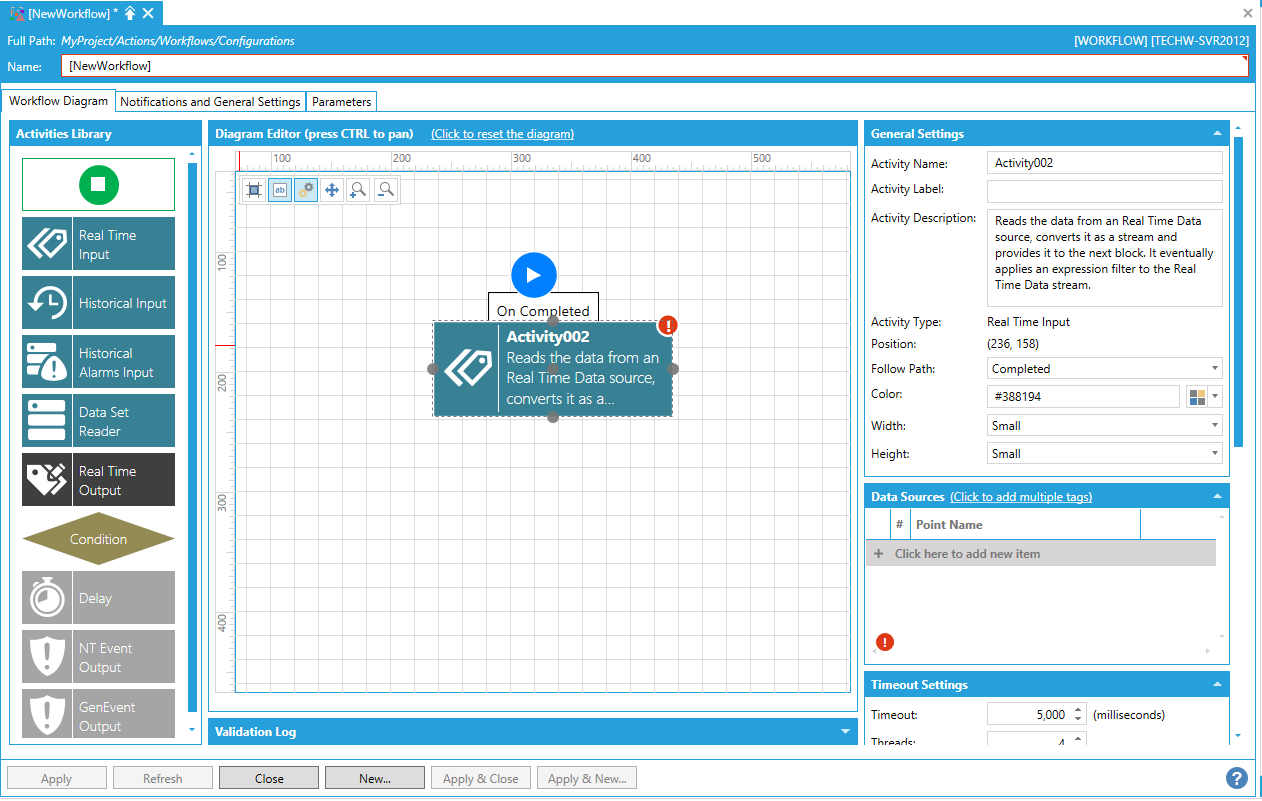
This opens the New Workflow properties in the Workbench, shown below.
New Workflow Properties
Enter a name for this workflow in the Workflow Name text entry field.
The New Workflow Properties include the Workflow Diagram tab and the Notifications and General Settings tab.
Workflow Diagram Tab
Diagram Editor
The Diagram Editor, when first opened, will display a Start Action. This is the starting activity of the Workflow. It cannot be deleted and is a unique element within the Workflow.
You can expand the Diagram Editor window in order to provide more room to create your Workflow Diagram. You can also use the following tools from the toolbar that first appears by default:
|
|
Snaps the item to the grid. |
|
|
Turns the diagram legend information On or Off. |
|
|
Displays or hides the Activity Library. |
|
|
Recenters the current Diagram within the editor window. |
|
|
Zooms (magnifies) the current Diagram within the editor window. |
|
|
Unzooms (demagnifies) the current Diagram within the editor window. |


Activity Library
The Activity Library allows you to drag listed elements into the Diagram Editor. Each Activity brings up its own set of properties that appear to the right of the Diagram Editor when the Activity has been added.
Activities in the Activity Library include:
You can select from the following items and set (or read) each Activity's individual properties:
Start
Start Activity

The Start activity is the starting activity of the workflow. It cannot be deleted and is unique in the whole workflow.
The Start activity has the following settings:
General Settings
-
Activity Name - The unique name of the activity. It can be used to identify the activity in the expressions or in traces.
-
Activity Description - The description of the activity will be visualized as a tooltip when you move the mouse over the activity.
-
Activity Type - The starting activity of the workflow. This activity cannot be deleted and is unique within the workflow.
-
Position - The position of the activity in the diagram.
Return to Top of Activity Library List
End
End Activity

The Endactivity returns a pre-defined result (Success or Failure) when it is executed.
The End activity has the following settings:
General Settings
-
Activity Name - The unique name of the activity. It can be used to identify the activity in the expressions or in traces.
-
Activity Description - The description of the activity will be visualized as a tooltip when you move the mouse over the activity.
-
Activity Type - The ending activity returns a pre-defined result (Success or Failure) when it is executed.
-
Position - The position of the activity in the diagram.
Other Settings
-
Result - The type of result of the workflow. Use the pulldown menu to select from Success or Failure.
Return to Top of Activity Library List
Real Time Input
Real Time Input Activity

The Real Time Input activity reads the data from a Real Time Data source, converts it into a stream and provides it to the next block. It eventually applies an expression filter to the Real Time Data stream.
The Real Time Input activity has the following settings:
General Settings
-
Activity Name - The unique name of the activity. It can be used to identify the activity in the expressions or in traces.
-
Activity Label - A custom label that is used to show additional information in the block, but it's not as verbose as the description.
-
Activity Description - The description of the activity will be visualized as a tooltip when you move the mouse over the activity.
-
Activity Type - Reads the data from a Real Time Data source, converts it into a stream and provides it to the next block. It eventually applies an expression filter to the Real Time Data stream.
-
Position - The position of the activity in the diagram.
-
Follow Path - The follow path specifies how to link to activities. "Completed" path will execute the next branch despite the state of this block. With "State" path, it's possible to associate two branches with this block. The "Success" branch is executed if this block is successful. Otherwise, the "Failure" branch will be executed.
-
Color - Enter a HEX color code in the text entry field or click on the
 button in order to open the color picker window to select
your preferred color.
button in order to open the color picker window to select
your preferred color. -
Width - Use the pulldown menu to select from Small, Medium, or Large activity block width size.
-
Height - Use the pulldown menu to select from Small or Large activity block height size.
Data Sources
-
Data Sources - Click on the "+ Click here to add new item" link to add a new tag. You can enter a Point Name directly in the text entry field or click on the
 button to open
the Data Browser and navigate to your selected tag. You can also click
on the "(Click to add multiple tags)" link in the Data Sources
section header in order to add more than one tag at a time.
button to open
the Data Browser and navigate to your selected tag. You can also click
on the "(Click to add multiple tags)" link in the Data Sources
section header in order to add more than one tag at a time.
Timeout Settings
-
Timeout - The timeout is applied when the DA tags are read. All the tags that can't be retrieved within the specified timeout will have bad quality.
-
Threads - The number of concurrent threads used to retrieve the DA tags.
-
Sampling Rate - Enter the rate in the text entry field (in milliseconds).
-
Split Array Values into multiple Data Rows - If checked, then if a DA Tag returns a value that is an array, these values will be separated and provided as multiple output Data Rows.
-
Succeed only if All tag values have Good Quality - If checked, if at least one tag value has Bad Quality, the entire operation will fail.
Data Schema
-
Data Schema - Shows the list of columns exposed by the activity. If the schema is not Read-Only, it is possible to configure the list of columns manually.
Data Filter
-
Data Filter - Select the rows that will be returned to the next activity. By default, all rows are returned. You can use the columns of the data source to create the row filter.
Retry Settings
-
-
Retry Count - The number of retrials before marking the activity as failed.
-
Delay - The delay between the retrials of the activity.
-
The activity is enabled - When checked, the selected activity remains active in the diagram. When unchecked, the activity will appear greyed out, but be inactive within the diagram.
-
Return to Top of Activity Library List
Historical Input
Historical Input Activity
The Historical Input activity reads the data from a Historical Data source, converts it into a stream, and provides it to the next block. It eventually applies an expression filter to the Historical Data stream.
The Historical Input activity contains the following settings:
General Settings
-
Activity Name - The unique name of the activity. It can be used to identify the activity in the expressions or in traces.
-
Activity Label - A custom label that is used to show additional information in the block, but it's not as verbose as the description.
-
Activity Description - The description of the activity will be visualized as a tooltip when you move the mouse over the activity.
-
Activity Type - Reads the data from an Historical Alarms source, converts it into a stream and provides it to the next block. It eventually applies an expression filter to the Historical Alarms stream.
-
Position - The position of the activity in the diagram.
-
Follow Path - The follow path specifies how to link to activities. "Completed" path will execute the next branch despite the state of this block. With "State" path, it's possible to associate two branches with this block. The "Success" branch is executed if this block is successful. Otherwise, the "Failure" branch will be executed.
-
Color - Enter a HEX color code in the text entry field or click on the
button in order to open the color picker window to select
your preferred color. -
Width - Use the pulldown menu to select from Small, Medium, or Large activity block width size.
-
Height - Use the pulldown menu to select from Small or Large activity block height size.
Data Source
-
Point Name - Enter the data source, in the text entry field, to be used by this activity or click on the
button to
open the Data Browser and navigate to your selected data source.
Historical Data Settings
-
Start Date - The starting date/time of the historical read.
-
End Date - The ending date/time of the historical read.
-
Threads - The number of concurrent threads to retrieve the HDA tags.
-
Aggregate - Use the pulldown menu to select from None, Interpolative, Average, TimeAverage, Total, Minimum, Maximum, MinimumActualTime, MaximumActualTime, Range, Sum, AnnotationCount, Count, Delta, DurationGood, DurationBad, PercentGood, PercentBad or WorstQuality.
-
Processing Time - Set the processing time for the Aggregate function by entering a number in the first text entry field (or using the up/down arrows), then selecting from Days, Hours, Minutes or Seconds.
-
Read Size - The number of samples requested from the historian in a single read. This does not limit the number of samples returned. Multiple calls will be made automatically, if needed. We do not recommend changing this number unless you are advised to change it to solve a specific issue.
Data Schema
-
Data Schema - Shows the list of columns exposed by the activity. If the schema is not Read-Only, it is possible to configure the list of columns manually.
Data Filter
-
Data Filter - Select the rows that will be returned to the next activity. By default, all rows are returned. You can use the columns of the data source to create the row filter.
Retry Settings
-
Retry Count - The number of retrials before marking the activity as failed.
-
Delay - The delay between the retrials of the activity.
-
The activity is enabled - When checked, the selected activity remains active in the diagram. When unchecked, the activity will appear greyed out, but be inactive within the diagram.
Return to Top of Activity Library List
Historical Alarms Input
Historical Alarms Input Activity
The Historical Alarms Input activity reads the data from an Historical Alarms source, converts it into a stream and provides it to the next block. It eventually applies an expression filter to the Historical Alarms stream.
The Historical Alarms Input activity has the following settings:
General Settings
-
Activity Name - The unique name of the activity. It can be used to identify the activity in the expressions or in traces.
-
Activity Label - A custom label that is used to show additional information in the block, but it's not as verbose as the description.
-
Activity Description - The description of the activity will be visualized as a tooltip when you move the mouse over the activity.
-
Activity Type - Reads the data from an Historical Alarms source, converts it into a stream and provides it to the next block. It eventually applies an expression filter to the Historical Alarms stream.
-
Position - The position of the activity in the diagram.
-
Follow Path - The follow path specifies how to link to activities. "Completed" path will execute the next branch despite the state of this block. With "State" path, it's possible to associate two branches with this block. The "Success" branch is executed if this block is successful. Otherwise, the "Failure" branch will be executed.
-
Color - Enter a HEX color code in the text entry field or click on the
button in order to open the color picker window to select
your preferred color. -
Width - Use the pulldown menu to select from Small, Medium, or Large activity block width size.
-
Height - Use the pulldown menu to select from Small or Large activity block height size.
Data Source
-
Point Name - Enter the data source, in the text entry field, to be used by this activity or click on the
button to
open the Data Browser and navigate to your selected data source.
Historical Data Settings
-
Start Date - The starting date/time of the historical read.
-
End Date - The ending date/time of the historical read.
Data Schema
-
Data Schema - Shows the list of columns exposed by the activity. If the schema is not Read-Only, it is possible to configure the list of columns manually.
Data Filter
-
Data Filter - Select the rows that will be returned to the next activity. By default, all rows are returned. You can use the columns of the data source to create the row filter.
Retry Settings
-
Retry Count - The number of retrials before marking the activity as failed.
-
Delay - The delay between the retrials of the activity.
-
The activity is enabled - When checked, the selected activity remains active in the diagram. When unchecked, the activity will appear greyed out, but be inactive within the diagram.
Return to Top of Activity Library List
Data Set Reader
Data Set Reader Activity

The Data Set Reader activity reads the data from a DataSet source, converts it as a stream and provides it to the next block. It eventually applies an expression filter to the DataSet stream.
The Data Set Reader activity has the following settings:
General Settings
-
Activity Name - The unique name of the activity. It can be used to identify the activity in the expressions or in traces.
-
Activity Label - A custom label that is used to show additional information in the block, but it's not as verbose as the description.
-
Activity Description - The description of the activity will be visualized as a tooltip when you move the mouse over the activity.
-
Activity Type - Reads the data from a DataSet source, converts it as a stream and provides it to the next block. It eventually applies an expression filter to the DataSet stream.
-
Position - The position of the activity in the diagram.
-
Follow Path - The follow path specifies how to link to activities. "Completed" path will execute the next branch despite the state of this block. With "State" path, it's possible to associate two branches with this block. The "Success" branch is executed if this block is successful. Otherwise, the "Failure" branch will be executed.
-
Color - Enter a HEX color code in the text entry field or click on the
button in order to open the color picker window to select
your preferred color. -
Width - Use the pulldown menu to select from Small, Medium, or Large activity block width size.
-
Height - Use the pulldown menu to select from Small or Large activity block height size.
Data Source
-
Point Name - Enter the data source, in the text entry field, to be used by this activity or click on the
button to
open the Data Browser and navigate to your selected data source.
Input Parameters
-
Input Parameters - Shows the parameters available for the selected data source. Click on the 'Configure' link to open the 'Configure the columns of the activity' window, where you can configure the input parameters including Name, Type, and Source Expression. Click on the 'Refresh' link to update the list.
Output Parameters
-
Output Parameters - Shows the parameters available for the selected data source. Click on the 'Configure' link to open the 'Configure the columns of the activity' window, where you can configure the output parameters including Name, Type, and Source Expression. Click on the 'Refresh' link to update the list.
Data Schema
-
Data Schema - Shows the list of columns exposed by the activity. If the schema is not Read-Only, it is possible to configure the list of columns manually.
Data Filter
-
Data Filter - Select the rows that will be returned to the next activity. By default, all rows are returned. You can use the columns of the data source to create the row filter.
Retry Settings
-
Retry Count - The number of retrials before marking the activity as failed.
-
Delay - The delay between the retrials of the activity.
-
The activity is enabled - When checked, the selected activity remains active in the diagram. When unchecked, the activity will appear greyed out, but be inactive within the diagram.
Return to Top of Activity Library List
Real Time Output
Real Time Output Activity

The Real Time Output activity writes the stream into a Real Time Data Tag.
The Real Time Output activity contains the following settings:
General Settings
-
Activity Name - The unique name of the activity. It can be used to identify the activity in the expressions or in traces.
-
Activity Label - A custom label that is used to show additional information in the block, but it's not as verbose as the description.
-
Activity Description - The description of the activity will be visualized as a tooltip when you move the mouse over the activity.
-
Activity Type - Writes the stream into a Real Time Data Tag.
-
Position - The position of the activity in the diagram.
-
Follow Path - The follow path specifies how to link to activities. "Completed" path will execute the next branch despite the state of this block. With "State" path, it's possible to associate two branches with this block. The "Success" branch is executed if this block is successful. Otherwise, the "Failure" branch will be executed.
-
Color - Enter a HEX color code in the text entry field or click on the
button in order to open the color picker window to select
your preferred color. -
Width - Use the pulldown menu to select from Small, Medium, or Large activity block width size.
-
Height - Use the pulldown menu to select from Small or Large activity block height size.
Data Sources
-
Data Sources - Click on the "+ Click here to add new item" link to add a new tag. You can enter a Point Name directly in the text entry field or click on the
button to open
the Data Browser and navigate to your selected tag. You can also click
on the "(Click to add multiple tags)" link in the Data Sources
section header in order to add more than one tag at a time.
Other Settings
-
Timeout - The timeout is applied when the DA tags are written.
-
Threads - The number of concurrent threads used to write the DA tags.
-
Sampling Rate - Scan rate used to subscribe DA tags for parameter expression(s).
-
Wait after Write - Use the pulldown menu to select from [None], 1.0x Scan Period, 1.5x Scan Period, 2.0x Scan Period, 2.5x Scan Period, or 3.0x Scan Period. This setting indicates the maximum time interval to wait for the next update from the OPC Server after a successful Write. Shorter wait intervals would result in faster completion of this activity. However, there might be a risk that a subsequent Read request immediately after for the same tag from the current or parallel transaction could possibly return an 'old' value and not the one just written. Typically, the OPC Server should send a 'new value' data update within one scan period after a successful Write.
-
Succeed only if All writes succeeded -Click this checkbox to report this activity as successful only if all Writes are successful.
Data Schema
-
Data Schema - Shows the list of columns exposed by the activity. If the schema is not Read-Only, it is possible to configure the list of columns manually.
Data Filter
-
Data Filter - Select the rows that will be returned to the next activity. By default, all rows are returned. You can use the columns of the data source to create the row filter.
Retry Settings
-
Retry Count - The number of retrials before marking the activity as failed.
-
Delay - The delay between the retrials of the activity.
-
The activity is enabled - When checked, the selected activity remains active in the diagram. When unchecked, the activity will appear greyed out, but be inactive within the diagram.
Return to Top of Activity Library List
Condition
Condition Activity
The Condition activity evaluates the expression and, depending on the expression, redirects the workflow.
The Condition activity has the following settings:
General Settings
-
Activity Name - The unique name of the activity. It can be used to identify the activity in the expressions.
-
Activity Label - A custom label that is used to show additional information in the block, but it's not as verbose as the description.
-
Activity Description - The description of the activity will be visualized as a tooltip when you move the mouse over the activity.
-
Activity Type - Evaluates the expression and, depending on the expression, redirects the workflow.
-
Position - The position of the activity within the workflow.
-
Color - Enter a HEX color code in the text entry field or click on the
button in order to open the color picker window to select
your preferred color. -
Width - Use the pulldown menu to select from Small, Medium, or Large activity block width size.
-
Height - Use the pulldown menu to select from Small or Large activity block height size.
Other Settings
-
Condition - The expression used to evaluate the result of the condition block. Click on the Edit Expression link to open the Configure the expression window.
Retry Settings
-
Retry Count - The number of retrials before marking the activity as failed.
-
Delay - The delay between the retrials of the activity.
-
The activity is enabled - When checked, the selected activity remains active in the diagram. When unchecked, the activity will appear greyed out, but be inactive within the diagram.
Return to Top of Activity Library List
Delay
Delay Activity

The Delayactivity adds a delay to workflow execution.
The Delay activity has the following settings:
General Settings
-
Activity Name - The unique name of the activity. It can be used to identify the activity in the expressions.
-
Activity Label - A custom label that is used to show additional information in the block, but it's not as verbose as the description.
-
Activity Description - The description of the activity will be visualized as a tooltip when you move the mouse over the activity.
-
Activity Type - Adds a delay to workflow execution.
-
Position - The position of the activity within the workflow.
-
Follow Path - The follow path specifies how to link to activities. The "Completed" path will execute the next branch despite the state of the block. With the "State" path, it's possible to associate two branches with this block. The "Success" branch is executed if this block is successful. Otherwise, the "Failure" branch will be executed. Use the pulldown menu to select either Completed or State.
-
Color - Enter a HEX color code in the text entry field or click on the
button in order to open the color picker window to select
your preferred color. -
Width - Use the pulldown menu to select from Small, Medium, or Large activity block width size.
-
Height - Use the pulldown menu to select from Small or Large activity block height size.
Other Settings
-
Delay - The delay (in milliseconds) between the retrials of the activity.
-
Wait until the expression is true - Click the checkbox in order to set an expression that must be True to proceed.
-
Delay Expression - The expression used to control the delay. Click on the Edit Expression link to open the Configure the expression window.
Retry Settings
-
Retry Count - The number of retrials before marking the activity as failed.
-
Delay - The delay between the retrials of the activity.
-
The activity is enabled - When checked, the selected activity remains active in the diagram. When unchecked, the activity will appear greyed out, but be inactive within the diagram.
Return to Top of Activity Library List
NT Event Output
NT Event Output Activity

The NT Event Output activity writes an error, warning, information, success audit, or failure audit with the given message text to the event log, using the specified registered event source.
The NT Event Output activity has the following settings:
General Settings
-
Activity Name - The unique name of the activity. It can be used to identify the activity in the expressions.
-
Activity Label - A custom label that is used to show additional information in the block, but it's not as verbose as the description.
-
Activity Description - The description of the activity will be visualized as a tooltip when you move the mouse over the activity.
-
Activity Type - Writes an error, warning, information, success audit, or failure audit with the given message text to the event log, using the specified registered event source.
-
Position - The position of the activity within the workflow.
-
Follow Path - The follow path specifies how to link to activities. The "Completed" path will execute the next branch despite the state of the block. With the "State" path, it's possible to associate two branches with this block. The "Success" branch is executed if this block is successful. Otherwise, the "Failure" branch will be executed. Use the pulldown menu to select either Completed or State.
-
Color - Enter a HEX color code in the text entry field or click on the
button in order to open the color picker window to select
your preferred color. -
Width - Use the pulldown menu to select from Small, Medium, or Large activity block width size.
-
Height - Use the pulldown menu to select from Small or Large activity block height size.
Other Settings
-
Event Text - Enter the source, in the text entry field, by which the application is registered on the specified computer. You can use the following shortcuts in the Event Text field:
/T - current workflow name
/B - activity in which last error occurred
/E - last error
/L - last executed activity name
/C - current activity name
/D - current activity description
-
Event Source - Enter the string, in the text entry field, to write to the event log.
-
Event Type - Use the pulldown menu to select from Information, Error, Failure Audit, Warning or Success Audit.
Retry Settings
-
Retry Count - The number of retrials before marking the activity as failed.
-
Delay - The delay between the retrials of the activity.
-
The activity is enabled - When checked, the selected activity remains active in the diagram. When unchecked, the activity will appear greyed out, but be inactive within the diagram.
Return to Top of Activity Library List
GenEvent Output
GenEvent Output Activity

The GenEvent Output activity writes a message to the GenEvent Server.
The GenEvent Output activity has the following settings:
General Settings
-
Activity Name - The unique name of the activity. It can be used to identify the activity in the expressions.
-
Activity Label - A custom label that is used to show additional information in the block, but it's not as verbose as the description.
-
Activity Description - The description of the activity will be visualized as a tooltip when you move the mouse over the activity.
-
Activity Type - Writes a message to the GenEvent Server..
-
Position - The position of the activity within the workflow.
-
Follow Path - The follow path specifies how to link to activities. The "Completed" path will execute the next branch despite the state of the block. With the "State" path, it's possible to associate two branches with this block. The "Success" branch is executed if this block is successful. Otherwise, the "Failure" branch will be executed. Use the pulldown menu to select either Completed or State.
-
Color - Enter a HEX color code in the text entry field or click on the
button in order to open the color picker window to select
your preferred color. -
Width - Use the pulldown menu to select from Small, Medium, or Large activity block width size.
-
Height - Use the pulldown menu to select from Small or Large activity block height size.
Other Settings
-
Event Text - Enter the source, in the text entry field, by which the application is registered on the specified computer. You can also click on the 'Edit Expression' link to open the Expression Editor to construct your intended expression. You can also use the following shortcuts in the Event Text field:
/T - current workflow name
/B - activity in which last error occurred
/E - last error
/L - last executed activity name
/C - current activity name
/D - current activity description
-
Severity - Enter the severity of the event in the text entry field or use the up/down arrows.
-
Timeout - The timeout is applied when the DA tags are requested within the expression. Enter a timeout (in milliseconds) in the text entry field or use the up/down arrows.
-
Scan Rate- This is the scan rate used to subscribe DA tags in the expression. Enter a scan rate (in milliseconds) in the text entry field or use the up/down arrows.
Retry Settings
-
Retry Count - The number of retrials before marking the activity as failed.
-
Delay - The delay between the retrials of the activity.
-
The activity is enabled - When checked, the selected activity remains active in the diagram. When unchecked, the activity will appear greyed out, but be inactive within the diagram.
Return to Top of Activity Library List
Notifications and General Settings
The next tab in the Workflow Properties is the Notifications and General Settings tab, shown below.
Notifications and General Settings Properties
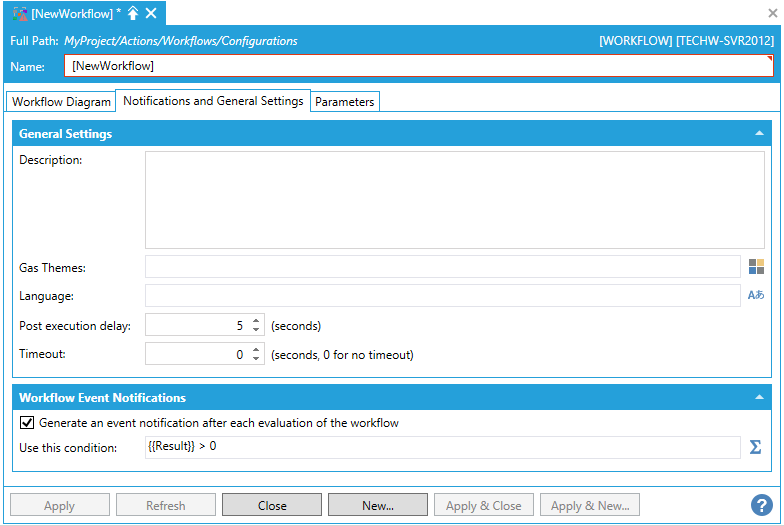
General Settings
-
Description - Enter a description for the Workflow in the text entry field.
-
Gas Themes - Enter a Gas Theme in the text entry field or click on the
button to open the Set Global Themes and Aliases window to select your Global Alias Theme.
-
Language - Enter the required language in the text entry field or click on the
 button to
open theLanguage Selectorwindow
to select your preferred language.
button to
open theLanguage Selectorwindow
to select your preferred language. -
Post execution delay - Enter a time (in seconds) in the text entry field for a delay after executing the workflow.
-
Timeout - Enter a time (in seconds) in the text entry field for a timeout. Enter '0' for no timeout.
Workflow Event Notifications
-
Generate an event notification after each evaluation of the workflow - Click this checkbox in order to receive notification of when the workflow is evaluated. Once checked, this activates the setting below.
-
Use this condition - Enter the condition that will be checked as part of the workflow evaluation in the text entry field or click on the
 button
to open the Configure the Expression window.
button
to open the Configure the Expression window.
Parameters
The next tab in the Workflow Properties is the Parameters tab, shown below.
Parameters Properties
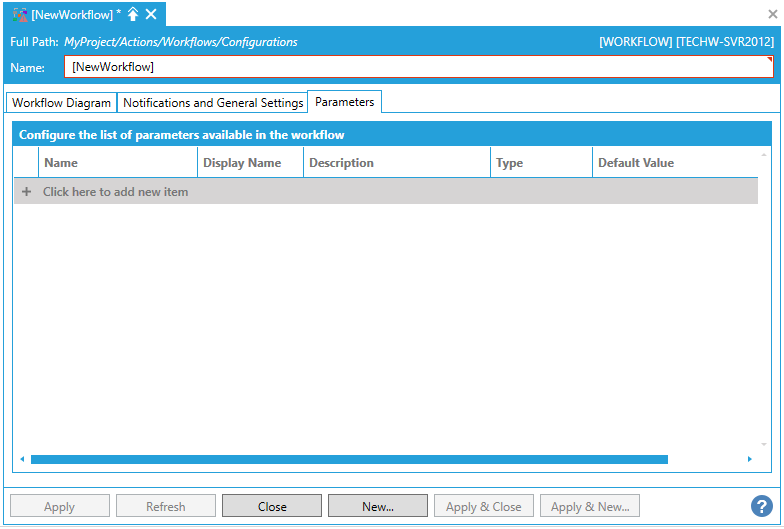
Configure the list of parameters available in the workflow
Click on the '+ Click here to add new item' link to add a new parameter. You will then be able to set the parameter's Name, Display Name, Description, Type and Default Value within each column in that row.
-
Click on Apply to save your changes and then on Close to return to the Workbench. Your new Workflow will then be added to the Project Explorer beneath the Workflow node or within a pre-existing Workflow Folder.
See Also: