Date/Time Triggers
To Add a Date/Time Trigger:
-
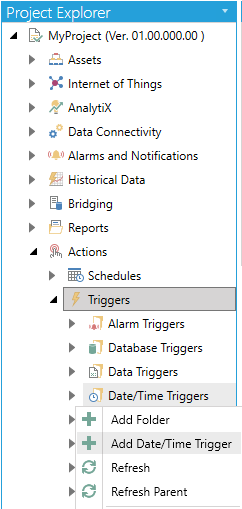
Open the Workbench and expand the Actions node and then the Triggers node. Right-click on the Time Triggers node then click on Add Date/Time Trigger, as shown below.
Add Time Trigger from Project Explorer in the Workbench
-OR-
Select the Date/Time Triggers node then click on the Add Date/Time Trigger button, shown below, in the Edit section of the Home ribbon in the Workbench.
Add Date/Time Trigger Button

-
This opens the New Date/Time Trigger Properties, shown below.
New Date/Time Trigger Properties
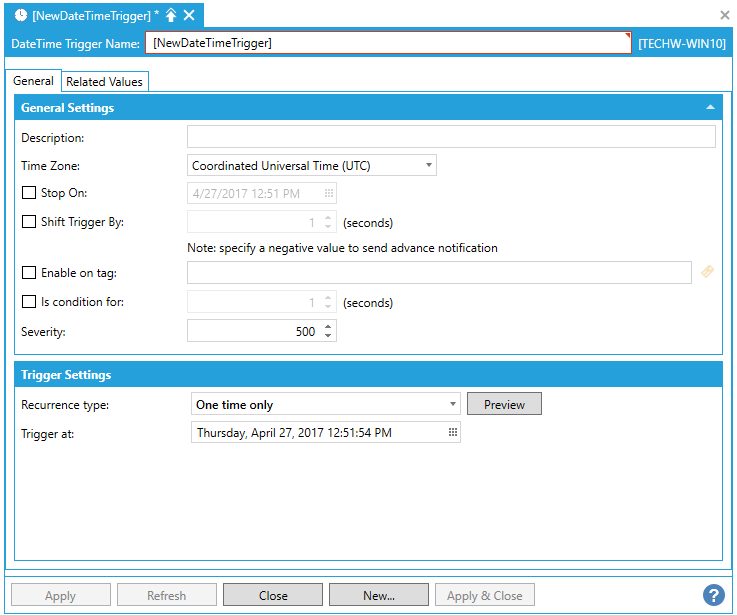
Enter a name in the Time Trigger Name text entry field.
General Tab
General Settings
-
Description - Enter a description for the alarm trigger in the text entry field.
-
Time Zone - Use the pulldown menu to select a time zone from either Coordinated Universal Time (UTC) or Local Server Time.
-
Stop On - Click this checkbox if you would like to set a stop date and time for trigger execution. Once checked, you can enter a date and time in the text entry field or click on the
 button, which will open the date/time picker.
 -
Shift Trigger By - Click this checkbox if you would like to shift timing for the trigger execution. Once checked, you can enter a time to shift by in seconds, in the text entry field or use the up/down arrows. Note that a negative value will send advance notification.
-
Enable on tag - Click this checkbox if you wish to enable your trigger based on a data tag. Once checked, you can enter a tag location in the text entry field or click on the
 button to open the Data Browser and navigate to your selected tag.
 -
Is condition for - Click the checkbox to send notifications as conditions. In the text entry field, you can enter the length of time ( in seconds) [or use the up/down arrows] that the condition should remain active. When you check the 'Is condition for:' checkbox and specify a time period in the field that follows it, the trigger that appears is a conditional trigger, which remains active for the specified period of time.
-
Severity - Enter a number for severity in the text entry field or use the up/down arrows.
Trigger Settings
-
Recurrence Type - Use the pulldown menu to select from One time only, Time interval, or Specific dates and times. Each selection will affect the remainder of the Trigger Settings properties:
One time only
-
Trigger at - Enter a date/time to set the trigger in the text entry field or click on the
button to open the date/time picker and select your date and time.
Time interval
-
Starting at - Enter a date/time to set as a starting point for the trigger in the text entry field or click on the
button to open the date/time picker and select your date and time. -
Recur every - Set the recurrence in the text entry fields (or using the up/down arrows) for Day, Hour, Minute, Second, Microsecond.
Specific dates and times
-
Starting at - Enter a date/time to set as a starting point for the trigger in the text entry field or click on the
button to open the date/time picker and select your date and time. -
Recur every - In the first text entry field, enter a number for the number of units you will then select with the pulldown menu: Second(s), Minute(s), Hour(s), Day(s), Week(s), Month(s), Year(s). Your selection in this tab will affect the remainder of the Trigger Settings properties:
-
Second(s) - No additional properties.
-
Minute(s)
-
-
Pick specific times - Click this checkbox in order to set a specific time.
-
-
Seconds - Enter the number of desired seconds in the text entry field or click on the
 button, which opens the Multi selection window, where you can set the number of seconds.
-
-
-
Hour(s)
-
-
Pick specific times - Click this checkbox in order to set a specific time.
-
-
Minutes - Enter the number of desired minutes in the text entry field or click on the
button, which opens the Multi selection window, where you can set the number of minutes. -
Seconds - Enter the number of desired seconds in the text entry field or click on the
button, which opens the Multi selection window, where you can set the number of seconds.
-
-
-
Day(s)
-
-
Pick specific times - Click this checkbox in order to set a specific time.
-
-
Hours - Enter the number of desired hours in the text entry field or click on the
button, which opens the Multi selection window, where you can set the number of hours. -
Minutes - Enter the number of desired minutes in the text entry field or click on the
button, which opens the Multi selection window, where you can set the number of minutes. -
Seconds - Enter the number of desired seconds in the text entry field or click on the
button, which opens the Multi selection window, where you can set the number of seconds.
-
-
-
Week(s)
-
-
On - Enter a specific day of the week in the text entry field or click on the
button, which opens theMulti selectionwindow, where you can select the day of the week. -
Pick specific times - Click this checkbox in order to set a specific time.
-
-
Days - Enter the number of desired days in the text entry field or click on the
button, which opens the Multi selection window, where you can set the number of hours. -
Hours - Enter the number of desired hours in the text entry field or click on the
button, which opens the Multi selection window, where you can set the number of hours. -
Minutes - Enter the number of desired minutes in the text entry field or click on the
button, which opens the Multi selection window, where you can set the number of minutes. -
Seconds - Enter the number of desired seconds in the text entry field or click on the
button, which opens the Multi selection window, where you can set the number of seconds.
-
-
-
Month(s)
-
-
Day - Enter a specific day (date) in the text entry field or click on the
button, which opens the Multi selection window, where you can select the day (date). -
The - In the first text entry field you can enter a set order (first, second, third, fourth, last) or click on the
button, which opens the Multi selection window, where you can select the set order. In the second text entry field, you can enter a specific day (Sunday, Monday, Tuesday, Wednesday, Thursday, Friday, Saturday, Week day, Day in a Weekend) or click on the button, which opens the Multi selection window, where you can select the specific day. -
Pick specific times - Click this checkbox in order to set a specific time.
-
-
Hours - Enter the number of desired hours in the text entry field or click on the
button, which opens the Multi selection window, where you can set the number of hours. -
Minutes - Enter the number of desired minutes in the text entry field or click on the
button, which opens the Multi selection window, where you can set the number of minutes. -
Seconds - Enter the number of desired seconds in the text entry field or click on the
button, which opens the Multi selection window, where you can set the number of seconds.
-
-
-
Year(s)
-
-
Every - Enter a specific month in the text entry field or click on the
button, which opens the Multi selection window, where you can select the month. -
Day - Enter a specific day (date) in the text entry field or click on the
button, which opens the Multi selection window, where you can select the day (date). -
The - In the first text entry field you can enter a set order (first, second, third, fourth, last) or click on the
button, which opens the Multi selection window, where you can select the set order. In the second text entry field, you can enter a specific day (Sunday, Monday, Tuesday, Wednesday, Thursday, Friday, Saturday, Week day, Day in a Weekend) or click on the button, which opens the Multi selection window, where you can select the specific day. -
Pick specific times - Click this checkbox in order to set a specific time.
-
-
Hours - Enter the number of desired hours in the text entry field or click on the
button, which opens the Multi selection window, where you can set the number of hours. -
Minutes - Enter the number of desired minutes in the text entry field or click on the
button, which opens the Multi selection window, where you can set the number of minutes. -
Seconds - Enter the number of desired seconds in the text entry field or click on the
button, which opens the Multi selection window, where you can set the number of seconds.
-
-
-
-
-
Preview - Click this button to open the Recurrence preview window and see your recently made time settings. ClickCloseto return to the Time Trigger properties.
-
-
Related Values Tab
Related Values Tab
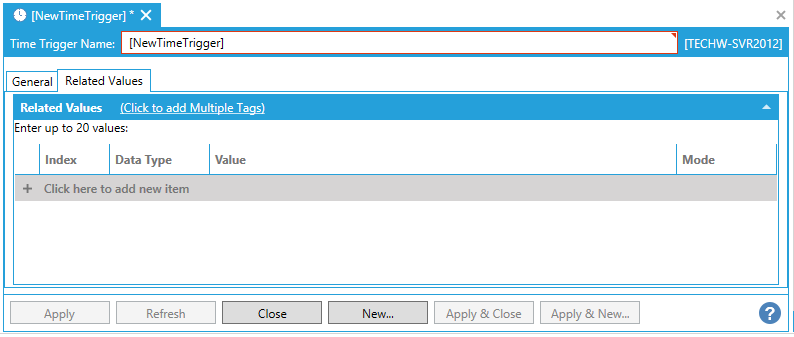
You can enter up to 20 values.
Click on the Click to add Multiple Tags link to open the data browser to navigate to your selected tags.
Or, click on +Click here to add new item to add individual tags.
-
Index - Enter a number to keep track of any new tags entered here.
-
Data Type - Use the pulldown menu to select from NATIVE, FLOAT, DOUBLE, BOOL, BYTE, WORD, DWORD, CHAR, SHORT, LONG, or STRING.
-
Value - Enter a value for the tag or click on the
button to open the Data Browser and navigate to your selected tag value source. -
Mode - Use the pulldown menu to select from either Value or Tag.
-
Once you have completed your settings, click on Apply to save them and Close to return to the Workbench. Your configured Time Trigger will now appear in the Project Explorer.
See Also: